
Full Product Manual


6
Outdoor Timer
The outdoor controller comes with a standard 6 ft
power cord so it can be installed indoors, or outdoors
if plugged into a weatherproof external outlet.
The outdoor controller can also be wired directly into
a power supply by removing the power cord. It has an
internal transformer that reduces supply voltage (120
VAC in US) to 24 VAC. You will need to connect power
supply wires to the transformer’s three wires. (Line,
Neutral, Ground).
WARNING: Electric shock can cause severe
injury or death. Make sure power supply is
turned OFF before connecting power wires.
WARNING: All electrical connections and
wiring runs must comply with local building
codes.
WARNING: DO NOT apply power to the unit
until you have completed and checked all wiring
connections.
WARNING: Disconnect or shut o the
external power source before connecting or
disconnecting wires to the Timer.
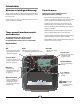
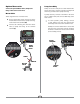
Remove the wiring bay cover at the bottom of
the unit.
Remove the WIFI Module to access the wiring
compartment.
Locate the wiring compartment in the lower left-
hand corner of the unit and using a screwdriver,
unscrew wiring compartment front cover.
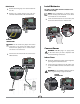
Unscrew the wire nuts connecting the power
cord and the transformer wires. Remove the
power cord wires from the transformer box.
CONNECT
120 VAC
WIRING COMPARTMENT
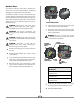
Route the three wires from an external power
source into the wiring compartment.
Using wire nuts, connect the external power
wires to the internal connection wires inside the
wiring compartment.
WARNING: Be sure to connect the colored
coded external wires to the same color internal
connection wires, as follows:
Power Wiring Connections
120 VAC (US)
Black supply wire (hot) to the black
transformer wire
White supply wire (neutral) to the white
transformer wire
Green supply wire (ground) to the green
transformer wire
Verify that all wiring connections are secure,
then replace the wiring compartment cover.
Reinstall the WiFi Module
INTERNAL
CONNECTION
WIRES
WIRING
COMPARTMENT
EXTERNAL
POWER WIRES
WIRE
NUTS
WIFI
MODULE