
Instruction Manual


away
ali
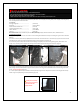
Tip:Toproperlyaligntheflaps,walktowardstherearofthevehicletoviewmudflap.Confirmtheedgeoftheflapisperpendiculartothe
ground.Ifneeded,incrementallyshifttheupperorlowerportionsoftheflap.Alwayscheckeachalignmentyouhaveperformedbywalking
fromthevehicleandlookingatthemudflapdirectlybehinditinrelationtothegroundandthebodyofthevehicle.Whenflapiscorrectly
gned,fullytightenhardwareonlyuntilsnug.(FigureF).
Tip:Thehardwareisquitestrongandselfthreadingbutover‐tighteningtheclipsbeyondtheirlimitisnotrecommended.
Tip:Tocheckanynonstandardwheelclearance,turnthesteeringwheelfromlocktolockwhileviewingthewheelwellareaatdifferent
intervals.Removethespacerifadditionalclearanceisrequired
andmountmudflapintomountingpoint#4‐directlyintovehicle.
RearMudFlapInstallation
1)Therearinstallationcanbeperformedwithouttireremovalusinganoffsetscrewdriver.Someusersmayfindremovaloftireseases
installation.Toavoidtireremoval,youmayalsojackupthevehicletolowerthewheelsallowingforbetteraccesstotheinnerwheelwellarea.
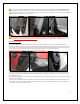
2)Removefactoryclips#5and#6byunscre ingtheinnersnapandpryingtheouterasse offthebumper(FigureG).Workingfromthe
re
3)
w mbly
arofthevehicle,removetheclipthatconnectsthelowerportionofthelinertotherearofthebumper(FigureH).
Placepolygonclipsoverthereartwomountingpointsandreplaceliner(FigureI).
2
4)Placerearmudflap(has3holes )againstthemountingpoints#5and#6withRallyarmorlogofacingtherearofthevehicle.Place1short
screw(1SS)throughawasher(FenWash)thenthroughmudflapmountingpoints#5and#6onthevehicle.Threadthesepointsloosely.*Do
notfullytighten*(FigureJ).
5)Placeapolygonclip(PolCl)overrearfenderlinercoverbehindthebumperportion(FigureK).Thiswillserveasamountingpointfortherear
Lbracket–mountingpoint#7.
6)Placeashortscrew(1SS)throughawasher(FenWash)thenthroughLbracketmountingholeA(RBRKT1)andpolygonclip(PolCl)overthe
slottedholeB(FigureL).Mountbracketassemblytobumperplacingtheportionwiththepolygonclipbetweenthefenderlinerandthemud
inordertocreatethefinalmountingpoi #8.flap nt