
Manual

IMF17 Version 1.0 Release Date 5.28.2010 1
To protect your Rally Armor mud flap set, care must be taken during parking and reversing. Check wheel clearance after installation, especially vehicles outfitted
with non-OEM offset wheels and suspensions. Rally Armor is not responsible for damage or loss of installed flaps.
Each mud flap set contains 4 flaps for all 4 tires of the vehicle.
Recommended tools: Offset, ratcheting or stubby Phillips screwdriver, small flat head screwdriver, small snips or razor blade, drill and bit assortment, 7/16
”
wrench or
ratchet /socket.
Rally Armor 2010+ Mazda3 and Mazdaspeed3
mud flap mounting hardware consists of:
Quantity Hardware Item Item ID
8 Polygon Edge Clips PolCl
12 Washers Wash
2
Short Screws
1SS
6 Long Screws 1.5SS
4 Machine Screws 1MCHSS
4 Locknuts SSLNut
2 Rear Mounting Brackets Lbrkt
To remove stock fasteners
Screw Reference
The supplied hardware is strong and self threading but over-tightening the clips is not advised.
Installation Tip: To ease installation and avoid damage to existing OEM clips during removal, a well lit, climate controlled installation environment is recommended.
To the installer: Please return these instructions to the customer after installation. Always test and check wheel clearance before returning vehicle.
To the customer: Retain these instructions after installation. They may be necessary for installing other optional parts or removal of this accessory.
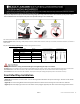
Front Mud Flap Installation
• (Figure A) Park vehicle on an even surface. Turn the steering wheel towards the side you are working on. Remove 4 outer fender
liner fasteners.
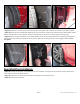
• (Figure B) Turn the steering wheel towards the opposite direction. Remove the remaining rear inner fender liner fasteners.
• (Figure C) Pull liner away to gain access to inner fender. Place a polygon clip (PolCl) over each of the 3 mounting points as shown.