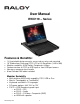
User Manual RWX119 – Series Features & Benefits: 1U short depth design console, server rack or relay rack mounted 19" Widescreen Samsung CCFL LCD w/ Hi-Resolution (1440 x 900) Modular scalability: KVM Switch, Peripherals & More Combo interface w/ PS/2 or USB input w/ front USB port access New easy maneuver front handle 6 foot Combo KVM cable included Modular Scalability Multi-platform KVM switch capability: PS/2, USB or Sun Mouse: Touchpad(e) or Trackball(b) Keyboard available in 1
Contents Chapter 1 Getting Started ........................................................................................................................... 4 1.1 Important Safeguards ........................................................................................................................................... 4 1.2 Regulatory Notice ..................................................................................................................................................
Chapter 5 Troubleshooting ....................................................................................................................... 23 Chapter 6 Dimensions ............................................................................................................................... 24 www.raloy.
Chapter 1 1.1 Getting Started Important Safeguards Please read all of these instructions carefully before you use the device. Save this manual for future reference. What the warranty does not cover Any product, on which the serial number has been defaced, modified or removed.
1.2 Regulatory Notice Legal Information First English printing, October 2002 Information in this document has been carefully checked for accuracy; however, no guarantee is given to the correctness of the contents. The information in this document is subject to change without notice. We are not liable for any injury or loss that results from the use of this equipment. Safety Instructions Unplug equipment before cleaning. Don’t use liquid or spray detergent; use a moist cloth.
1.3 Package Contents 1) LCD keyboard drawer x 1 pc 2) RCB-6 USB 2-in-1 KVM cable x 1 pc or RCE-6 Combo 4-in-1 KVM cable x 1 pc 3) User manual x 1 pc 4) Power cord x 1 pc 5) Auto switch power adapter ( for external power version) x 1 pc 6) Mounting bracket x 2 pcs 7) M6*15mm screw x 8 pcs 8) M3.2*6mm screw x 4 pcs The above package content is only for the single console models. It varies with options such as KVM, SDI, HDMI, DVI-D, AV, audio & DC power. www.raloy.
1.4 1.5 Before Installation It is very important to place the LCD Keyboard Drawer in a suitable environment. The surface for placing and fixing the LCD Keyboard Drawer should be stable and level or mounted into a suitable cabinet. Make sure the location is well ventilated, out of direct sunlight, away from sources of excessive dust, dirt, heat, water, moisture and vibration. Position LCD Keyboard Drawer with respect to related facilities.
1.7 Default KVM Password & Reset Diagram The user name & password can be reset to default “00000000” (8 digits of zero via keyboard not 10Key) 1) The KVM password can be reset on the KVM PCB board 2) Open the KVM top metal cover 3) Find the jumper J7, then use either paper clip or scissors to touch the two boxes of J7 in order to close/short the jumper 5 ~ 10 second www.raloy.
1.8 Structure Diagram www.raloy.
1.9 Installation 1 Attach the left and right mounting bracket to rack 19” mounting rails Adjust the mounting bracket to fit your rack M6 screw x 8pcs included Caution: Leaving all M6 screw slightly loose, until you complete the installation in step 2 Pull out left & right inner slide members www.raloy.
1.9 Installation (continued) 3 Pick up the LCD tray. Insert the LCD tray into the mounting bracket. Pull and hold the left & right black arrow buttons on the rails. Return the LCD tray to park position. 4 Fix the rear kit to the mounting bracket by M3.2 screw x 4 pcs included. Caution: This step is necessary. Failure to complete this will cause damage. 5 Complete the installation www.raloy.com Tighten all 8 pcs of M6 screw to complete the installation.
1.10 How to use the slides A black arrow release button is located on the outside of each slide. (shown in Figure 1). Pull and hold the black arrow button on either side of the LCD keyboard drawer to unlock. (shown in Figure 2). Push the LCD keyboard drawer into the rack. (shown in Figure 3). Figure 1. Figure 2. Caution : Keep your fingers away from the slide stop Figure 3. www.raloy.
1.11 How to use the LCD Keyboard Drawer Press the carry handle button. Gently pull the carry handle toward the front of the LCD. (shown in Figure 4) Flip up the LCD to a suitable angle. (shown in Figure 5) Operate the LCD keyboard drawer. (shown in Figure 6) Figure 4. Sliding out the LCD keyboard drawer by pressing the carry handle button first. Figure 5. Flipping up the LCD to a suitable angle. Figure 6. Operating the LCD keyboard drawer www.raloy.
1.12 RWX119 (Single console) – PS/2 Server Connection - Use RCE-6 to connect to server via PS/2 interface Figure 9. Example of connecting RCE-6 4-in-1 Combo KVM cable to server via PS/2 interface 1.13 RWX119 (Single console) – PS/2 KVM Connection - Use RCE-6 to connect to KVM via PS/2 interface Figure 10. Example of connecting RCE-6 4-in-1 Combo KVM cable to KVM via PS/2 interface Remarks: The above connection is only for the LCD keyboard without KVM switch built-in.
1.14 RWX119 (Single console) – USB Server Connection - Use RCE-6 to connect to server via USB interface *- Note: if you requested the RCB-6 it is a USB only connection Figure 11. Example of connecting RCE-6 4-in-1 Combo KVM cable to server via USB interface 1.15 RWX119 (Single console) – USB KVM Connection - Use RCE-6 to connect to KVM via USB interface *- Note: if you requested the RCB-6 it is a USB only connection Figure 12.
Chapter 2 Operation 2.1 On-screen Display Operation LCD membrane Membrane Switch Function Power light Green = On Orange = Power saving Power on / off LCD Display the OSD menu Scrolls through menu options and adjusts the displayed control (To auto adjustment by pressing the button for 5 seconds) Exit the OSD screen Toggle analog, digital & video connection (DVI-D and video options only) www.raloy.
2.2 On-screen Menu OSD Configuration Page Image: To enter into the brightness, contrast, colour temp, red, green, and blue Geometry: To enter into the auto adjust, H position, V position, phase and clock Video: To enter into the colour, tint, sharpness, noise reduction, DCDi and TV Setup Audio: To enter into volume, bass, treble, balance, AVL and mute Misc: To enter into the language, OSD position, graphic mode, OSD time, ratio, reset and timer www.raloy.
Chapter 3 3.1 Standard Specifications Specifications Item Description Form Factor 1U rack mounting on slide-out rails LCD Manufacturer Series RWX Diagonal Size Wide 19" TFT color LCD Max Resolution 1440 x 900 Color Support Brightness (cd/m²) 16.7 250M Contrast Ratio (typ.) 1000:01:00 Viewing Angle (H/V) 80/80/80/80 Display Area (mm) 408H.24H x 255.15V Tr Response Time (ms) 5 LCD Panel MTBF (hrs) 50,000 VGA Signal Input Analog RGB, 0.7Vp-p Sync.
3.2 Keyboard & Mouse Supporting languages Supporting layouts www.raloy.
Chapter 4 Optional Specifications 4.1 KVM Integration Options Our KVM is designed to seamlessly integrate into the rear of our full range of LCD drawer solutions: www.raloy.
4.2 DVI-D Option DVI-D 3-in-1 VGA KB mouse console port Remarks: Package includes 1 x 6ft DVI-D cable Either HDMI or DVI-D can be selected. For the above option casing depth will be extended from 460mm ( 18.1" ) to 530mm ( 20.9" ) 4.3 BNC + S-Video Option S-Video 3-in-1 VGA KB mouse console port BNC Remarks: Package includes 1 x 6ft S-Video cable 4.4 Audio Option Speaker Power Audio Remarks: Audio input is 35mm audio plug The speaker shares the same power with LCD. www.raloy.
4.5 HDMI Option HDMI 3-in-1 VGA KB mouse console port Remarks: Either HDMI or DVI-D can be selected. For the above option casing depth will be extended from 460mm ( 18.1" ) to 530mm ( 20.9" ) 4.6 DC Power Options Model 12V 24V 48V Input voltage: 12-Volt 24-Volt 48-Volt Input range: 9 ~ 18V 18 ~ 36V 36 ~ 75V - No load 50 mA 50 mA 50 mA - Full load 4950 mA 2450 mA 1220 mA Output voltage: 12-Volt 12-Volt 12-Volt Output current: 4.16A 4.16A 4.
Chapter 5 Troubleshooting 1. Is interference signal appeared on LCD normal when shutting down the computer? In rare cases, interference may appear on the monitor. This may be caused by signal rate of VGA card and is considered normal. The image quality can be improved by adjusting the phase or pixel rate automatically or manually. 2. The membrane power light is not ON Press the power ON / OFF on LCD membrane to check if the monitor is in the ON mode.
Chapter 6 Dimensions Model RWX119 Series Product Dimension (W x D x H) Packing Dimension (W x D x H) Net Weight Gross Weight 17.4W x 18.1D x 1.73H in. (442 x 460 x 44 mm.) 23.2 x 30.2 x 5.5 in. (590 x 768 x 140 mm.) 25 lbs (11.5kgs) 36 lbs (16.3kgs) The company reserves the right to modify product specifications without prior notice and assumes no responsibility for any error which may appear in this publication.