DANGER THIS TOOL FOR USE BY LICENSED OPERATORS ONLY. READ AND OBEY ALL SAFETY AND OPERATING INSTRUCTIONS BEFORE OPERATING TOOL.
SAFETY INTRODUCTION DANGER DANGER THIS TOOL IS TO BE USED ONLY BY PROPERLY TRAINED AND LICENSED OPERATORS. YOU MUST SUCCESSFULLY COMPLETE THE RAMSET TRAINING PROGRAM FOR THE TOOL AND OBTAIN A CERTIFIED OPERATOR’S LICENSE BEFORE HANDLING, LOADING OR OPERATING THIS TOOL. ATTEMPTING TO HANDLE OR OPERATE THIS TOOL WITHOUT PROPER TRAINING AND LICENSING CAN RESULT IN SERIOUS INJURY TO THE OPERATOR OR BYSTANDERS. Operator’s and bystanders must wear eye and hearing protection. Read manual before operating tool.
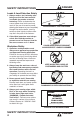
DANGER SAFETY INSTRUCTIONS Preparation Acceptable Base Materials Powder actuated fastening is suitable for use in the following base materials only: • Poured Concrete • Structural Steel • Masonry Joints (see page 8) Never attempt to fasten into any other type of material. Fastening into other materials can cause blindness or other serious injury.
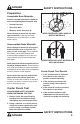
SAFETY INSTRUCTIONS DANGER Loads & Load Selection Safety 1. Always make a test fastening after being sure that the base material is suitable for powder actuated fastening. Failure to determine the correct power level to be used may result in the use of excessive power, allowing the fastener to pass completely through the work material, causing serious or fatal injuries to others who may be in the path of the fastener. ALWAYS MAKE A TEST FASTENING 2.
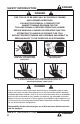
DANGER SAFETY INSTRUCTIONS Tool Handling Safety 1. Always be sure tool is operating properly before attempting to use it. Follow the “Daily Function Check” shown to the right and described on page 9. 2. Always load tool using a disc load selected directly from a box indicating the power load type and number. Never attempt to use loose disc loads that could be mis-identified. 3. Never carry loose disc loads in pockets with pins or other hard objects.
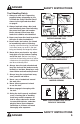
DANGER SAFETY INSTRUCTIONS FAILURE TO FOLLOW INSTRUCTIONS CAN CAUSE INJURY TO THE TOOL OPERATOR OR TO BYSTANDERS. Fastener Driving Safety 1. Only use the tool for fastening into a suitable base material. 2. Never fire the tool without a fastener. Firing a tool without a fastener will cause the piston to strike the work surface, and may cause serious injury to you and others in the work area. SPALL GUARD USE THE SPALL GUARD WHENEVER POSSIBLE 90° 3.
FASTENERS / LOADS Your Ramset D60 Tool uses only the Ramset fasteners and loads shown below or listed for the tool in the Product Catalog. DANGER Never use any other types of fasteners or strip loads in the Ramset D60 Tool. Use of other types of fasteners or loads may cause unintentional load discharge, damage the tool, cause poor fastening performance, or create a risk of serious injury to the operator or bystanders. FASTENERS .300 HEAD PLASTIC FLUTED DRIVE PINS .
FASTENING APPLICATIONS FASTENING APPLICATIONS Your Ramset tool can be used for a wide range of fastening needs in a variety of base materials. Reading and following theseimportant fastening guidelines will help you get the best results from your tool, fasteners, and powder loads, as well as help you perform these fastening operations safely and effectively. Powder actuated fastenings are permanent fastening so attempting to remove a fastener from concrete or steel may result in serious injury.
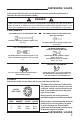
TOOL OPERATING INSTRUCTIONS TOOL OPERATION Daily Function Test Always check the tool first to make sure that it does not contain a disc load or fastener. Test the tool several times by depressing the muzzle bushing fully on a hard surface and pulling the trigger. You should hear an audible click as the firing pin releases. Let up on the tool and check to be sure the barrel has opened to the semi-closed position. PERFORM FUNCTION TEST WITH EMPTY, UNLOADED TOOL OPERATING THE D60 TOOL 1.
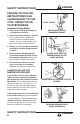
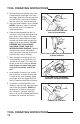
TOOL OPERATING INSTRUCTIONS 4. With the tool barrel closed to the semiclosed position and finger away from the trigger, open the cover by pressing the side button, and insert a load disc into the slots in the receiver housing. 5. Close the cover and be sure it is locked. NEVER attempt to make a fastening with the tool cover in the open or unlocked position. 6. Hold the tool perpendicular (90°) to the work surface with both hands and press firmly to fully depress the tool.
TOOL OPERATING INSTRUCTIONS D60 POWER LEVEL ADJUSTMENT The power level of the D60 tool may be adjusted for varying materials by changing the length of the barrel. Extending the barrel length reduces the driving power and shortening the length increases the driving power. The D60 tool utilizes a “quick release” pawl design to easily change power levels. QUICK RELEASE PAWL 1. To change the power level, pull the plastic cap on the pawl rearward and twist it 1/4 turn to lock the pawl in the released position.
MAINTENANCE MAINTENANCE IMPROPERLY MAINTAINED TOOLS CAN CAUSE SERIOUS INJURIES TO TOOL OPERATOR AND BYSTANDERS CLEAN TOOL DAILY Always make sure the tool is not loaded before performing any service or repair and always wear safety goggles when cleaning or servicing the tool. NORMAL CLEANING All front end parts shown in the disassembly section are to be cleaned daily with a good detergent oil and wire brush. Remove all dirt and carbon buildup and wipe parts dry with a clean rag.
TROUBLESHOOTING REFER TO PARTS SCHEMATIC FOR PROPER ASSEMBLY OF PARTS – Overdriving of fasteners – Excessive power – Change to the next lower power level load disc color and number.
PARTS SCHEMATIC PARTS SCHEMATIC 14
PARTS LIST RAMSET D60 TOOL PARTS LIST KEY 1 2 3 4 5 6 7 8 9 10 11 12 13 14 16 17 18 19 20 21 22 23 * PART NO.
DISASSEMBLY TOOL DISASSEMBLY Shroud Clip 1. Slide the barrel assembly out of the tool until the barrel shroud clip is exposed. SLIDE THE BARREL ASSEMBLY OUT OF THE TOOL TO EXPOSE THE CLIP 2. Unscrew and remove the pawl assembly. Note the position of the notch on the pawl as the pawl is removed. The pawl must be installed at reassembly with the notch in this direction. Notch REMOVE THE PAWL ASSEMBLY 3. Slide the barrel assembly completely out of the tool body.
DISASSEMBLY 5. Slide the barrel assembly from the outer barrel shroud and muzzle bushing. 6. Unscrew the firing chamber from the barrel. NOTE: When ready to reassemble the firing chamber, do not screw it on tightly to the barrel so that it can be readily aligned with the slot in the receiver. REMOVE THE BARREL ASSEMBLY FROM THE BARREL SHROUD 7. Remove the piston from the barrel by pulling straight outward.
D60 WARRANTY AND LIMITATIONS Ramset warrants that new D60 power fastening tools, parts and accessories will be free from defects in material and workmanship for the period shown below. THREE-YEAR WARRANTY A three-year warranty will apply to all parts, except those listed below as normal wearing parts, or parts which are specifically covered by an extended warranty.