
Instruction manual


RV-1 • 10
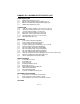
[ ] 11. Install C19, a 10uF electrolytic capacitor. Be sure and check the
orientation before you solder it into place.
[ ] 12. Install R1 a 4.7K resistor (yellow-violet-red).
[ ] 13. Install R2, a 100K resistor (brown-black-yellow).
[ ] 14, install R35, a 4.7K resistor (yellow-violet-red).
[ ] 15. Install R36, one of your 200K ohm trimmer pots. This part combined
with R35, and C19 controls how much feedback is allowed back into
the inputs. This in effect determines how long a delayed signal can
recycle through the circuit.
[ ] 16. Install JMP13 with a piece of scrap component lead.
[ ] 17. Install JMP15 with another piece of scrap.
[ ] 18. Install R10, a 100K resistor (brown-black-yellow).
[ ] 19. Install R11, a 4.7K resistor (yellow-violet-red).
[ ] 20. Install C11, a 10uF electrolytic capacitor, again pay close attention to
orientation.
[ ] 21. Install R25, the other 200K potentiometer.
[ ] 22. Install U1, the larger 14 pin IC marked 324 or LM324. Look at the
parts layout diagram and note where the notch is located. This notch
represents the end where pin 1 of the IC is, so make sure and install
your part with the same orientation as in the circuit diagram. This is the
quad opamp which performs most of the signal conditioning in the
circuit. Be sure and solder all of the pins on the IC, and make sure you
don't have any solder bridges. We sure wouldn't want any solder
bridges to destroy our hard work before we even enjoy a finished kit!
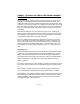
Up to this point we have completed the input mixer, and the microphone
preamp, along with the reverb feedback control. Now is a good time to check
all of your soldering up to this point. Check closely for cold solder joints and
bridges. If desired use a magnifier for this to help you get in close.
We have come a long way, so give your eyes a break and relax a minute.
When we come back we will begin the construction of the part that does the
audio delay, centered around U2 and U3.