
- Ramsey Walking Electronic Bug Owner's Manual


WEB1• 14
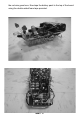
SETUP AND TESTING
If you would like, you can go ahead and put the batteries in their holders and
flip on the switch. The little flashing LEDs should blink, and at least one of the
motors should be buzzing away. At this point you can bend the flashing LEDs
in a way that you think is cute. I bent mine kind of off to the side, so they look
like eyeball stalks or something. It is possible that you have skillz and your
WEB1 will not need any adjustment. Go ahead and place it on a hard smooth
surface like a wooden desktop. It’s best that it is not completely smooth like
glass; the wire feet need a little texture to push against. If it zooms straight
ahead, then all three runners are perfectly adjusted and nothing else is neces-
sary. But, more likely it turns in a circle or just buzzes. In this case, the adjust-
ment procedure is necessary.
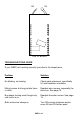
ADJUSTMENT PROCEDURE
1. Forward motion adjust:
A. If the bug does not move forward at all, bend the back runner to
make it a little more straight or a little more angled. When you get
the angle right, your bug will move.
B. Once the bug moves forward you can make it move straight by
tweaking the side runners. They should be roughly straight about
the same height, so that the bug isn’t leaning to one side. If the
bug veers to one side, try twisting the back runner a bit in either
direction. It kind of acts like a rudder on a boat. IF you still can’t
get the bug to go straight, you may have to bend the side runners
a little differently. Try making one a little taller than the other, or
change the shape a bit. Don’t be discouraged if your bug isn’t per-
fect right away. Some adjustment is normal.
C. The last adjustment you can make is the motor speed adjust R2.
It will make your bug go faster or slower. It’s also useful because
usually the bug performs differently on different types of surfaces.
It’s best to adjust the speed to get the results you like for whatever
surface you’re running on.