THANK YOU FOR PURCHASING A FIND WHICH RAMSOND SOLAR PANEL YOU HAVE BELOW Ramsond Mono-Crystalline PV Solar Panel Different models may have different features out-of-box: You are now one step closer to a sustainable energy system; when installed properly, you will be guaranteed to years of reliable, high quality power at very low cost. The following guide contains the basic necessary information to begin installing your new Ramsond Solar Panel (hereafter referred to as “module”).
STEP 1: PLACEMENT The first step of installation will require you to examine N several things before any actual work can begin. The first aspect that will need to be decided on is PLACEMENT. For the higest efficiency, solar PV modules should ideally be under direct sunlight during all S daylight hours and all times of year. Shade or indirect covering will lower the power output. Physical obstructions that interfere with sunlight will also lower output.
STEP 2: PHYSICAL INSTALLATION After you have decided on the correct placement, you can now begin physically installing your solar module. There are many different ways your solar module can be set up; however the most common are set up as a single panel or are installed as part of a larger multiple panel system, known as a solar panel array. This manual will cover the basic elements of these two methods.
STEP 2: PHYSICAL INSTALLATION FOR MULTIPLE PANELS Multiple panel systems use several panels connected together for higher power output in groups called “arrays.” Solar modules must always be connected only to similarly rated modules (for example 100 watt panels should only be connected with other 100 watt panels). This is to avoid overload and damage to the system itself, as well as damage caused by the system not operating correctly due to unblanced power output from different types of panels.
STEP 3: ELECTRICAL INSTALLATION Now that your solar module (or modules) are physically secured and attached to its support system, the last step of installation is connecting the elecrical wiring so that your modules can start producing power safely. Important note: Ramsond solar panels rated 50 Watts and below will not come with pre-wired cables or connectors; this means you will have to open the junction box to connect wiring (not supplied) using the terminal screws inside the junction box.
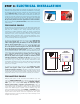
STEP 3: ELECTRICAL INSTALLATION There are two main types of multiple panel connections: SERIAL and PARALLEL. The essential difference between them is how the power the modules generate is combined. SERIAL connection combines the voltage of each connected module, while the amperage (or current) remains the same as a single module would produce. For example, three 100 watt modules connected in series may produce 18.5 volts each at 5.4 amps; the total voltage output for all three would be 55.5 volts at 5.
STEP 3: ELECTRICAL INSTALLATION MULTIPLE PANELS: PARALLEL CONNECTION Exacly how you connect your panels will vary based on how your overall system is designed. There are many different products that can be connected to your panel; all diagrams are shown using a Ramsond SunShield Charge Controller, which is purchased separately, and a battery. Charge controllers are highly recommended for multiple panel use to regulate the flow of power and to ensure nothing is damaged during operation.
Thank for purchasing a Ramsond product. Hopefully your installation has been simple and as smooth as possible. We have taken great effort to make our manual easy to understand yet comprehensive enough to cover the basic information necessary for you to get the most out of your new solar system. If the instructions were followed properly, your Ramsond solar panel should provide you with years of troublefree, high-quality power generation.
NOTES sensible solutions
NOTES sensible solutions