
Owners manual


INSTALLATION INSTRUCTIONS 8964
REV A
FOR: ADD-A-LEAF
READ ALL INSTRUCTIONS THOROUGHLY FROM START TO FINISH BEFORE BEGINNING INSTALLATION
IMPORTANT NOTES:
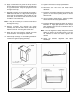
• To contain the potential energy stored in a leaf spring assembly, secure the leaves with two large C-clamps. See
illustration 1.
• Some springs will have a factory helper spring consisting of one or more flat or nearly flat leaves installed at the
bottom of the leaf pack. Do not install your Add-A-Leaf spring in or below the helper spring assembly.
• Some vehicle manufacturers recommend replacing U-bolts when removed. New U-bolts may not be supplied
with your kit and should be purchased separately.
• These instructions use general procedures for installing an Add-A-Leaf. Obtain and review your vehicle’s service
manual for specific procedures and specifications.
Illustration 1
1. Park the vehicle on a level surface. Set parking
brake and chock front wheels. Raise the rear of
the vehicle and support the frame with jack stands.
2. Remove the rear wheels.
3. Support the rear axle with a floor jack to relieve
the tension on the leaf springs.
4. Remove the rear shock absorbers. Disconnect
the axle vent hose from the axle housing.
Note: Removing and installing one leaf spring
assembly at a time will prevent the rear axle from
tipping.
5. Loosen all the rear axle U-bolt nuts, but do not
remove.
6. Remove the left rear axle U-bolts and anchor
plate. Remove the spring eye bolts and/or
shackles. Carefully lower the rear axle enough to
remove the leaf spring from the vehicle. Do not
allow the axle to hang from any brake lines or
cables.
7. Hold the spring assembly securely together with
C-clamps. See illustration 1. If applicable,
remove any spring alignment clamps.
8. Remove the center bolt using vise-grips to hold
the round head. If the bolt is rusted, it may be
necessary to drive the bolt out with a hammer and
drift punch.
9. Carefully remove the C-clamps.