
Install Instructions

4
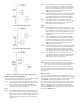
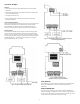
Figure 5: Dimensions (Inches)
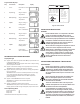
CONTROL MOUNTING
Mount the ETC to a wall or any at surface using a combinaon of any
two or more of the sloed holes located on the back of the control
case. The control’s components are not posion sensive, but should
be mounted so that they can be easily wired and adjusted. Avoid
excessive condions of moisture, dirt, dust and corrosive atmosphere.
The ETC has provisions for 1/2 inch conduit connecons. The conduit
hub should be secured to the conduit before securing the hub to the
plasc housing of the control. When using the conduit entry in the rear
of the case, a standard plug should be inserted into the conduit hole
in the boom. Cauon should be exercised not to damage the control
circuit board or wiring when installing
a conduit connector.
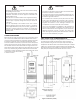
CAUTION
Read all of the informaon in these instrucons before installing
or operang the ETC control.
The schemac drawings and other informaon included in these
installaon instrucons are for the purpose of illustraon and
general reference only.
ETC controls are not to be located in areas of signicant moisture,
dirt or dust as use of the control in such environment may cause
personal injury or property damage and is likely to shorten the
control life.
It is the responsibility of the installer and the user to assure
that the applicaon and use of the ETC control is in compliance
with all applicable federal, state, and local laws, regulaons and
ordinances, including, without any limitaon, all requirements
imposed under the Naonal Electric Code and any applicable
building codes.
PRÉCAUTIONS
Lire toutes les informaons contenues dans ces instrucons avant
d’installer ou d’uliser le contrôleur ETC.
Les schémas et toutes les autres informaons gurant dans ces
instrucons d’installaon sont indiqués à des ns d’illustraon et
de référence générale seulement.
Les contrôleurs ETC ne doivent pas être placés dans des zones
ayant un taux d’humidité élevé, de la saleté ou de la poussière,
car l’ulisaon du contrôleur dans de tels environnements peut
engendrer des blessures ou des dommages matériels et est
suscepble de raccourcir la durée de vie du contrôleur.
Il est de la responsabilité de l’installateur et de l’ulisateur de
s’assurer que l’installaon et l’ulisaon du contrôleur ETC soit
faites en conformité avec tous les règlements, lois, et ordonnances
fédéraux, provinciaux, et locaux, y compris, sans y être limité,
toutes les exigences imposées par la Naonal Electric Code ainsi
que tous les codes du bâment, en vigueur.
ANTI-SHORT CYCLE COMPRESSOR DELAY
When the unit is configured for cooling and there is a call for cooling,
the relay will not activate until the Anti-short Cycle Compressor
Delay is satisfied. During an Anti-short Cycle Compressor Delay, the
temperature will alternate with Cd to indicate the Relay On is delayed.
If Relay 1 is in Anti-short Cycle Compressor Delay, the temperature will
alternate with aCd or S1 icon. If Relay 2 is in Anti-short Cycle Compressor
Delay mode, the temperature will alternate with a Cd or S2 icon.