
User Manual


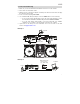

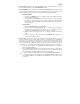
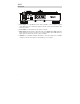


Table Of Contents

6
Features
Top Panel
1. High Torque Direct Drive Platter: A
5.0 kgf-cm motor turns this aluminum
platter with speed position dots.
Note: The platter itself should not be
held in position for sustained periods
while powered to rotate.
2. Vinyl with Slipmat: This full-size 12"
(30.5 cm) vinyl controls the audio
playhead in the software when
attached to the spindle using the
spindle lock adapter. Place the
included slipmat under the vinyl, or
replace with your preferred choice.
Note: The vinyl can be user replaced
and customized by attaching the
spindle lock adapter to your own
modified vinyl. Three holes (6 mm)
must be added, and the included vinyl
should be used as a reference.
3. Spindle Lock Adapter: This secures the vinyl to the platter using the included spindle
screw. It also determines the feel of how smoothly your vinyl responds. For a tighter feel,
press down on the vinyl while tightening the spindle screw. For a looser feel with more
spinback, lift up the vinyl slightly while tightening the spindle screw.
4. Motor On/Off & Strobe Light: Turn this dial at the top of the strobe light to turn the platter
motor on or off. The unit will remain powered on, allowing for wind down effects.
The strobe light illuminates the edge of the platter, which indicates whether or not the
phase of the platter’s rotation is constant. As the platter rotates, look at the dots on its
edge under the light’s strobing. If the phase is constant, the dots will appear to be still. If
the rotation is out of phase, the dots will appear to move or “drift.”
5. Start/Stop: Press this button to start and stop the platter. The LED around this button will
be dim when power is on and no track is playing, bright when a track is playing, and
flashing red when the track is near its end.
6. 33 & 45 RPM: Press one of these buttons to set the rotation speed (RPM) of the platter.
The lit button indicates the current selection.
7. Pitch Range: Press one of these buttons to adjust the range of the Pitch Fader to ±8%,
±16%, and ±50%.
8. Pitch Fader: Move this fader to adjust the speed (pitch) of the track. You can adjust its
total range with the Pitch Range buttons.
9. Takeover LEDs: When you select another Deck with the Deck Select buttons, the
position of the Twelve’s Pitch Fader may not match the Pitch setting for that Deck in the
software. Slowly move the Pitch Fader in the direction indicated by the Takeover LED
arrow until it turns off. At this point, the Pitch Fader matches the Pitch setting in the
software and can control it again.
1
2
3
4
5
6
7
8
12
10
11
9