
Owner manual


V. FUNCTIONAL DESCRIPTION
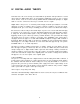
So, you have read the previous page and you’re ready to continue. Use the block diagram as a
pictorial guide as we describe the signal path of the AD 13. It will help you a lot.
If you attempt to read this without first digesting the previous section covering digital audio
theory you should be ashamed. Page numbers are included for a reason . . . . it gives one a
certain sense of the order in which to read this manual.
AD 13 BLOCK DIAGRAM
7
The next stop in the signal path is the pre-emphasis block This circuit boosts high frequencies
relative to the tower frequencies for two reasons: First, high frequencies are usually lower in
level than low frequencies and can be processed with higher resolution when boosted and
second, to reduce the output sensitivity of the unit when de-emphasis is applied at the output
to compensate for the pre-emphasis and return the overall frequency response to flat. The
lower high frequency sensitivity at the output results in a lower output noise level.
The next stop on the tour is the input level control. From the input level control the signal is
passed to the input gain adjustment amplifier which preconditions the audio signal for
presentation to the nine pole elliptic anti-aliasing filter. The anti-aliasing filter prevents any
frequencies above 20kHz from entering the audio to digital converter. If they were allowed to
pass they would cause a great deal of difficulty with the meter reader and some severe
distortion at the output of the system.
In the beginning, signal is applied at the input either through the 3-pin connector or the barrier
strip. Whether the input is balanced or not, it will first pass through the Radio Interference
Filter to strip it of local police matters and reruns of Falcon Crest. It will then be applied to the
differential amplifier which unbalances a balanced input and rejects common mode noise on
the input lines. For unbalanced inputs the differential input amp behaves like a piece of
ordinary zip cord.