
Installation guide


9
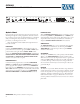
CP52S
COMMERCIAL PROCESSOR
VR1 LEVEL REMOTE
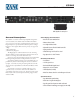
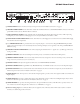
Rane provides the VR1 Volume Remote for applications that re-
quire a remote level control without the program selector found
in the ZR1. It contains the same 2k RD taper pot, and connects
as shown in the ZR1 schematic.
With the front panel REMOTE switch, all selection and lev-
el is done either on the front panel or at the remote; never both
locations. Connecting just a VR1 to the CP52S remote control
terminals will allow level adjustment. However without a source
selector, the unit will default to source one. If the PRIORITY
/ L4 INPUT automatic switching is enabled, then the unit will
select the L4 signal when present and L1 at any other time. us
if only a jukebox (P/L4) and other line source (L1) are used, the
remote volume control will work just ne.
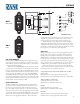
REMOTE MOUNTING
e ZR1 or VR1 remote assembly mounts in a standard U.S.
electrical box with a minimum depth of 2.25". Be sure to note
the wire color of each input in order to facilitate correct wir-
ing to the CP52S. Connect each wire to the connector by fully
inserting it in the correct socket and tightening the screw. Make
sure the cable jacket is stripped back suciently to allow it to lie
in the electrical box with the remote assembly inserted. Use the
at head #6 screws supplied with the kit to mount the remote
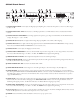
PROGRAM SELECT
LEVEL
8 2
10 0
4 6
L1
L3 L2
P
Decora plate (not included)
1
2
3
4
5
S1A
6
7
8
9
10
S1B
2
3
4
1
5
J1A
5 POS TERM
GND
GND
GND
D1
D0
Vc
Vr
ZONE REMOTE (ZR 1)
CW
2
1 3
R1
2KRD
ZR1
Zone / Level
VR1
Level
assembly and silk-screened front panel to the electrical box (see
diagram, next page). Note the “UP” arrow screened on the
printed circuit board of the remote (mount it pointing up).
Install each knob so that the line on the knob is properly
aligned with the silk-screening on the front panel of the remote
assembly. Install any Decora plate of your choice. For a secured
installation, you may wish to leave the knobs o and use a blank
Decora plate to cover the remote after adjustment.
WIRE TYPES
ough variations in wire type do not greatly aect the perfor-
mance of the remote controls, 22-gauge stranded wire with a
exible jacket is recommended. You may use 5-conductor un-
shielded remote control signal cable for short runs (less than 200
feet [60 meters]) or 4-conductor (2 pair) shielded remote control
signal cable (use the shield as the ground return) for long runs
(200 to 1000 feet [60 to 300 meters]). e type of wire required
is inuenced by your installation and local electrical codes.
Rane Corporation does not provide or source cable. Please
contact your local retail or wholesale outlet, not the factory. e
following is a short list of suitable cable types:
CONSOLIDATED ELECTRONIC WIRE AND CABLE
Plenum cable:
Unshielded remote control signal cable CAT. # 9896
Shielded remote control signal cable CAT. #9877, CAT. #9852
WEICO WIRE & CABLE INC.
Communication and control cable:
Multiconductor, unshielded CAT. #7606
ALPHA
Communication and control cable:
Multiconductor, unshielded CAT. #1175C
BELDEN
Unshielded remote control signal cable CAT. # 88741
Shielded remote control signal cable CAT. # 88723
4
0
2
6
8
10
LEVEL