TTM - OPERATOR’S MANUAL 1.8.1 MP 457SL - OPERATOR’S MANUAL 1.8.
MP 4 - OPERATOR’S MANUAL 1.8.
Important Safety Instructions 1. Read these instructions. 2. Keep these instructions. Introduction 4. Follow all instructions. Beyond the Quick Start guide, please read through this manual to get the most from your MP 4 and the included Scratch LIVE software. Keep this manual in a safe place. If you lose yours, a new copy may be downloaded at www.rane.com/mp4.html. 5. Do not use this apparatus near water. 6. Clean only with a dry cloth. 7. Do not block any ventilation openings.
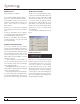
CONTENTS main screen overview Important Safety Instructions 3 Introduction 3 Virtual Deck 12 Copyright Notices 3 Visual Aids 13 Warning 3 Tempo Matching Display 13 Minimum System Requirements 3 Track Overview Display 13 PC 3 Main Waveform Display 13 Mac 3 Beat Matching Display 13 Master Gain 13 Check List 3 Tap Tempo 14 6 Key Lock 14 6 Repeat 14 Outputs 6 Censor 14 Recording 6 Eject 14 Cueing 6 Fader Start 14 Track Gain 14 MP 4 Overview Inputs
Organizing your music 19 Display 24 19 Maximum Screen Updates 24 19 Audio Cache 24 Sorting Your Files 19 Horizontal Waveforms 24 Using the Song Browser 19 Searching 19 USB Dropout Indicator 25 Prepare Window 19 Review Window 20 Editing ID3 Tags 20 Display Album Art 20 Status icons 20 More info on corrupt files 20 Auto-Backup 20 Deleting Crates and Tracks 20 Grouping Tracks into Crates Subcrates Recording 21 Keyboard Shortcuts 22 Additional Setup 23 Playback 23
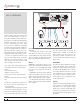
MP 4 Overview Two CD players or Two Turntables or One of Each. 100-240V 50/60 Hz 7 WATTS MP 4 MADE IN U.S.A. RANE CORP. FOR CONTINUED GROUNDING PROTECTION DO NOT REMOVE SCREW HOUSE AUX MIC TO USB RECORD LEVEL USB RIGHT LEFT RIGHT LEFT RIGHT LEFT MIC PHONO GROUND BALANCED OUTPUTS: TIP = (+), RING = (–), SLEEVE = SIGNAL GROUND ACN 001 345 482 L BALANCED INPUT R NO YES LINE PHONO IN 2 IN 1 LINE PHONO The MP 4 combines Rane mixer technology and Serato Scratch LIVE software.
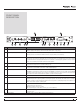
Front Panel Description 6 MIC PROGRAM A LINE 4 2 2 1 6 1 USB 2 4 8 0 10 MIC LEVEL –12 OL INPUT 1 2 +12 –12 LOW +12 HIGH 3 10 4 6 8 PROGRAM B 10 B 0 8 0 2 +12 6 2 0 9 -12 –24 -24 A LEVEL A 10 8 6 4 2 4 0 –12 0 4 5 HOUSE LINE +12 1 6 2 2 1 USB 2 8 0 10 B LEVEL 5 4 4 2 –12 +12 –12 LOW +12 HIGH CUE 8 0 10 INPUT LEVEL 2 7 3 PHONES PAN PGM 6 4 6 0 10 2 A CUE B 8 MP 4 8 MIXER LEVEL POWER 10 11 Feature Description 1
Rear Panel Description 3 COMMERCIAL AUDIO EQUIPMENT 24TJ 100-240V 50/60 Hz 7 WATTS MP 4 MADE IN U.S.A. RANE CORP.
Scratch LIVE: Getting Started On the input tab, you will see four MP 4 devices are free. To install the software, double-click listed. on the installer icon from the CD-ROM, or the installer you just downloaded from scratchlive. They are, in order: net. Follow the on-screen instructions. 5. Click “Next” to continue the install, or choose custom if you wish to change the install directory or choose not to install the ASIO driver. Mac OS X Before you install the Scratch LIVE software, 1.
Windows Vista Third-Party Software When you plug in your hardware: The MP 4 can be used with third party software, as well as the Scratch LIVE software that comes 1. A Found New Hardware wizard will pop up. with it. When you install Scratch LIVE, an ASIO 2. Choose “Locate and install driver software”. driver will also be installed. You can use the MP 3.
Importing and playing music 2. Once you have located your music, drag playing music the folder or files you want to import onto the Click on the All… icon to show all the tracks purple “All...” icon. This is located to the left of in your library. Use the keyboard shortcut Shift your screen at the top of the crates and playlist - Left Arrow to load the highlighted track on to window.
Set Auto-BPM If this option is checked, building overviews will PREPARING YOUR FILES main screen overview If this option is checked while building overviews, Scratch LIVE will calculate the estimated tempos of your files. If Scratch LIVE is confident that the auto-BPM estimate for a file is accurate, it will be written to an ID3 tag* in the file. The auto-BPM function will not be applied if the track already contains BPM information.
TIP: Use the keyboard shortcut shift-alt-arrow auto fill overviews in the setup screen – with this Beat Matching Display to unload a track from the Virtual Deck. setting disabled, the overview will be filled as This view shows the position of beats you play the track. within the track. When beat matching, Visual Aids When the track is playing several waveforms are Main Waveform Display this view helps align the downbeats of the two tracks. The markers are displayed.
Tap Tempo Repeat the left deck, and k for the right deck. The fader For tracks with no BPM information, Use the repeat function to repeat the start point is not saved with the file, and by there song across the entire length of the default this point is set to the start of the track. is a tap tempo button displayed where the BPM usually control record. is, in the song info area.
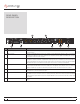
Mixing With The MP 4 Pitch Sliders Left Deck Function Scratch LIVE has two pitch sliders Q play / pause reverse A – a large slider for coarse pitch W play / pause forward S adjustment, and a small pitch slider E pitch down D for fine adjustments.
Cue Points Each cue point can have a different color. To change the color of a cue point, click on the colored square and choose a new color from the drop down menu. To remove a cue point, use the x button on the right side of the cue point panel. You can set up to five visual cue points within each track. Use the + button to place cue point. Click the arrow to the left of each cue point to jump to it.
Looping click on the locked loop symbol, a red border The A - Slot will appear. This indicates the loop is locked, and A special loop slot ‘A’ exits for auto-looping. The you will not be able to adjust the end points or act of using the auto-loop buttons sets a loop delete the loop until you unlock it, by clicking on in the ‘A’ slot, following the rules above. Turning the number again.
Assigning Controls Presets To enable MIDI assign mode, click the MIDI Control MIDI button or press ctrl+M. Hovering the mouse pointer over a control will bring up the MIDI assignment box, showing the current assignment status. To assign a MIDI control, click on the control in Scratch LIVE, then move the MIDI control. The MIDI assignment box should update to show it MIDI presets are accessible in the MIDI panel of has mapped the controls to one- another. the setup screen.
TIP: The protect library option in the setup Using the Song Browser screen applies to removing, editing and Organizing your music renaming crates. Check this option to prevent changes to your crates. If you do delete a crate by accident, you can get it back from the recycle bin / trash. Crate files have the extension .crate. Subcrates The song browser allows you to filter your song You can drag and drop crates into other crates list by Genre, BPM, Artist and Album. To turn the to make subcrates.
TIP: Use the keyboard shortcut ctrl-p to add Display Album Art tracks to the prepare window. Auto-Backup Scratch LIVE stores your library database and crates information in a Scratch LIVE folder on TIP: Select the contents of the prepare your hard disk. This folder is created on a drive window, drag them onto the new crate button when files from that drive are added to Scratch (+) to save the selection. LIVE.
TIPS. • The keyboard shortcut ctrl-n turns recording Recording on and off • You can load a recording without saving it using the short cut keys shift left arrow to deck 1 or shift right arrow to deck 2. • If the Virtual Deck is set to int mode and is unloaded, the input record level is sent to the Virtual Deck’s higher resolution stereo meters. E.g.
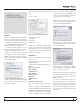
Keyboard Shortcuts These actions can be accessed directly from the computer keyboard. NOTE: Playback, cue and speed controls use Shift or Caps Lock. You can turn this off in the setup screen. 22 Key Action ctrl - L Locate the current track. This will highlight the track you most recently loaded. Pressing ctrl - L again will alternate between the tracks recently loaded on both decks. Reveal - the highlighted song is opened in a file browser. Find - moves the cursor to the search box. Select all.
Additional Setup Sort Cues Chronologically TIP: Slightly too quiet is always better than The five cue points can be placed in any order, too loud. If your LED meter is in the red, it is and can be dragged up and down if you wish likely that it is clipping. Not only does clipping to reorder them. If you prefer to lock them to not sound very nice, it can damage your chronological order, turn this option on. equipment.
Read iTunes™ Library Auto Fill Overviews 3. When this process is complete, your Scratch Existing iTunes users will recognize many Enable this setting to automatically generate the LIVE library will be updated with the new location features from iTunes. Scratch LIVE can read track overview as soon as a track is loaded. If of your files. the iTunes library format, and will automatically this setting is not enabled, the track overview will import the iTunes library and iTunes playlists.
USB Dropout Indicator The USB dropout indicator on the main screen is a useful trouble shooting tool if you have problems with audio dropouts. drive, and a separate database will be made in Troubleshooting and Frequently Asked Questions Such dropouts are caused by an interruption in this folder. If it is a removable drive, the tracks will only appear in your library when the drive is connected. To keep up with the latest tips, visit the Official Scratch LIVE Forum online at scratchlive.
Corrupt File Descriptions and Diagnoses Corrupt file: This MP3 contains invalid frames. This MP3 contains frames which do not conform strictly to the official MP3 specification. Scratch LIVE can not be certain that this file will play back 100% accurately. Corrupt file: This file contains corrupt frames that This file contains two or more contiguous corrupt frames. Since corrupt frames are replaced with silence, this could may result in audible glitches.
Cleaning Instructions Fader Cleaning A. Fader assembly replacement (part #11646) 1. Unplug the MP 4. 2. Remove the bottom cover. 3. Remove the fader screws from the front panel. 4. Draw fader assembly out through the bottom. 5. Remove ribbon cable from old fader. 6. Attach ribbon cable to new fader. 7. Screw onto front panel 8. Replace bottom cover. B. Fader cleaning 1. Hold the fader assembly away from the mixer. 2. Position the fader at mid-travel. With heavy use in harsh environments, the fader 3.