INPUT 2 A AES3 LOCK B 1 2 4 OUTPUT 3 5 6 PRESET 24 VIP ETHERNET STATUS POWER PROGRAMMABLE MULTIPROCESSOR RPM 26z PROGRAMMABLE MULTIPROCESSOR 1 RPM 26z
IMPORTANT SAFETY INSTRUCTIONS 1. Read these instructions. 2. Keep these instructions. 3. Heed all warnings. 4. Follow all instructions. 5. Do not use this apparatus near water. 6. Clean only with a dry cloth. 7. Do not block any ventilation openings. Install in accordance with manufacturer’s instructions. 8. Do not install near any heat sources such as radiators, registers, stoves, or other apparatus (including amplifiers) that produce heat. 9.
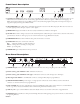
HARDWARE MANUAL RPM 26z PROGRAMMABLE MULTIPROCESSOR 1 2 INPUT LOCK A AES3 B 1 2 3 4 5 6 OUTPUT 24 PRESET RPM 26z PROGRAMMABLE MULTIPROCESSOR VIP ETHERNET STATUS POWER QUICK START This section is intended to help you make the physical connections and software manipulations necessary to get up and running with your sleek new RPM 26z. If you don’t read the entire Hardware Manual, at least read this section.
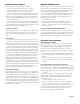
Front Panel Description 1 2 LOCK A B 1 3 2 4 5 24 6 RPM 26z PROGRAMMABLE MULTIPROCESSOR INPUT AES3 OUTPUT PRESET VIP 1 2 1 3 4 ETHERNET STATUS POWER 5 6 7 1 Signal/Overload LED meters indicate the presence of significant audio signal or overload for Inputs and Outputs. These 3-color meters indicate the available headroom once the analog signal has been converted to digital: -4 dBFS (red, near clipping), -12 dBFS (yellow, high normal level), and -48 dBFS (green, low level).
Audio Connections Digital (AES3) Input For each Input or Output Euroblock connector: • Connect the (positive) audio line to the ‘+’ terminal. • Connect the (negative) audio line to the ‘–’ terminal. • Connect the cable shield to the ground terminal.
Remote Level Control Using Potentiometers The VIP inherently prefers linear taper 10 kΩ potentiometers, which provide a nice audio taper “feel” for the end user. When used with suitable twisted pair wiring, the 10 kΩ value also offers acceptable noise immunity and very long cable lengths. AMX and Crestron Control There are two ways to control a Drag Net device from an AMX or Crestron system. Use either Ethernet connectivity or use the rear panel Versatile Input Port (VIP).
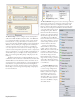
Drag Net Quick Start Rane’s tradition of writing a one page Quick Start section in our manuals has been revamped. Since this section is four pages, it’s called the Mostly Quick Start section. Drag Net software installation is straight forward — just run the setup.exe file included on the CD-ROM or downloaded from Rane's website (www.rane.com/dragnet) and follow the onscreen instructions. You are prompted to create a new project and device configuration the first time Drag Net is launched.
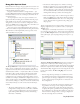
The Remote Map is used to configure the Versatile Input Port (VIP) and the RW-485 Remote Interface Port, if the RPM unit is so equipped. The VIP accepts either contact closure switches for Preset recall, or 0-5V potentiometer-on-a-wall devices for Level control. Double-click Edit VIP Properties in the Parameter Window to allocate multi-pin or single-pin control. Multi-pin control is used with contact closure switches to recall Presets, or to select inputs in a Source Selector, for example.
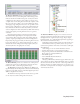
The Resource Window displays usage information specific to the hardware device you're working with. The DSP usage meter indicates the amount of DSP "horsepower" used by the current configuration, and is always accurate. There is no need to hit a “compile” button, since Drag Net automatically compiles on the fly as you work. It is possible to exceed 100% DSP usage when developing Storage configurations, but it is not possible to transfer the Storage configuration to a Live device.
Big Picture Concepts Storage Mode versus Live Mode When you first create a Drag Net device configuration, it is stored and appears under the Storage folder of the Project Window. Think of this as offline mode. Any changes made to Storage configuration are saved to your computer only; they are not updated automatically on the Live device. Storage configurations are transferred to a Live device, which appears under the Live folder of the Project window after successfully polling for devices.