OPERATOR’S MANUAL ��� ��� ��� 15185 Version 1.
Intro Refer to the separate Quick Start guide that was included in the box. If you lost yours, a new copy (along with this manual and all other documentation) may be downloaded at www.rane.com/scratch.html. To keep up with the latest tips, and to check for Scratch LIVE software updates, visit the Official Scratch LIVE Forum at scratchlive.net For the questions that the Quick Start guide doesn't answer, please read through these operating instructions so you will know how to get the most from Scratch LIVE .
SERATO SCRATCH LIVE OPERATOR’S MANUAL Contents Intro ...................................................... intro Optional power supply ........................ intro Getting started ........................................... 2 Install the software .................................. 2 Connect and install the hardware ............ 2 Connections................................................ 3 Optional extra setup ................................ 3 Setting up your turntables and mixer .......
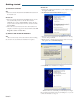
Getting started 1) Install the software Mac 1. Insert the Software Installation CD-ROM and double-click the installer icon. Windows XP 1. Connect the Scratch LIVE Interface to your computer using the supplied USB cable. 2. The Windows New Hardware Wizard appears. Windows XP 1. Insert the Software Installation CD-ROM. If Setup doesn’t start automatically, browse to the CD drive and run setup.exe.
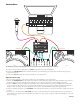
Connections ��� ������������� ������ ������ ������ ��������������������� ������������� ������ Tip: Whenever you are connecting input devices to your DJ mixer, turn down the master volume. 1. Connect your turntables (or CD players ) to INPUTS 1 and 2 of the Scratch LIVE hardware. 2. Connect the LINE OUTPUTS of the Scratch LIVE hardware to the Line Inputs on your DJ mixer, check that those inputs are switched to line level. 3. Connect the USB cable from the Scratch LIVE hardware to your Mac or PC.
Setting up your turntables and mixer 1. Set the tone arms to the specific recommendations of the cartridge used, such that the needle never leaves the record, but not heavy enough that it heats up significantly. Both produce poor tracking. 2. If the track plays backwards, you have connected the inputs from your turntables the wrong way around. Left=white, Right=red. 3. Grounding is extremely important when using Scratch LIVE .
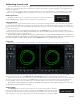
Calibrating Scratch LIVE The Scratch LIVE hardware interprets the signal on record and communicates with the software. The signal needs to be clear for Scratch LIVE to perform well. This section describes how to calibrate Scratch LIVE to optimize reading the control signal from your turntables or CD players. For best results, you should re-calibrate Scratch LIVE each time you move or make changes to your DJ equipment.
Playing your first track Now that you have calibrated Scratch LIVE , you are ready to play your first track. We will return to the setup screen later to set general system preferences. When you first run Scratch LIVE , your library contains only the pre-installed tracks. To import your own tracks, drag files and folders directly from Windows Explorer (PC version) or Finder (Mac version) into the Scratch LIVE library. You can also load files into Scratch LIVE by pressing the import button.
Playing tracks When a track is loaded, the track name, artist, length and BPM are displayed in the track title bar, and the Virtual Deck shows a solid black line. The track will start playing as soon as it detects the signal from the record (or CD). The control record The control record has two sides. The first side is ten minutes long and contains the Vinyl Scroll section. The second side is 15 minutes long.
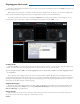
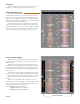
Visual aids When the track is playing several waveforms are displayed. Each shows a different aspect of the track being played. Tempo Matching display The Tempo Matching display area provides a helpful tool for beat matching. Scratch LIVE detects the beats within the track, and places a row of orange peaks (for the track on the left side) above a row of blue peaks (for the track on the right side) in the Tempo Matching display area. When the two tracks are matched to the same tempo, the peaks will line up.
Main Waveform display This view provides a close-up view of the track, including color-coding to show the frequency of the sound; red representing low-frequency bass sounds, green representing mid-frequency sounds and blue representing high-frequency treble sounds. You can also switch to a three-band spectrum view by holding the crtl key and clicking on the waveform. Click on the waveform to ‘scrub’ or make fine adjustments to your position within the track.
Gain adjustment Use the gain adjustment to balance the volume of the tracks in your library. Any adjustment made to the gain of a track is saved with the file, and will be reapplied to the entire track when it is loaded again. The level meter shows the level sent to the hardware interface — after both individual channel gain and master gain adjustment. Master Gain The master output of Scratch LIVE can be controlled using the master gain control. This adjusts the output volume of all tracks played.
Scratch LIVE modes Scratch LIVE has three different modes of operation. You can switch between these modes by clicking the mode buttons near the Virtual Deck. Absolute mode Absolute mode is the default mode, and most closely resembles the properties of normal vinyl. The beginning of the track is mapped to the start of the record, and by picking up the tone arm and moving the needle to another part of the record (needle dropping) you can move to a different position within the track.
Organizing your music Scratch LIVE can support an unlimited number of tracks – the only limitation is the size of the hard drive of your computer. A number of features are included to help you to keep your music organized and find songs quickly and easily. Grouping tracks into crates Scratch LIVE supports several ways of organizing and sorting your file library. iTunes™ users will notice that Scratch LIVE automatically incorporates your existing iTunes library and playlists.
Using the song browser The song browser allows you to filter your song list by Genre, BPM, Artist and Album. To turn the song browser on or off, click the browse button. Searching Scratch LIVE includes a search function to help you find files quickly and easily. Enter text into the search box and Scratch LIVE will automatically find as you type. Tip: Use the keyboard shortcut ‘ctrl-f’ to jump to the search box.
The prepare window The prepare window is a holding area for tracks, much like preparing a set by lifting records part way out of your record bag. You can drag tracks from the main track list into the prepare window, or simply drag tracks onto the prepare button. These tracks will be removed from the prepare window once they have been played. All tracks in the prepare window will be discarded when you exit Scratch LIVE . Tip: Use the keyboard shortcut ctrl-p to add tracks to the prepare window.
Markers You can set up to five visual markers within each track to help you to find important cue points. Use the set new button to place a marker. Click the arrow to the left of each marker to jump to that marker (rel. and int. mode only). You can also jump to markers using keyboard shortcuts – 1 through 5 for the markers on the left deck, and 6 through 0 for the markers on the right deck.
Keyboard shortcuts The following actions can be accessed directly from the computer keyboard. Key ctrl - or shift - Action ctrl - or shift - Load the highlighted song to the right deck. ctrl - / Swap the two currently playing tracks from one deck to the other. ctrl - L Locate the current track. This will highlight the track you most recently loaded. Pressing ctrl - L again will alternate between the tracks recently loaded on both decks.
Additional setup This section covers general preferences and adjustments you can make to improve the performance of Scratch LIVE . From the main screen, tick setup to get to this area. Vinyl scroll sensitivity Vinyl Scroll allows you to load a new track without touching the computer, simply by lifting the needle and placing it in the special section of side A of the control record. For a full description, see page Manual-7.
Drift compensation Scratch LIVE works by tracking a control signal that is pressed onto vinyl records, and applying that movement to audio files. It does this exceptionally accurately at low and high speeds, both forwards and backwards. Users have reported drifting of tracks during long mixes, and after careful investigation we have found the lathe that mastered the original CV01 control records induced pitch variations in the vinyl master.
USB dropout indicator The USB dropout indicator on the main screen is a useful trouble shooting tool if you have problems with audio dropouts. Such dropouts are caused by an interruption in passing the audio to the Scratch LIVE hardware interface. If such an interruption (or dropout) occurs, a red light will appear briefly, just to the left of the Scratch LIVE logo at the top of the screen. The light will be red for one second, and then orange for four seconds.
Troubleshooting and Frequently Asked Questions Scratch LIVE hardware is not recognized It takes five seconds for Scratch LIVE to detect the hardware. The hardware can be unplugged at any time; you do not need to exit Scratch LIVE before disconnecting the hardware. Use the supplied USB cable, longer lengths are not recommended. On some Windows machines each USB port is treated separately, so you will need to install the driver separately for each USB port.
Can I use one turntable and one CD player? Yes. You need a phono preamp to boost the signal from the turntable to line level, and you need to set the input to line in the setup screen. Rane’s PS 1 Phono Preamp is a good solution. When I do transform scratches (switching between phono and line level inputs) I hear a crazy noise; what’s happening? When you switch to phono level, you will hear the sound of the control vinyl.
SERATO SCRATCH LIVE SPECIFICATIONS (all specs typical) USB Power 300mA, 5.0 Volts Optional External Power Pack 300mA, 9.0 Volts CODEC 16-bit / 44.1 kHz sample rate LINE OUTPUT: Unbalanced RCA …...THD+N -88 dB (1 kHz, 0 dBu, 20 kHz BW) …...Maximum Output +5 dBu, +3 dBV …...Dynamic Range 94 dB A-weighted Input to THRU Unbalanced RCA …...Gain Unity …...Maximum Input / Output 2 Vrms …...