
Quick start guide

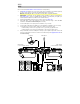
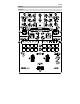

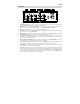
Table Of Contents
- User Guide (English)
- Guía del usuario (Español)
- Guide d'utilisation (Français)
- Guida per l'uso (Italiano)
- Benutzerhandbuch (Deutsch)
- Appendix (English)

6
1. Scroll/Load: Turn this knob to browse through lists and press it to select an item or load the currently
selected track to the deck.
Tip: Press this knob twice quickly to load the same track to both decks (“instant doubles”).
2. Back: Press this button to view the previous screen in Serato DJ Pro.
Hold Shift and press this button to cycle through the Files, Browse, Prepare, and History windows in
Serato DJ Pro.
3. Load Prep: Press this button to send the highlighted track to the Prepare window in Serato DJ Pro.
Hold Shift and press this button to open the Prepare window.
4. Deck Source: Set this knob to the desired audio source for this channel: USB A or B (a track playing on
that layer in the software), PH/CD (a device connected to the Deck PH/CD In on the rear panel), or Aux
(a device connected to the Deck Aux In on the rear panel).
Note: If you select PH/CD, set the PH/CD selector switches on the rear panel properly.
Note: A deck’s controls will send MIDI information only when its deck source selector is set to USB
A or B.
5. Deck Level: Turn this knob to set the pre-fader, pre-EQ audio level of the corresponding channel. The
meter next to this knob indicates the signal’s volume level (reduce it if it begins "clipping," reaching
the red part of the meter).
6. Deck EQ High: Turn this knob to adjust the high (treble) frequencies.
7. Deck EQ Mid: Turn this knob to adjust the mid-range frequencies.
8. Deck EQ Low: Turn this knob to adjust the low (bass) frequencies.
9. Deck LP/HP: Turn this knob to adjust the filter applied to the deck. Turn the knob counterclockwise to
apply a low-pass filter. Turn the knob clockwise to apply a high-pass filter. Set it to the center
(“12:00”) position to deactivate the filters.
Note: The filters are full-kill by default, but you can adjust the cutoff frequencies by going to the
settings menu. See Operation > Settings Menu for more information.
10. Loop Controls: Use the Loop On/Off (Reloop), x1/2 (Loop In), and x2 (Loop Out) buttons to loop
segments of the track playing on the corresponding deck. See Operation > Looping to learn more
about creating loops.
11. Shift: Press and hold this button to access secondary functions of other controls on Seventy.
12. Instant Doubles Buttons: Press a deck’s Instant Doubles button to load the track on that deck to
the other deck; the playhead will be in the same position on both decks. If you would like these
buttons to instead perform Sync or Silent Cue functions, you can adjust the button mode from
Seventy’s Settings Menu. See Operation > Settings Menu for information on how to change the
mode and how the modes work.
13. Pad Mode Buttons: Press one of these buttons to enter the corresponding pad mode. Press once to
enter the primary (printed above) mode, and press a second time to enter the secondary mode. See
Operation > Pad Modes to learn how to use the pads in each mode.
14. Performance Pads: These pads have different functions on each deck depending on the current pad
mode. Use the Pad Mode Buttons to select the pad mode. These pads are velocity-sensitive (in
certain modes only), durable, and easy to play. See Operation > Pad Modes to learn how to use the
pads in each mode.
15. Parameter /: Use these buttons for various functions in each pad mode. Press and hold Shift
and use these buttons to access secondary parameters.
16. Display: The main Display screen shows adjustable parameters for software and internal Flex FX. The
Display can also be used to access and edit settings for the mixer. See Operation > Effects and
Operation > Settings Menu
for more information.
17. Effects Toggle: Move this toggle switch away from you to activate the software effects or Seventy's
Flex effects—the toggle will latch to that position. Pull the toggle back to the center position to
deactivate the effects.
Pull and hold this toggle toward you to activate the software effects or Seventy effects momentarily,
and release the toggle to deactivate the effects—the toggle will return to the center position.
Note: The Effects Toggle switches can be removed and rotated 180° depending on your preference.
Note: All EQ controls
are full-kill.