
Quick start guide

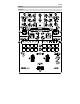

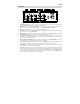
Table Of Contents
- User Guide (English)
- Guía del usuario (Español)
- Guide d'utilisation (Français)
- Guida per l'uso (Italiano)
- Benutzerhandbuch (Deutsch)
- Appendix (English)

7
18. FX Mode Button: Use this button to determine whether the Effects Toggles activate Seventy’s
internal Flex FX or software effects. While in Flex FX Mode, the FX Mode Button will be lit blue. While
in Software Effects Mode, the button will be lit amber.
19. FX Buttons: Use these buttons to select or deselect effects for activation by the Effects Toggles.
20. Parameter Knob: Turn this knob to edit effect parameters and menu settings. When editing menu
settings, press this knob to save your changes to the setting.
21. FX Joystick: Push this joystick up and down or left and right to navigate effect parameters and menu
settings.
22. Depth: Turn this knob to adjust the “wet-dry” mix of the effects on the corresponding deck.
23. Tap: Press this button two or more times at the desired BPM in order to manually set the FX tempo for
the deck in focus on the Display. To reset the FX tempo back to automatically matching the software
tempo, press and hold the Tap button for three seconds.
Hold Shift and press the Tap button to bring up Seventy’s settings menu.
24. Sampler Level: Turn this knob to adjust the volume level of the software sampler.
25. Cue Slider: Push this slider to the left or right to determine which deck is sent to the cue channel.
When the slider is in the center position, both decks will be sent to the cue channel.
26. Cue Level: Turn this knob to adjust the volume level of the cue channel.
27. Cue Mix: Turn to mix between the cue channel and program mix in the headphone outputs. When all
the way to the left, only the cue channel will be heard. When all the way to the right, only the program
mix will be heard.
28. Channel Fader: Move this fader to adjust the volume level of the corresponding deck.
29. Crossfader: Move this fader to mix between the decks.
30. Main: Turn this knob to adjust the output volume of the main outs. The meters next to this knob
indicate the signal’s volume level (reduce it if it begins "clipping," reaching the red part of the meter).
31. Booth: Turn this knob to adjust the output volume of the Booth Outs.
32. Session Out: Turn this knob to adjust the output volume of the Session Outs.
33. Session In: Turn this knob to adjust the input volume of the Session Ins.
34. Session In Cue: Press this button to send the signal from the Session Ins to the cue channel for
monitoring. When engaged, the button will be lit.
35. Mic 1 Level: Turn this knob to adjust the gain of the Mic 1 Input.
36. Mic 1 Tone: Turn this knob to adjust the balance of low (bass) and high (treble) frequencies of the
audio signal coming from the Mic 1 Input.
37. Mic 1 On/Duck: Press this to activate or deactivate the Mic 1 Input on the rear panel.
Press and hold this button for 2 seconds to activate the “ducking” feature, which reduces the volume
level of all other inputs by 10 dB. The button will flash when this feature is active. Press this button
once more to deactivate this feature and the Mic 1 Input. If you would like to edit the volume
threshold or the hold time for the mic ducking feature, you can do so in the Settings Menu. See
Operation > Settings Menu for more information.
38. Mic 1 Echo: Press this button to activate or deactivate the echo effect on the Mic 1 Input signal. Turn
the Mic 1 Echo knob on the front panel to adjust the amount of the effect. If you would like to edit the
amount of feedback for the mic echo feature, you can do so in the Settings Menu. See Operation >
Settings Menu for more information.