
Quick start guide

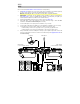
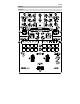

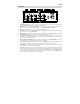
Table Of Contents
- User Guide (English)
- Guía del usuario (Español)
- Guide d'utilisation (Français)
- Guida per l'uso (Italiano)
- Benutzerhandbuch (Deutsch)
- Appendix (English)

8
Rear Panel
12
12
14
13
1
2
33
4
5
6
7
8
99
10
11
11
8
1. Power Input: While Seventy is powered off, connect the included power cable to this input and then
to a power outlet.
2. Power Switch: Use this switch to power Seventy on or off. Power on Seventy only after you have
connected all of your input devices and before you power on your amplifiers and loudspeakers. Power off
your amplifiers and loudspeakers before powering off Seventy.
3. Main Out (XLR): Connect these outputs to loudspeakers or an amplifier system. Use the Master knob
on the top panel to control the volume level.
4. Booth Out (1/4”/6.35 mm, TRS): Connect these outputs to booth monitors or a booth amplifier
system. Use the Booth knob on the top panel to control the volume level.
5. Session In (RCA): Connect these inputs from a line-level device like another mixer, a CD player, drum
machine, etc. The signal will be sent directly to the program mix. Turn the Session In knob on the top
panel to control the input volume level.
6. Session Out (RCA): Connect these outputs to another mixer, recording device, etc. The program mix
will be sent to these outputs. Turn the Session Out knob on the top panel to control the volume level.
7. Deck PH/CD In (RCA): Connect these inputs to an external audio source or to a turntable, CD player,
or other line-level device. Remember to set the corresponding PH/CD selector to the appropriate
position and to set the deck source knob for that deck to PH/CD to play its audio signal on that deck.
8. PH/CD Selector: Set this switch to the appropriate position, depending on the device connected to the
PH/CD Ins of the corresponding deck. If you are using phono-level turntables, set this switch to PH to
provide the additional amplification needed for phono-level signals. If you are using a line-level device,
such as a line-level turntable, CD player or sampler, set this switch to CD.
9. Phono Grounds: If you are using phono-level turntables with a grounding wire, connect the grounding
wire to these terminals. If you experience a low “hum” or “buzz”, this could mean that your turntables
are not grounded.
Note: Some turntables have a grounding wire built into the RCA connection and, therefore, nothing
needs to be connected to the grounding terminal.
10. Deck Aux In (RCA): Connect these inputs to an external line-level audio source. Remember to set the
Deck Source knob for that deck to Aux to play its audio signal on that deck.
11. Mic Inputs 1–2 (XLR / 1/4”/6.35 mm, TS): Connect microphones or line-level devices to these mono
inputs. Their mono audio signals are split and routed directly to the stereo program mix and cue
channel. If you prefer a stereo line input, the Session In may be used.
12. Line/Mic Selector: Set this switch to the appropriate position, depending on the device connected to
Mic Inputs 1–2. If you are using a microphone, set this switch to Mic. If you are using a line-level
device, such as a keyboard or sampler, set this switch to Line.
13. Twelve/Controller USB Ports (USB Type-A): Use USB cables to connect these USB ports to your
controllers such as Twelve or a standard USB MIDI controller.
Important: Do not connect USB drives to these ports. Switching the Deck Source knob will force
eject the drive from the connected computer, which could damage the contents and should be
avoided.
14. USB Ports (USB Type-B): Use USB cables to connect these USB ports to available USB ports on
your computer. These connections send and receive audio and MIDI control information to and from
the computer.
Note: Make sure you have downloaded and installed the Rane Control Panel from dj.rane.com.