
90 Induction Cooker User Guide


WARNING – SERVICING TO BE CARRIED OUT ONLY BY AN AUTHORISED PERSON
Disconnect from electricity before servicing. Check appliance is safe when you have finished.
25
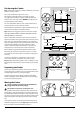
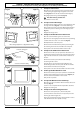
16. To Replace an Oven Door Seal
Open the oven door. The seal has small hooks that hold it in
place by locating into holes in the rear door face on the main
oven and oven front face on tall oven. At the corner, pull the
seal diagonally away from the door centre until the hook is
released (Fig.8-10). Proceed to the next hook and release it in
a similar way, and so on.
You can use force if the hooks are stiff, as the old seal will be
discarded.
Carefully lift away the inner back. Reassemble in reverse
order making sure that the four screws and washers are fully
tightened.
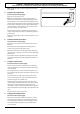
17. To Remove the Grill Door
Remove the control panel (see 1). Remove the left-hand side
panel (see 2). Remove the centre cover strip (5 screws, 2 top, 2
bottom, 1 in middle). Remove the two countersunk screws (1
each side) securing the grill hinge arms to the front of the grill
chamber.
Note: The arms are spring tensioned. Carefully remove the grill
door. Retain the gaskets.
Reassemble in reverse order ensuring that the gasket is fitted
between the hinge arm and the front of the grill chamber.
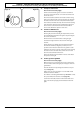
18. To Remove an Oven Element Thermal Cut-out
Disconnect from electricity supply.
Pull the cooker forward to gain access to the cover box. Undo
the cover screws and lift clear. The cutout is located on the
earth plate beside the oven element connections. Disconnect
the cutout wiring. Undo the fixings that secure the cutout to
the earth plate and remove. Fit the replacement control and
re-assemble in reverse order.
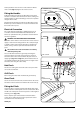
19. To Remove an Oven Inner Back
Disconnect from electricity supply.
Open the door and remove the shelves. Remove the screws
and washers securing the inner back to the back of the oven
(Fig.8-11). Carefully lift away the inner back. Reassemble in
reverse order making sure that the screws and washers are
fully tightened.
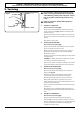
20. To Remove the Fan Oven Element
Disconnect from electricity supply.
Remove the oven inner back (see 19). Remove the two screws
from the top of the element and the one from the bottom of
the element inside the oven (Fig.8-12).
Lift the element out carefully, disconnecting the terminals
connected to the element (noting their positions).
If it is not possible to disconnect the leads in this way, pull the
cooker forward to gain access to the rear.
Remove the screws securing the electric cover to the back
sheet, remove the cover and disconnect the terminals from
the rear.
ArtNo.320-0004 Oven door keep
Fig.8-9
ArtNo.320-0005 Oven door rubber seal
Fig.8-10
ArtNo.320-0020 Oven back fixing screws
Fig.8-11
ArtNo.321-0005 Fan oven element
Fig.8-12