Double Built in Oven Users Guide & Installation & Servicing
Contents Safety Instructions 3 Before first use 3 The Facia Panel 4 Oven accessories 4 Oven operation 4 Main oven 5 Top oven 5 Oven temperature 6 Oven cooking chart 7 Grilling in the oven 8 Grilling cooking chart Installation Technical Data 8 13 16
USERS GUIDE Safety Instructions • On no account should flammable materials be stored in a drawer or cupboard beneath a built-in oven as there is a risk of fire. Do not place heavy objects on the open door or sit on it as this could cause damage to the hinging. To avoid damage to the interior enamel, do not place the oven pan or baking trays on the bottom of the oven and do not line the base of the oven with aluminium cooking foil.
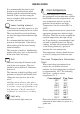
USERS GUIDE The Facia Panel The shelf supports are numbered from 15 in the main oven and 1-3 in the top oven, position 1 being the lowest. The oven pan can be used for roasting or grilling in the oven. When grilling, fit the handle to the oven pan to slide it in or out of the oven. Oven accessories Oven operation The oven is supplied with a full range of accessories. Depending on the model, this comprises either 2 or 3 wire shelves 2 enamelled oven pans with 2 trivets and a handle.
USERS GUIDE selector knob in a clockwise direction to the chosen symbol. The interior light of the selected oven will illuminate and the ‘On’ indicator light will glow. The oven functions and their symbols are: Main oven Fan oven This function operates the fan and the heating element around it. An even heat is produced throughout the oven, allowing you to cook large amounts quickly. Fan oven cooking is particularly suitable for baking on several shelves at one time and is a good ‘all-round’ function.
USERS GUIDE It is recommended that food is only placed on one shelf position when cooking with the conventional heating function. Take care when using the lowest or highest shelf positions or the food may overcook. Oven temperature Lower heating element The element in the floor operates to give a conventional bottom heat oven system. The oven should be pre-heated before use until the temperature indicator light goes out.
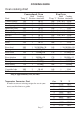
COOKING GUIDE Oven cooking chart Conventional Oven Shelf Cooking Food Temp ºC Position time/mins.
COOKING GUIDE Grilling in the oven The grilling function can be selected in either oven. Whenever the grilling function is selected, set the appropriate temperature selector knob at maximum and pre-heat the oven for 5-10 minutes before use. Food should be arranged on a wire shelf on one of the upper shelf positions. The oven pan should be placed into the oven with the trivet in place to collect any juices. Fit the handle to the oven pan when sliding it in or out of the oven.
USERS GUIDE Electronic digital 24-hour clock and hold the ( ) button and at the same time press the + or - buttons to set the required time. Release the buttons once the time has been set to start the minute minder running. The time display will show the time of day and the ( ) indicator will appear. To check the remaining time on the minute minder at any point, press the ( ) button. The time display will show the remaining time on the minute minder until the button is released.
USERS GUIDE will disappear. The main oven can now be used manually. selector knobs to zero. Press the ( ) button to reset the main oven to manual operation. The flashing ( ) indicator will disappear. The main oven can now be used manually. Cancelling an automatic cooking programme Setting the timer to turn the oven on and off automatically Press and hold the ( ) button and at the same time press the + or - buttons to set the required cooking time. Release the buttons once the time has been set.
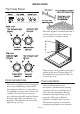
USERS GUIDE Removing the shelf supports Some models have detachable shelf supports, which can be removed, from the oven for cleaning by hand or in a dishwasher. Grasp the shelf support and press downwards to release from the clip device on the lowest runner (see diagram). This will lock the hinges in the open position. Stand in front of the oven and grasp the open door with one hand on each side.
USERS GUIDE wiped away as soon as possible after they occur. Clean the enamelled interior surfaces using a damp cloth and a proprietary mild cream cleaner, rinse, and then dry carefully using a soft cloth. Any burnt-on soiling can be carefully removed using a plastic scourer. Do not use caustic or abrasive cleaning agents, knives or other metal implements as these could damage the oven.
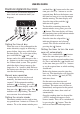
INSTALLATION Replacing the oven light bulb Installation Warning: Switch off the mains electricity supply to the oven. The oven light is positioned in the top left hand corner of the oven interior. If the light bulb needs replacing, unscrew the protective cover by turning it anticlockwise and remove the faulty bulb (see diagram). Fit the replacement bulb and replaced the protective cover, screwing it firmly into place.
INSTALLATION The connection clamp for the cable is at the rear of the appliance. Unscrew and remove the cover then insert the cable by way of the cable clip and connect. Warning: This appliance must be earthed. The earth conductor of the mains cable must be longer than the other two conductors; in order that it would become disconnected last should the cable be pulled or work loose following installation. Secure the cable by tightening the cable clip screws fully, then replace and secure the cover.
INSTALLATION Ventilation The appliance housing used must provide adequate ventilation in accordance with the manufacturer’s recommendations as detailed in the installation diagrams above. For built-in installation, a minimum ventilation cut-out of 400cm2 must be incorporated into the support shelf beneath the oven together with a 500mm x 15mm cut-out along the upper edge of the housing unit’s plinth.
Technical Data Electrical ratings Total rated load 3.9W Main oven fan element 2.3kW Main oven grill element 2.0kW Top oven upper element 0.9kW Top oven lower element 1.3kW Top oven grill element 2.