GB Instruction Manual
RECOMMENDATIONS AND SUGGESTIONS INSTALLATION • The manufacturer will not be held liable for any damages resulting from incorrect or improper installation. • The minimum safety distance between the cooker top and the extractor hood is 650 mm. • Check that the mains voltage corresponds to that indicated on the rating plate fixed to the inside of the hood. • For Class I appliances, check that the domestic power supply guarantees adequate earthing.
CHARACTERISTICS Dimensions ø150 240 175 240 L1 370 L Hood Type L L1 54 540 512 400 72 720 692 Components Ref. 1 9 9 Ref. 12c 12c GB Q.ty Product Components 1 Hood Body, complete with: Controls, Light, Blower, Filters 1 Reducer Flange ø 150-120 mm Q.ty Installation Components 2 Screws 2,9 x 6,5 Q.
INSTALLATION Drilling the Support surface and Fitting the Hood The Hood can be fitted directly to the underside of the Wall units (min. 650 mm above the cooker top) with snap-on side supports, which are set up for a support panel thickness of between 15 mm and 30 mm. • Cut a fitted opening in the bottom surface of the wall unit, as shown. • Remove the metal grease filters (see par. on Maintenance). • Disconnect the filter support by turning the internal handles provided.
• Replace the filter support • Screw the filter support using the 2 screws 12c (2,9 x 6 ,5) provided. • Replace the grease filters make sure that the handle is visible on the outside. 12c Connections DUCTED VERSION AIR EXHAUST SYSTEM When installing the ducted version, connect the hood to the chimney using either a flexible or rigid pipe ø 150 or 120 mm, the choice of which is left to the installer. • To install a ø 120 mm air exhaust connection, insert the reducer flange 9 on the hood body outlet.
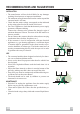
USE Control Panel The hood can be switched on pushing directly onto the requested speed without firstly having to select 0/1 button. L T1 T2 T3 T4 S1 KEY L T1 LED 0/1 Light 0/1 Motor on T2 T3 T4 Speed on Speed on Speed Fixed Flashing FUNCTIONS Turns lighting on and off. First speed. When pressed for about 2 seconds the motor is switched off. S1 Led Fixed Flashing GB Second speed. Third speed. Max. speed Intensive speed. Suitable for the strongest cooking vapours and odours.
REMOTE CONTROL (OPTIONAL) The appliance can be controlled using a remote control powered by a 1.5 V carbon-zinc alkaline batteries of the standard LR03-AAA type. • Do not place the remote control near to heat sources. • Used batteries must be disposed of in the proper manner. MAINTENANCE Grease filters CLEANING METAL GREASE FILTERS Alarm signal reset • Switch of the lights and extractor motor. • Press button T3 for at least 3 seconds, until the leds start to flash.
Activated charcoal filter (Recirculation version) REPLACING THE ACTIVATED CHARCOAL FILTER • The filter is not washable and cannot be regenerated. It must be replaced when led S1 flashes or at least every 4 months. The alarm signal will only light up when the extractor motor is switched on. Alarm signal reset • Switch off the lights and extractor motor. • Press button T3 for at least 3 seconds, until the B A leds start to flash. Replacing the Filter • Remove the grease filters.