R9044 Electric Oven User Guide & Installation & Service Instructions U109908 - 03
Contents 1. 2. 3. 4. 5. 6. 7. 8. 9. 10. Before You Start...
1. Before You Start... DocNo.014-0001 - Introduction - BI oven Personal Safety Thank you for buying a Rangemaster oven. It should give you many years trouble-free cooking if installed and operated correctly. It is important that you read this section before you start, particularly if you have not used an electric oven before. Accessible parts will become hot during use and will retain heat even after you have stopped cooking. Keep babies and children away from the oven.
2. Oven Overview Fig.2-1 DocNo.024-0004 - Overview - R9044 oven � � � � � � 0 50 100 MAX 100 250 150 150 200 200 ArtNo.
0-0006 n oven ols 0-0006 n oven ols 0-0006 n oven ols 030-0006 ion oven mbols Functions ������������ The main oven functions are shown in (Fig.2-2) while the top oven functions are shown in (Fig.2-3). ArtNo.030-0006 9-function oven symbols ArtNo.030-0006 9-function oven symbols ArtNo.030-0006 9-function oven symbols ArtNo.030-0006 9-function oven symbols ArtNo.030-0006 9-function oven symbols ArtNo.030-0006 9-function oven symbols ArtNo.030-0006 9-function oven symbols ArtNo.
Make sure that dairy foods, meat and poultry are completely defrosted before cooking. Fig.2-4 ArtNo.030-0006 9-function oven symbols ArtNo.030-0006 9-function oven symbols ArtNo.030-0006 9-function oven symbols ArtNo.030-0006 9-function oven symbols Full grill This function uses the heating elements in the roof of the oven. ArtNo.030-0006 9-function oven symbols ArtNo.030-0006 9-function oven symbols ArtNo.030-0006 9-function oven symbols ArtNo.030-0006 9-function oven symbols ArtNo.
To Start and then Stop the Oven using the Timer Fig.2-8 This is a semi-automatic function that allows you to set the ‘cook time’, which is the duration you want the oven to cook for and the ‘stop time’, which is the time of day at which you want the oven to stop cooking. You cannot set a start time directly – this is set by a combination of the ‘cook time’ and ‘stop time’. Press the timer key for about 3 seconds. Press the key again until ‘dur’ appears in the display (Fig.2-7).
3. Cooking Tips DocNo.030-0001 - Cooking tips Tips on Cooking with the Timer General Oven Tips If you want to cook more than one dish, choose dishes that require approximately the same cooking time. However, dishes can be ‘slowed down’ slightly by using small containers and covering them with aluminium foil, or ‘speeded up’ slightly by cooking smaller quantities or placing them in larger containers. The wire shelves should always be pushed firmly to the back of the oven.
DocNo.031-0002 - Cooking table 4. Cooking Table The oven control settings and cooking times given in the table below are intended to be used AS A GUIDE ONLY. Individual tastes may require the temperature to be altered to provide a preferred result. Top Centre Food is cooked at lower temperature in a fan oven than in a conventional oven. When using recipes, reduce the fan oven temperature by 10°C and the cooking time by 5-10 minutes.
5. Cleaning Your Oven DocNo.044-0002 - Cleaning - BI ovens: opp sides Essential Information Fig.5-1 Allow the oven to cool and isolate the electricity supply before carrying out any thorough cleaning. Never use paint solvents, washing soda, caustic cleaners, biological powders, bleach, chlorine based bleach cleaners, coarse abrasives or salt. Do not mix different cleaning products – they may react together with hazardous results.
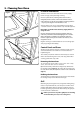
Oven Fig.5-3 DO NOT use steel wool, oven cleaning pads, or any other materials that will scratch the surface. Removing the Oven Shelf Supports The oven shelf supports can be easily removed for cleaning. First remove the all of the oven shelves and the grill pan. Squeeze the two lower wires of the oven shelf frame together to clear the retaining peg (Fig.5-3). Turn the frame into the oven cavity and drop clear of the supporting holes.
6. Troubleshooting DocNo.054-0001 - Troubleshooting BI oven Steam is coming from the oven. Check that the door seal is not damaged and that the door is held firmly against the seal. When cooking foods with a high water content (e.g. oven chips) there may be some steam visible at the top of the door. Take care when opening the oven door, as there may be a momentary puff of steam when the door is opened. Stand well back and allow any steam to disperse.
INSTALLATION Check the appliance is electrically safe when you have finished. 7. Installation Dear Installer Location of the Oven Before you start your installation, please complete the details BELOW. The oven may be installed in a kitchen/kitchen diner but NOT in a room containing a bath or shower. This appliance is designed for domestic cooking only. Use for any other purpose could invalidate any warranty or liability claim.
INSTALLATION Check the appliance is electrically safe when you have finished. Fig.7-1 �� ��� ��� ��� �� ������ 0 ��� 50 100 150 MAX 250 200 ��� 0 ��� ��� 50 100 150 MAX 250 200 ��������������������������������������� ��� ��� All dimensions in mm Positioning the Oven Provision for Ventilation The oven can be installed at high level in a tall kitchen unit and is designed to fit into a standard 600mm wide oven housing (Fig.7-1). The appliance housing used must provide adequate ventilation.
INSTALLATION Check the appliance is electrically safe when you have finished. Electrical Connection ���� �� � � � � � � This appliance must be installed by a qualified electrician to comply with the relevant Institute of Electrical Engineers (I.E.E.) regulations and also the local electricity supply company requirements.
14 �� � M A B C D E F G H I Supply terminal Electronic timer Selector Oven thermostat Earth Fan motor Pilot lamp selector Oven light Cooling fan motor Key to circuit diagram � � � �� � �� � � �� � �� � �� � � �� �� � J K L M N O P Q R M �� � T � � �� � �� �� �� �� �� � � �� Thermostat start cooling fan Pilot lamp thermostat Live Bottom heating element Neutral Circular heating element Upper and grill heating element Thermal cut-out Rotating spit motor (optional) � �� �
9. Technical Data INSTALLER: Please leave these instructions with the user. DATA BADGE LOCATION: Back of the oven. COUNTRY OF DESTINATION: GB/IE Dimensions Overall height 888 mm Overall width 594 mm Overall depth 540 mm Connections Electric 220 – 240V 50Hz Ratings Oven Top oven Main oven B A Usable volume (litres) 33.4 57.2 Size Small Medium Energy efficiency class on a scale of A (more efficient) to G (less efficient) Maximum total electric load at 230V 50Hz: 4.
10. Warranty/After Sales Service If consultation or technical assistance is needed, please provide the local authorised service agent with the purchase invoice and the product code/serial number. The 2 years free maintenance for the operation of the appliance started from the date of purchase of this product. Any cosmetic damage to the appliance must be reported within 90 days of delivery. For in-warranty service please call: 0845 6035312. For general enquiries please call: 0870 7895107. 16 DocNo.
17
DocNo.000-0001 - Back cover Rangemaster ���������������������������������������� ArtNo.000-0003 CE logo www.rangemaster.co.