RC90 Ceramic Hob User Guide & Installation & Service Instructions U109917 - 02
Contents Before You Start...
DocNo.012-0001 - Introduction - BI hob ceramic 1. Before You Start... Thank you for buying a Rangemaster hob. It should give you many years trouble-free cooking if installed and operated correctly. It is important that you read this section before you start, particularly if you have not used a ceramic hob before. This appliance is designed for domestic cooking only. Using it for any other purpose could invalidate any warranty or liability claim.
Hob Care Cleaning Never cook directly on the hob surface. The ceramic surface should be washed after use in order to prevent it from becoming scratched or dirty. Do not use the hob surface as a cutting board. In the interests of hygiene and safety, the hob should be kept clean at all times as a build up in fats and other foodstuffs could result in a fire. Do not leave utensils, foodstuffs or combustible items on the hob when it is not is use (e.g. tea towels, frying pans containing oil).
2. Hob Overview �������������� ���������������������������� ���������������������������� �������������� ��������������������� �������������� ����������������������������� ������������������������������ ���������������������������� Fig.2-1 ArtNo.
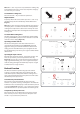
Fig.2-5 � � � � � � � � � � ArtNo.315-0016 RC90 control panel � 1. 2. 3. 4. Power ON/Power OFF Cooking element ‘+’ key Cooking element ‘–’ key Cooking zone digital display � �� � � 5. Dual element selector key (Indicator light above) 6. Triple element selector key (Indicator lights above) 7. Timer key 8. Timer ‘+’ key 9. Timer ‘–’ key 10. Timer digital display � �� � 11. Child lock key (Indicator light above) pans wastes heat, and any spillage will be burnt on.
Note: The ‘+’ and ‘–‘ keys have a repeat function: holding a key pressed down will increase or decrease the power setting by one level every 0.3 seconds. Fig.2-9 To shutdown a cooking zone: Press the relevant ‘–‘ key to reduce the power to 0. Rapid shutdown: To quickly switch off a selected zone press the ‘+’ and ‘–‘ keys simultaneously: this will immediately switch off that zone (Fig.2-9). ArtNo.315-0021 RC90 Rapid shutdown Fig.
Fig.2-14 Timer Function ��������������������� The timer has two settings: ArtNo.315-0026 RC90 Setting the zone timer Zone timer • Minute timer Zone timer This allows any one of the cooking zones to be programmed to cook up to a maximum of 99 minutes at a set power level. At the end of the cooking time an alarm will sound and the zone will automatically turn off. ��������� Fig.2-15 • Note: The timer function can only be assigned to one of the cooking zones at a time. Activating the timer: 1.
Deactivating the timer: Press and hold the timer key. The timer display will reset to ‘00’ and after a few seconds go out. ��������������� ����������� � � � � � � � � Art � No. 050-0008 Child Lock Function IMPORTANT: Make sure that all cooking zones are switched off before operating the child lock. If the lock is operated when any cooking zones are active they will remain on. Any active zones can be turned off by pressing the ‘+’ and ‘–‘ keys simultaneously or switching off the hob.
3. Cleaning Your Hob DocNo.042-0001 - Cleaning - BI hob ceramic Essential information Cleaning burned-on spills Allow the hob to cool and isolate the electricity supply before carrying out any thorough cleaning. Make sure that the residual heat indicators are off and that the hob is cool. Remove the excess burned-on substance with a single-edged razor scraper. Hold the scraper at an angle of about 30° to the surface and then scrape off the burned-on matter (Fig.3-1).
4. Troubleshooting DocNo.052-0001 - Troubleshooting ceramic & induction If there is an installation problem and I don’t get my original installer to come back to fix it, who pays? You do. Service organisations will charge for their callouts if they are correcting work carried out by your original installer. Therefore, it’s in your own interest to keep track of this installer so that you can contact them as required. A crack has appeared in the hob surface.
INSTALLATION Check the appliance is electrically safe when you have finished. 5. Installation Dear Installer Multimeter (for electrical tests) Before you start your installation, please complete the details BELOW. You will also need the following tools: 1. Electric drill 2. Jigsaw 3. Steel tape measure 4. Cross head screwdriver 5. Pencil 6. Sharp knife Should your customer have a problem relating to your installation they will be able to contact you easily.
INSTALLATION Check the appliance is electrically safe when you have finished. Positioning the Hob The hob should be fitted into a work surface, which is at least 600mm deep. In position, it has a maximum thickness of 5mm from the top of the work surface. The cut-out dimensions are shown in (Fig.5-1) and the minimum clearances in (Fig.5-2). The minimum recommended distances from the hob to nearby surfaces are shown in (Fig.5-3). Fig.
INSTALLATION Check the appliance is electrically safe when you have finished. Electrical Connections Fig.5-4 ��� This appliance must be installed by a qualified electrician to comply with the relevant Institute of Electrical Engineers (I.E.E.) regulations and also the local electricity supply company requirements. ������� ����� Note: All external wiring must comply with the IEE Regulations for the Electrical Equipment of Buildings.
6.
7. Technical Data DocNo.102-0003 - Technical data - RC90 INSTALLER: Please leave these instructions with the user. DATA BADGE LOCATION: Base of the hob.
8. Warranty/After Sales Service If consultation or technical assistance is needed, please provide the local authorised service agent with the purchase invoice and the product code/serial number. The 2 years free maintenance for the operation of the appliance started from the date of purchase of this product. Any cosmetic damage to the appliance must be reported within 90 days of delivery. For in-warranty service please call: 0845 6035312. For general enquiries please call: 0870 7895107. 15 DocNo.
16
17
DocNo.000-0001 - Back cover Rangemaster ���������������������������������������� ArtNo.000-0003 CE logo www.rangemaster.co.