RDW6012FI/SF Dishwasher User Guide & Installation & Service Instructions U110142 - 01
Contents 1. 2. 3. Before You Start 1 At Time of Delivery 1 Resolving minor problems yourself 14 During Installation 1 Problems when the unit is switched on 14 During Normal Use 1 Problems with the appliance 14 If a Fault Occurs 1 Problems during washing 15 Caring for the Environment 1 Problems with the dishes, cutlery, etc. 15 Overview and Operation 2 4. 5.
1. Before You Start DocNo.800-0101 - Introduction At Time of Delivery If a Fault Occurs Check packaging and dishwasher immediately for signs of transport damage. If the appliance is damaged DO NOT USE. Contact your supplier or customer services. If the appliance malfunctions, turn off the water supply and disconnect the plug from the wall socket. If you cannot solve the problem, contact your service centre. Please dispose of packaging materials properly. Only authorized persons should make repairs.
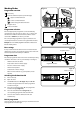
2. Overview and Operation DocNo.800-0204 - Overview - RDW6012SF dishwasher Getting to Know Your Dishwasher Fig.2-1 A B C D J K E A Upper rack B Upper spray arm C Lower rack F G D Cutlery basket H E Control panel I F Lower spray arm G Salt container cap H Washing filter I Detergent and rinse aid dispenser J Water inlet hose K Drain hose L Power supply cord L Dishwasher Interior (Fig.2-1) Control Panel (Fig.2-2) Fig.
Salt Fig.2-3 The hardness of water varies from place to place. If hard water is used in the dishwasher, deposits will form on the dishes and utensils. The appliance is equipped with a special softener that uses a salt specifically designed to eliminate lime and minerals from the water. Loading the salt into the container Low salt indicator Always use salt intended for use with dishwashers. Fig.2-4 The salt container is located beneath the lower rack and should be filled as follows: 1. 2. 3.
Rinse Aid Fig.2-5 This product makes dishes sparkle and helps them to dry without spotting. The dispenser is located on the inside panel of the door. When the low rinse aid indicator on the control panel (Fig.2-5) and the indicator on the dispenser (Fig.2-6) lights you must add rinse aid. Note: When 3-in-1 or similar combination detergent tablets, the rinse-aid is no longer useful. Low rinse aid indicator Loading the rinse aid Fig.2-6 To load the rinse aid: 1. 2.
What you should not put into the dishwasher Fig.2-9 Cutlery and tableware manufactured in whole or part from wood. They become faded and unsightly in appearance. Furthermore the adhesives that are used are not suitable for the temperature that occurs inside the dishwasher. Delicate decorative glassware and vases, special antiques or irreplaceable china. The decorative patterns on such items will not be dishwasher-proof.
Arranging Crockery, Glasses, etc. in the Dishwasher Fig.2-11 Before placing the dishes in the dishwasher, remove larger food particles to prevent the filter from becoming clogged, resulting in reduced performance. If the pots and pans have baked-on food that is extremely hard to remove, we recommend that they are soaked before washed. This will eliminate the need for extra wash cycles. Pull out the rack to load the dishwasher. Using the lower rack Fig.
Washing Dishes Fig.2-15 Fig.2-16 Programme overview Time delay Press for additional options (scroll through): Upper rack wash function Lower rack wash function Combi detergent tablets function Program select ArtNo.800-0304 - Using the cup rack Start/reset button ArtNo.800-0305 - Knife rack On/Off button Programme selection Fig.2-17 The most appropriate programme can be identified by comparing the type of crockery, cutlery, etc.
8 Soak 48°C Green wash 40°C Rapid wash 45°C Glassware 50°C Light wash 55°C Normal wash 70°C Intensive wash 55°C/65°C Automatic wash Wash programme Mixed Non-delicate Types of crockery e.g. china, pots & pans, cutlery, glassses, etc. Programme Overview ArtNo.030-0026 - Dish ArtNo.030-0026 - Dishwasher - symbols ArtNo.030-0026 - Dishwasher - symbols ArtNo.030-0026 ArtNo.030-0026 ArtNo.030-0026 - Dishwasher - Dishwasher - Dishwasher - symbols - symbols - symbols ArtNo.
Switching the dishwasher OFF Using 3-in 1 Detergent Tablets Several minutes after the programme has ended: General Advice 1. 2. 3. Open the door. Set the ON-OFF button to OFF. Remove dishes, etc. when they have cooled down. 1. Note: For the best drying performance, we recommend that you do not remove the contents for at least 30 minutes. This allows residual heat in the dishwasher to remove any small droplets of water that may occur. 2. 3.
To select the ‘tablets’ function: Fig.2-20 1. 2. Additional options button 3. Open the door. Select the programme and then press the additional options button (Fig.2-20) until the tablets indicator [ ] lights. Press the Start/Reset button (Fig.2-21) and close the door. The dishwasher will start immediately. To cancel the ‘tablets’ function: Follow the ‘Cancelling or modifying a cycle’ instructions. Fig.
Delayed start programming Delayed start button You can delay the start of a programme from 1 hour up to 24 hours. 1. 2. 3. 4. 5. 6. Open the door, switch the dishwasher ON. Press programme button to choose the desired programme. Press the Delayed Start button (Fig.2-22); the timeremaining indicator changes to ‘1’. Press the Delayed Start button as many times as necessary until the numerical display shows the required delay.
3. Looking after your Dishwasher DocNo.800-0301 - Care & maintenance - RDW6012 dishwasher Care Fig.3-1 After Every Wash After every wash, set the ON-OFF button to OFF and leave the door slightly ajar so that moisture and odours are not trapped inside. Before cleaning or performing maintenance isolate nn from mains. Low salt indicator Overall condition of appliance Check that no grease or scale has accumulated on the inside of the dishwasher.
Moving the Appliance Fig.3-5 If the appliance must be moved, try to keep it in a vertical position. If absolutely necessary, it can be positioned on its back. Seals ArtNo.800-0509 - Cleaning the lower spray arm One of the factors that cause odours to form in the dishwasher is food that remains trapped in the seals. Periodic cleaning with a damp sponge will prevent this from occurring.
4. Troubleshooting DocNo.800-0401 - Troubleshooting - RDW6012 dishwasher Fig.4-1 Resolving minor problems yourself Fig.4-2 Problems when the unit is switched on Fig.4-3 Appliance does not start up • Fault with fuse in mains electricity supply. • Plug not inserted in wall socket. • Appliance door not closed properly. • Programme button has not been pressed. Water tap not turned on. • Blocked strainer in water intake hose.
• • • • • • • • If the dishwasher still does not function and/or the problem persists, contact the nearest authorized service centre and provide them with the following information: 1. 2. The nature of the problem. The model type number (Mod...) and serial number (S/N...), as indicated on the plate located on the side of the inner part of the door. Lower spray arm rotates with difficulty • The spray arm is blocked by small items or food remains. Items in the rack were touching each other.
5. Installation DocNo.800-0501 - Installation - RDW6012 dishwasher Positioning the Dishwasher Fig.5-1 The dishwasher should be aligned to the front of the adjacent cabinets, with allowance made for the door thickness. The dishwasher has water supply and drain hoses that can be positioned on either to the left or the right.
Electrical Connection Fig.5-5 The dishwasher must be installed by a qualified electrician, in accordance with all relevant British Standards/Codes of Practice (in particular BS 7671), or with the relevant national and local regulations. WARNING: THIS APPLIANCE MUST BE EARTHED nn 870 mm max All external wiring must comply with the IEE Regulations for the Electrical Equipment of Buildings.
The adjustable feet allow the dishwasher to be raised up to 870 mm. If the space between the floor and the underside of the work surface is more than 870 mm, the unit should be positioned on suitable wooded spacers that should be fixed to the floor (Fig.5-5). Fig.5-8 Always use a spirit level to make sure that the appliance is level left-to-right and front-to-back. If the appliance is installed on carpet, ensure that there is clearance beneath the appliance. ArtNo.
Securing the Dishwasher Fig.5-12 Using the two screws supplied, secure the dishwasher to the underside of the worktop (Fig.5-12). For non-wooden worktops (e.g. marble) two brackets are provided to allow the appliance to be secured to the sides of the adjacent cabinets. Secure the appliance using the two screws at the top of the chassis (Fig.5-13); adjust to the correct width and then screw to the adjacent side panels using suitable screws. ArtNo.
6. General Information DocNo.800-0604 - General information - RDW6012SF Measures must be taken to ensure that the units that are subsequently re-sited as freestanding appliances cannot topple over. This can be achieved by bolting the dishwasher to the wall or fitting it under a continuous work surface, that is screwed to the adjacent cupboards. Fig.6-1 1 4 4 4 4 1 1 4 4 4 4 4 4 4 4 1 2 1 1 2 2 2 5 2 2 5 2 Appliance loaded in accordance with standard specifications.
7. Circuit Diagram DocNo.
8. Technical Data • DocNo.800-0804 - Technical data - RDW6012SF dishwasher INSTALLER: Please leave these instructions with the user. DATA BADGE LOCATION: Inside face on the side of the door. COUNTRY OF DESTINATION: GB/IE Dimensions 580 596 600 820 - 880 725 max 820 All dimensions in mm 550 Connections Electric 220-240 v 50 Hz Ratings Energy efficiency class on a scale of A (more efficient) to G (less efficient) A Standard cycle used Light wash Energy consumption 1.
23
24
25
DocNo.000-0001 - Back cover Rangemaster Clarence Street, Royal Leamington Spa, Warwickshire, CV31 2AD, England. Tel: +44 (0) 1926 457400 Fax: +44 (0) 1926 450526 E-mail: consumers@rangemaster.co.uk ArtNo.000-0003 CE logo w w w.rangemaster.co.