Single Built in Oven Users Guide & Installation & Servicing
Contents Safety Instructions 3 Before first use 3 The Facia Panel 4 Oven accessories 4 Oven operation 4 Oven temperature 6 Oven cooking chart 7 Grilling in the oven Grilling cooking chart 8 8 Cleaning and care 10 Solving problems 12 Installation 13 Technical Data 16
USERS GUIDE Safety Instructions • Never store flammable materials in a drawer or cupboard beneath a built-in oven as there is a risk of fire. Do not place heavy objects on the open door or sit on it as this could cause damage to the hinging. To avoid damage to the interior enamel, do not place the oven pan or baking trays on the bottom of the oven and do not line the base of the oven with aluminium cooking foil.
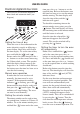
USERS GUIDE The Facia Panel Page 4
USERS GUIDE although they will need to be swapped over during the cooking time, as the heat at the top of the oven is greater than at the base, when using this function. This is a fast intensive form of cooking; keep an eye on the food cooking until you have become accustomed to this function. Light only The oven interior light comes on. Base heat plus fan The fan operates with the element under the floor of the oven. The oven should be pre-heated before use until the temperature indicator light goes out.
USERS GUIDE saving energy. You will also find that the food needs to be watched and turned less than for normal grilling. Pre-heat this function before cooking. Defrosting should not be carried out in a warm oven. Ensure that dairy foods, meat and poultry are completely defrosted before cooking. Fan oven This function operates the fan and the heating element around it. An even heat is produced throughout the oven, allowing you to cook large amounts quickly.
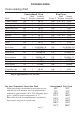
COOKING GUIDE Oven cooking chart Conventional Oven Shelf Cooking Food Temp ºC Position time/mins.
COOKING GUIDE Grilling in the oven Depending on the amount to be cooked select either the single or dual circuit grill. Whenever the grilling function is selected, set the appropriate temperature selector knob at maximum and pre-heat the oven for 5-10 minutes before use. Food should be arranged on a wire shelf on one of the upper shelf positions. The oven pan should be placed into the oven with the trivet in place to collect any juices. Fit the handle to the oven pan when sliding it in or out of the oven.
USERS GUIDE Electronic digital 24-hour clock The oven has an electronic digital 24 hour clock and automatic timer (see diagram) Setting the time of day When the oven is first connected to the mains electricity supply or following a power failure, three zeros will flash in the time display. To set the time of day press and hold the ( ) and ( ) buttons and at the same time press the + or - buttons to set the correct time using the 24 hour clock system.
USERS GUIDE Cancelling an automatic cooking programme flashing ( ) indicator will disappear. The oven can now be used manually. Setting the timer to turn the oven on and off automatically Press and hold the ( ) button and at the same time press the + or - buttons to set the required cooking time. Release the buttons once the time has been set. The time display will show the time of day and the ( ) and (AUTO) indicators will flash.
USERS GUIDE Grip the sides of the door and lift it upwards and slide it forward to remove. To refit the door, slide the hinges into their slots. Before closing the door, remember to rotate the two toggles B, used to lock the two hinges, fully back. The shelf support can then be hinged upwards and lifted from the mounting holes in the upper corners of the oven prior to removal. To re-fit the shelf supports, reverse the procedure ensuring that the clip device engages firmly on the lowest runner.
USERS GUIDE Catalytic stay-clean liners (optional extra) Solving problems Catalytic stay-clean liners for the sides and rear of the oven only are available as an optional extra for some models. Please contact your Rangemaster dealer for details. With catalytic liners fitted, only the roof, floor and door of the oven require conventional cleaning (see page 11).
USERS GUIDE Page 13
USERS GUIDE Built-in installation This appliance is designed for buildingin to a standard 600mm wide oven housing. The housing, adjacent furniture and all materials used in installation must be able to withstand a minimum temperature of 80°C plus ambient temperature during periods of operation. In addition, adjacent furniture cabinet doors must be at least 8mm from the appliance at all points.
USERS GUIDE Ventilation The appliance housing used must provide adequate ventilation in accordance with the manufacturer’s recommendations as detailed in the installation diagrams above. For built-in installation, a minimum ventilation cutout of 400cm² must be incorporated into the support shelf beneath the oven together with a 500mm x 15mm cut-out along the upper edge of the housing unit’s plinth.
Technical Data Electrical ratings Total rated load 2.95 kW Grill element 2.3 kW Upper element 2.0 kW Lower element 1.