Britain’s No.
RANGEMASTER COOKWARE Our range cookers are well known for providing the best possible cooking performance and years of faithful service. However, a great cooker alone cannot guarantee perfect results every time. The other vital ingredients are of course enthusiasm and quality cookware. We offer cookware to work perfectly with all fuel types manufactured by Rangemaster, including induction hobs.
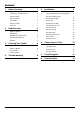
Contents 1. 2. 3. 4. Before You Start... 1 5.
ii
1. Before You Start... Personal Safety Your hob should give you many years of trouble-free cooking if installed and operated correctly. It is important that you read this section before you start, particularly if you have not used a gas hob before. DO NOT modify this appliance.
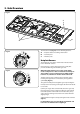
2. Hob Overview DocAUS.020-0004 - Overview - 110DF - Elan Fig.2-1 C B A The Toledo FS hob (Fig.2-1) has the following features: Fig.2-2 A. B. C. 5 hotplate burners including a wok burner A control panel A warmer plate Hotplate Burners The drawing by each of the central knobs indicates which burner that knob controls. Each burner has a Flame Supervision Device (FSD) that prevents the flow of gas if the flame goes out.
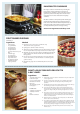
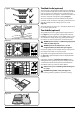
Make sure that the flames are under the pans. Using a lid will help the contents boil more quickly (Fig.2-4). Fig.2-4 Large pans should be spaced well apart. Pans and kettles with concave bases or down-turned base rims should not be used (Fig.2-5). Simmering aids, such as asbestos or mesh mats, are NOT recommended (Fig.2-6). They will reduce burner performance and could damage the pan supports. ArtNo.
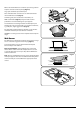
The Wok Cradle (optional) Fig.2-9 The wok cradle is designed to fit a Professional 35 cm Wok. If you use a different wok, make sure that it fits the cradle. Woks vary very widely in size and shape. It is important that the wok sits down on the pan support – however, if the wok is too small, the cradle will not support it properly (Fig.2-9). The cradle should be used on the wok burner only.
Warmer Warmer On the right of the hob is the Warmer (Fig.2-15). Use the Warmer for keeping food warm while the final touches are put to a meal. Fig.2-15 To switch on the Warmer, turn the control knob either clockwise or counter-clockwise – the HOT indicator lights up. For best results, preheat a covered serving dish for 10 minutes before adding food to it. Use only heat resistant dishes. Warmer control CAUTION: If the warmer/control panel glass shatters due to accidental damage, etc.
3. Cleaning Your Cooker Essential Information Fig.3-1 A Isolate the electricity supply before carrying out any thorough cleaning. Allow the cooker to cool. C NEVER use paint solvents, washing soda, caustic nn cleaners, biological powders, bleach, chlorine based B bleach cleaners, coarse abrasives or salt. DO NOT mix different cleaning products – they may nn react together with hazardous results.
Cleaning Table Cleaners listed (Table 3-1) are available from supermarkets or electrical retailers as stated. For enamelled surfaces use a cleaner that is approved for use on vitreous enamel. Regular cleaning is recommended. For easier cleaning, wipe up any spillages immediately. Hotplate Part Finish Recommended Cleaning Method Hob top Enamel or stainless steel Hot soapy water, soft cloth. Any stubborn stains remove gently with a nylon scourer.
4. Troubleshooting Hotplate ignition or hotplate burners faulty Is the power on? What cleaning materials are recommended for the cooker? See the ‘Cleaning’ section for recommended cleaning materials. If not, there maybe something wrong with the power supply. Never use caustic or abrasive cleaners as these will nn damage the surface.
INSTALLATION Check the appliance is electrically safe and gas sound when you have finished. 5. Installation Dear Installer In the UK the hob must be installed in accordance with: Before you start your installation, please complete the details below, so that, if your customer has a problem relating to your installation, they will be able to contact you easily. • • • Installer’s Name Installer’s Company • • All relevant British Standards / Codes of Practice, in particular BS 5440 Part 2.
INSTALLATION Check the appliance is electrically safe and gas sound when you have finished. Checking the Parts: Location of the Hob The hob may be installed in a kitchen/kitchen diner but NOT in a room containing a bath or shower. 3 pan supports This appliance is designed for domestic cooking only. Use for any other purpose could invalidate any warranty or liability claim. Note: An appliance for use on LPG must not be installed in a room or internal space below ground level, e.g. in a basement.
INSTALLATION Check the appliance is electrically safe and gas sound when you have finished. Positioning the Hob Cut-out Fit the hob into a worksurface which is at least 600 mm deep. Fig.5-1 Worktop You can fit the hob to worktops of between 30 mm and 50 mm thick. For example: If fitting to a 30 mm worktop, the base of the hob extends below the worktop by up to 20 mm. Make sure that there is sufficient clearance below the hob to avoid interference with drawer bodies, support struts, etc.
INSTALLATION Check the appliance is electrically safe and gas sound when you have finished. Fig.5-5 Gas Connection Front Before connecting the hob, check that it is suitable for your gas and electricity supply. This information is on the data label fixed to the underside of the hob. Gas connection must comply with the relevant standards and regulations in force. The gas connection point is located as shown (Fig.5-5). The inlet union is Rp ½.
INSTALLATION Check the appliance is electrically safe and gas sound when you have finished. Pressure Testing Fig.5-6 The gas pressure can be measured at one of the hotplate burner injectors (not the wok burner). Lift off a burner head. Fit the pressure gauge to the injector. Turn on and light one of the other hotplate burners. Turn on the control knob for the burner with the pressure gauge fitted to let gas through. See the data badge for test pressures. Turn off the burners.
INSTALLATION Check the appliance is electrically safe and gas sound when you have finished. Fig.5-8 Earth Electrical Connection Live The hob must be installed by a qualified electrician, in accordance with all relevant British Standards/Codes of Practice (in particular BS 7671), or with the relevant national and local regulations. WARNING: THIS APPLIANCE MUST BE EARTHED nn Cable clamp Fig.
WARNING – SERVICING TO BE CARRIED OUT ONLY BY AN AUTHORISED PERSON Disconnect from electricity and gas before servicing. Check appliance is safe when you have finished. 6. Conversion to LP Gas Check in the ‘Technical Data’ section at the back of the book that the hotplate is convertible to the gas you want to use. Fig.6-1 This conversion must be performed by a competent person.
WARNING – SERVICING TO BE CARRIED OUT ONLY BY AN AUTHORISED PERSON Disconnect from electricity and gas before servicing. Check appliance is safe when you have finished. Pressure Testing Connect the appliance to the gas supply. Check the appliance is gas sound. The gas pressure can be measured at one of the left-hand hotplate burner jets (not the wok burner). Lift off a burner head. Fit the pressure gauge to the jet. Turn on and light one of the other burners with a match.
7. Circuit Diagram C1 bk w bk or w w y bk C2 b w C3 b b b b bk bk bk bk B b A b L bk N bk bk b or bk bk L N L N Key The connections shown in the circuit diagram are for single-phase. The ratings are for 230 V 50 Hz.
8. Technical Data THE HOB IS CATEGORY: II2H3+. It is supplied set for group H natural gas. A conversion kit from NG to LP is available for the cooker. INSTALLER: Please leave these instructions with the User. DATA BADGE LOCATION: Hotplate base. COUNTRY OF DESTINATION: GB, IE. Connections Gas (Rp ½ at rear right-hand side) Natural gas 20 mbar Butane 29 mbar Propane 37 mbar Electric 230/400 V 50 Hz See the appliance badge for test pressures.
For warranty compliance, the requirements are that the appliance: Name of Appliance & Colour* • Has been correctly installed in accordance with current legislation, relevant British and European Standards and Codes of Practice, by a suitably competent person registered with Gas Safe or equivalent body and, where applicable, a qualified electrician. • Has been used solely for domestic cooking purposes. • If in use in the UK*, has not been taken abroad as a personal export.
ALSO PART OF THE RANGEMASTER COLLECTION... Refrigeration Built-in Cooking Dishwashing Sinks & Taps Clarence Street Royal Leamington Spa Warwickshire CV31 2AD England Tel: +44 (0) 1926 457400 Fax: +44 (0)1926 450526 E-mail: consumers@rangemaster.co.uk Consumer Services Tel: +44 (0) 870 7895107 www.rangemaster.co.uk Britain’s No.1 Range Cooker For ROI Enquiries Tel: 1850 302 502 Search Rangemaster UK Registered in England and Wales. Registration No.