FS Users Guide with Installation & Service Instructions U108900 - 02
Be safe Warning Accessible parts will become hot in use. To avoid burns and scalds children should be kept away You need clean fresh air - so does your hotplate. Burner flames produce exhaust gases, heat and moisture. Make sure that the kitchen is well ventilated: keep natural ventilation holes open or install a powered hotplate hood that vents outside. If you have several burners on or use the hotplate for a long time, open a window or turn on an extractor fan.
Contents Hotplate Burners Page 4 Warmer Page 5 The Griddle (optional extra) Page 6 The Wok cradle (optional extra) Page 7 Cleaning your hotplate Page 8 Troubleshooting Page 10 General Safety Instructions Page 10 Installation Page 12 Conversion to LP gas Page 17 Circuit Diagram Page 20 Technical Data Page 21 3 U108900-02
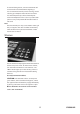
Hotplate Burners between high and off. The small flame marks the ‘low position’. Turn the knob towards it after the contents of a pan have boiled. The drawing by each knob indicates which burner that knob controls. Make sure flames are under the pans. Using a lid will help the contents boil more quickly. Pans and kettles with concave bases or down turned base rims should not be used. 1 Simmering aids, such as asbestos or mesh mats, are NOT recommended.
If a burner flame goes out, turn the control knob off and leave it for one minute before relighting it. You can remove the burner parts for cleaning; see the ‘Cleaning your hotplate’ section of the instructions. You should wipe the top surface of the hotplate around the hotplate burners as soon as possible after spills occur. Try to wipe them off while the enamel is still warm. Note: Use of aluminium pans may cause metallic marking of the pan supports.
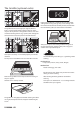
The Griddle (optional extra) Preheat the griddle for a maximum of 5 minutes before adding food. Leaving it longer may cause damage. Turn the control knobs towards the low position, marked with the small flame symbol, to reduce the burner flames The griddle fits the centre right pan support, front to back. It is designed for cooking food on directly. Don’t use pans of any kind on it. The griddle surface is non-stick and metal cooking utensils (e.g. spatulas) will damage the surface.
The Wok cradle (optional extra) The cradle will get very hot in use - allow plenty of time for it to cool before you pick it up. The Wok cradle is designed to fit a Typhoon™ Professional 35cm Wok (Part Code 13840S) Care and Cleaning Essential information This is available from leading retailers. Never use paint solvents, washing soda, caustic cleaners, biological powders, bleach, chlorine based bleach cleaners, coarse abrasives or salt.
Cleaning your hotplate Essential information Before thorough cleaning isolate the electricity supply. Remember to switch on the electricity supply before using the hotplate. Never use paint solvents, washing soda, caustic cleaners, biological powders, bleach, chlorine based bleach cleaners, coarse abrasives or salt. Don’t mix different cleaning products - they may react together with hazardous results. Recommended cleaning materials are shown in the ‘Cleaning Table’ at the end of this section.
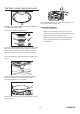
A electrode notch B ignition electrode Now fit the two burner caps, making sure that they are sitting down properly. Cleaning Table Hotplate Part Hotplate Top Pan Supports, Wok Cradle (some models only) Burner Caps Burner Trim Rings (some models only) and Burner Head Griddle Plate (some models only) Finish Enamel or Stainless Steel Enamel coated Cast Iron or Stainless Steel Enamel Aluminium Non-Stick Surface Recommended Cleaning Method Hot soapy water, soft cloth.
Troubleshooting What cleaning materials are recommended for the hotplate? See the ‘Cleaning’ section for recommended cleaning materials. We do not recommend Mr. Muscle, as it contains chemicals that may damage the surfaces of your hotplate. If there is an installation problem and I don’t get my original installer to come back to fix it who pays? You do. Service organisations will charge for their callouts if they are correcting work carried out by your original installer.
Clean with caution. If a wet sponge or cloth is used to wipe spills on a hot surface, be careful to avoid steam burns. Some cleansers can produce noxious fumes if applied to a hot surface. Do not use unstable saucepans and position the handles away from the edge of the hotplate. Babies, toddlers and young children should not be allowed near the hotplate at any time. They should never be allowed to sit or stand on any part of the appliance.
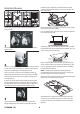
INSTALLATION Check the appliance is electrically safe and gas sound when you have finished. Installation Dear Installer Before you start your installation, please complete the details BELOW. If your customer has a problem relating to your installation they will be able to contact you easily. Installer’s Name The Gas Safety (Installation and Use) regulations 1998. The relevant Building / IEE regulations.
INSTALLATION Check the appliance is electrically safe and gas sound when you have finished. Never leave the packaging materials (cardboard, plastic bags, polystyrene foam, etc.) within children’s reach since they could become potential sources of danger kit. After converting the appliance please attach the Gas Conversion sticker over the appropriate area of the data badge, this will identify the gas type the appliance is now set for. This appliance is designed for domestic cooking only.
INSTALLATION Check the appliance is electrically safe and gas sound when you have finished. We cannot accept responsibility for damage caused by normal use of the hotplate to any material that delaminates or discolours at temperatures less than 65°C above room temperature. For safety reasons curtains must not be fitted immediately behind the hotplate. Conversion to LP If the appliance is to be converted to LP gas do the conversion at this point. See the conversion section of these instructions.
INSTALLATION Check the appliance is electrically safe and gas sound when you have finished. For LP Gas it should be capable of 50mbar pressure, 70°C temperature rise and carry a red stripe, band or label. WARNINGS: Ensure that the gas supply pipe is never able to touch moveable parts of the built-in cabinet (e.g. drawers). It must not pass through compartments that could be used for storage purposes.
INSTALLATION Check the appliance is electrically safe and gas sound when you have finished. POLARITY CHECK If a replacement cable is fitted it must be 250v high temperature rubber/synthetic of 0.75mm2 minimum conductor size. Connect the replacement cable to the terminal block on the hotplate as shown. The hotplate must be connected to the power supply. Your meter should be set on 300V ac scale. Test at the hotplate terminal block: 1. Test leads from L to N. Your meter should read approx. 220-240V ac. 2.
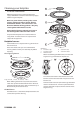
WARNING - SERVICING TO BE CARRIED OUT ONLY BY AN AUTHORISED PERSON Disconnect from electricity and gas before servicing. Check appliance is safe when you have finished. Conversion to LP gas Tap adjustment Disconnect from electricity supply. Check in the Technical Data section at the back of the book that the hotplate is convertible to the gas you want to use. This conversion must be performed by a competent person.
WARNING - SERVICING TO BE CARRIED OUT ONLY BY AN AUTHORISED PERSON Disconnect from electricity and gas before servicing. Check appliance is safe when you have finished. Stick on label Stick the LP gas label over the natural gas part of the appliance data label. Pressure Testing Connect the appliance to the gas supply. Check the appliance is gas sound. The gas pressure can be measured at one of the left hand hotplate burner jets. Lift off a burner head. Fit the pressure gauge to the jet.
WARNING - SERVICING TO BE CARRIED OUT ONLY BY AN AUTHORISED PERSON Disconnect from electricity and gas before servicing. Check appliance is safe when you have finished.
Circuit Diagram bk C1 Warmer Element Warmer Switch w C3 w bk Warmer Neon y bk C2 or B Ignition Swirches b A b L N Spark Generator bk D L N Mains Terminal Block Connection shown in circuit diagram is for single phase.
Technical Data The hotplate is an independent Class 3 built in unit. This hotplate is category II2H3+ It is supplied set for group H natural gas. A conversion kit from NG to LP gas is packed with the hotplate. INSTALLER: Please leave these instructions with the User. DATA BADGE LOCATION : Base of the hotplate.
U108900-02 22
U108900-02
U108900-02 230207