10 Dual Fuel Users Guide Installation & Service Instructions U102110-07
Be safe You need clean fresh air - so does your cooker. Burner flames produce exhaust gases, heat and moisture. Make sure that the kitchen is well ventilated: keep natural ventilation holes open or install a powered cooker hood that vents outside. If you have several burners on or use the cooker for a long time, open a window or turn on an extractor fan. For more detail see the Installation Instructions.
Contents Hotplate Burners Page 4 The Griddle Page 5 The Wok cradle Page 6 The Grill Page 7 The Ovens Page 8 The Left Hand Oven Page 8 The Right Hand Oven Page 8 The Clock Page 9 Both Ovens Page 11 Multi-function oven Page 12 Handyrack Page 13 Oven shelves Page 14 Storage Page 15 Multi-function Oven cooking guide Page 16 Oven Cooking chart Page 17 Cleaning your cooker Page 18 Moving your cooker Page 21 Troubleshooting Page 22 General Safety Instructions Page 24 Installat
Hotplate Burners Avoid using unstable and misshapen pans that may tilt easily and pans with a very small base diameter e.g. milk pans, single egg poachers. The minimum pan diameter recommended is 120mm (about 43/4"). The drawing by each knob indicates which burner that knob controls. Push in and turn a knob to the large flame symbol ( ) and press the igniter button or light with a match. The Wok burners are designed to provide even heat over a large area. They are ideal for large pans and stir frying.
The Griddle Preheat the griddle for a maximum of 5 minutes before adding food. Leaving it longer may cause damage. The controls can be turned to a lower position simply by turning the control knobs towards the lower position marked with the small flame symbol. The griddle fits the centre left pan support, front to back. It is designed for cooking food on directly. Don’t use pans of any kind on it. The griddle surface is non-stick and metal cooking utensils (e.g. spatulas) will damage the surface.
The Wok cradle Make sure the cradle is stable and that the Wok is sitting level in the ring. The Rangemaster Wok cradle is designed to fit a TyphoonTM Professional 14” Wok. This is available from CookCraft (www.cookcraft.com) and also from other retailers. The cradle will get very hot in use - allow plenty of time for it to cool before you pick it up. Care and Cleaning If you use a different Wok make sure that it fits the cradle. Woks vary very widely in size and shape.
The Grill CAUTION: Accessible parts may be hot when the grill is in use. Young children should be kept away. 5 The grill pan grid can be turned over to give two grilling positions. Remove the pan from the bottom of the grill compartment. Don’t leave the grill on for more than a few moments, without the grill pan underneath it. For best results, especially with toast, preheat the grill with the grill pan in the cooking position for two minutes before use.
The Ovens During use the appliance becomes hot. Care should be taken to avoid the touching heating elements inside the oven. The clock must be set to the time of day before the ovens will work. See ‘The Clock’ section for instructions on setting the time of day. The Left Hand Oven The Right Hand Oven The left hand oven is a Multi-function oven. As well as the oven fan and fan element, it is fitted with two extra heating elements, one visible in the top of the oven and the second under the oven base.
The Clock You can turn the knob back to the ( ) manual setting to keep an eye on the time of day or leave it in the ( ) minute minder position as the time ticks down. Setting the time of day To stop the beeper when it sounds Turn the Adjusting knob anticlockwise To stop automatically Use when you have started the oven manually. Turn the Timer knob to the ( ) position. Use the adjustment knob to set the time you need as below.
To activate the key lock Turn the Timer knob to the ( ) position. Use the Adjusting knob to set the ‘cooking time’ you need as below. Turn and hold the Timer knob to the clock symbol ( ) for about 8 seconds. ‘On’ will appear on the display. Turn the Timer knob to the ( ) position. The display will show the current time of day plus the ‘cook period’ you just set. Use the adjustment knob to set the ‘Stop time’ you need as below.
Whole poultry must be thoroughly defrosted before placing in the oven. Check that meat and poultry are fully cooked before serving. After a few seconds the display will revert to show the time of day. Both Ovens Before using for the first time, heat the ovens to 200°C for 30 minutes to dispel manufacturing odours. The ovens can now be used normally. Cooking using the timer The wire shelves should always be pushed firmly to the back of the oven.
Multi-function oven Fan oven The left hand oven of your Elan cooker is Multifunction. It has many varied uses. We suggest you keep a careful eye on your cooking until you are familiar with each function. Remember - not all functions will be suitable for all food types. This function operates the fan and the heating element around it. An even heat is produced throughout the oven, allowing you to cook large amounts quickly.
Conventional oven (top and base heat) Handyrack This function combines the heat from the top and base elements. It is particularly suitable for roasting and baking pastry, cakes and biscuits. Food cooked on the top shelf will brown and crisp faster than on the lower shelf, because the heat is greater at the top of the oven than at the base, as in ‘Fan assisted oven’ function. Similar items being cooked will need to be swapped around for even cooking.
Oven shelves Steam During cooking, food naturally produces steam, particulary when cooking foods with high water content (e.g. oven chips). There may be some steam visible at the grille at the rear of the hotplate. This is perfectly normal. the shelf guard should be at the back pointing upwards The oven shelves can be easily removed and refitted. Pull the shelf forward until the back of the shelf is stopped by the shelf stop bumps in the oven sides.
Storage The bottom drawer is for storing oven trays and other cooking utensils. It can get very warm, don’t store anything in it which may melt or catch fire. The drawer can be removed completely for cleaning etc. Lift up the ends of the plastic clips (one each side) to release the catches holding the drawer to the side runners and at the same time pull the drawer forward and away from the side runners. For safety’s sake push the drawer runners back out of the way.
Multi-function Oven cooking guide Remember - not all functions will be suitable for all food types. The oven control settings and cooking times given are intended to be used only as a guide. Individual tastes may require the temperature to be altered to provide a preferred result. Food is cooked at lower temperature in a fan oven than in a conventional oven. When using recipes, reduce the temperature by 10°C and the cooking time by 5-10 minutes.
Oven Cooking chart - Conventional and full Fan oven functions Food Convection Oven Shelf Temp Position Fan Oven Temp Approximate Cooking Time 190°C 190°C 190°C 180°C 180°C 180°C Fillets 15-20mins. Whole 10mins.per 500g + 10mins. Steaks according to thickness. FISH 3 3 3 ROAST MEATS Beef with bone 160°C 2-3 150°C 20-25mins. per 500g + 20-25mins. 200°C 2-3 190°C 15-20mins. per 500g + 15-20mins. Beef without bone 160°C 2-3 150°C 30-35mins. per 500g + 30-35mins. 200°C 2-3 190°C 20-25mins.
Cleaning your cooker Essential information The Wok burners The Wok burners are a little more complicated but it also can be taken apart for cleaning. Before thorough cleaning isolate the electricity supply. Remember to switch on the electricity supply before use. Never use paint solvents, washing soda, caustic cleaners, biological powders, bleach, chlorine based bleach cleaners, coarse abrasives or salt. Don’t mix different cleaning products - they may react together with hazardous results.
Turn the head until the ‘D’ matches the one on the burner base. Turn the head over and place it on the burner base. To fit the small inner burner, find the larger electrode notch in the burner rim. Line this up with the white ignition electrode and place the inner burner on the large base ring. Ovens The ovens have removable panels that have been coated with a special enamel that partly cleans itself. This does not stop all marks on the lining, but helps to reduce the amount of manual cleaning needed.
Cleaning Table Hotplate Part Finish Recommended Cleaning Method Hotplate Top Enamel or Stainless Steel Hot soapy water, soft cloth. Any stubborn stains remove gently with a nylon scourer. Pan Supports, Wok Cradle (some models only) Enamel coated Cast Iron or Stainless Steel Cif Cream Cleaner- Faberge Lever and a nylon scourer. Dishwasher. Warming Zone (some models only) Toughened Glass Hot soapy water, cream cleaner/scourer if necessary. Burner Caps Enamel Cream cleaner, nylon scourer.
Turn the levelling tool clockwise, two full (180°) turns. It will be stiff. The front of the oven will rise slightly as the roller drops down. When replacing the linings fit the side linings first. Make sure you fit the oven roof with the slot at the front. Moving your cooker Switch off the electricity supply. The cooker is heavy; two people may be required to move it. The cooker is fitted with one roller at the front and two at the back. There are also two screw down levelling feet at the front.
cause nuisance tripping. In these instances the cooker circuit may need to be protected by fitting 100mA device. This work should be carried out by a qualified electrician. Troubleshooting Steam is coming from the oven During cooking, food naturally produces steam, particulary when cooking foods with high water content (e.g. oven chips). There may be some steam visible at the grille at the rear of the hotplate. This is perfectly normal.
Oven temperature getting hotter as the cooker gets older If turning the knob down has not worked or only worked for a short time then you may need a new thermostat. This should be fitted by a service person. Grill not cooking properly Are you using the pan and trivet supplied with the cooker? Is the pan being used on the runners, not the floor of the compartment? Is the grill tray pushed fully back to stop? The oven light is not working The bulb has probably blown.
All parts of the cooker become hot with use and will retain heat even after you have stopped cooking. General Safety Instructions The cooker must be installed by a CORGI registered engineer in accordance with the installation instructions. The installation must comply with the relevant regulations and also the local gas and electricity supply companies’ requirements.
Never leave the hotplate unattended at high heat settings. Pans boiling over can cause smoking and greasy spills may catch on fire. Make sure that your kitchen is well ventilated at all times. Use extractor fans or hoods when fitted. Never heat unopened food containers. Pressure build up may make container burst and cause injury. Never wear loose-fitting or hanging clothes while using the appliance. Be careful when reaching for items stored in cabinets over the hotplate.
For LP Gas - BS 5482-1:1994 (when the installation is in a permanent dwelling), BS 5482-2:1977, (when the installation is in a caravan or other non permanent dwelling), or BS 5482-3:1999 , (when the installation is in a boat). The Gas Safety (Installation and Use) regulations 1998. The relevant Building / IEE regulations. Installation Dear Installer Before you start your installation, please complete the details BELOW.
Conversion All models are supplied set for use on group H natural gas. A conversion kit for LP gas is included with the appliance. See the instructions that are supplied with the conversion kit. After converting the appliance please attach the Gas Conversion sticker over the appropriate area of the data badge, this will identify the gas type the appliance is now set for. This appliance is designed for domestic cooking only. Use for any other purpose could invalidate any warranty or liability claim.
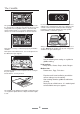
Positioning the Cooker The diagrams below show the minimum recommended distance from the cooker to nearby surfaces. The cooker should not be placed on a base. Unpacking the Cooker Do not take any packaging off the cooker until it is directly in front of the place it is to be installed (unless it will not fit through a door in its outer packaging). Cut the banding straps and lift the cardboard box off the cooker, LEAVING THE COOKER STANDING ON THE BASE PACKAGING. See the loose unpacking sheet.
Levelling Fit the levelling tool on the rectangular adjuster as shown below. You are recommended to use a spirit level on a shelf in one of the ovens to check for level. Place the cooker in its intended position taking care not to twist it within the gap between the kitchen units as damage may occur to the cooker or the units. The rollers can be adjusted to level the cooker.
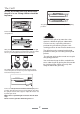
Fitting the splash back Gas Connection It is essential the splash back is fitted. Remove the two fixing screws (3mm hexagonal socket head) and nuts that pass through the top of the rear flue grille. Hold the splash back in position. From the rear refit the 2 fixing screws and nuts. The Gas supply needs to terminate with a down facing bayonet. The rear cover boxes limit the position of the supply point.
Electrical Connection Hotplate This appliance must be installed by a qualified electrician to comply with the relevant Institute of Electrical Engineers (I.E.E.) regulations and also the local electricity supply company requirements. Check each burner in turn. Push in tap and turn to the large flame symbol. Press ignition switch on facia panel. Grill WARNING: THIS APPLIANCE MUST BE EARTHED Open the grill compartment door. Turn on the grill control and check that the grill heats up.
SERVICING - WARNING Disconnect from electricity and gas before servicing. Check appliance is safe when you have finished. Remove the 2 cross headed screws that were hidden by the hand rail end brackets. Conversion to LP gas Check in the Technical Data section at the back of the book that the cooker is convertible to the gas you want to use. Open the oven door & or grill door and remove the fixing screws underneath the control panel.
SERVICING - WARNING Disconnect from electricity and gas before servicing. Check appliance is safe when you have finished. Servicing Notes When servicing or replacing gas carrying components disconnect from gas before commencing operation and check appliance is gas sound after completion. When checking for gas leaks use a liquid leak detector at all joints and connections to check for leaks in the system. Use a product specifically manufactured for leak detection.
SERVICING - WARNING Disconnect from electricity and gas before servicing. Check appliance is safe when you have finished. lead. Fit new electrode to the lead. Fix electrode in burner with screw. Replace burner cap. Check the burner ignition. Replace grates. 7. To Remove A Thermostat Remove control panel (see 2) and cooktop (see 3). Open the appropriate oven door and remove the oven shelves. RH oven Remove oven roof. Remove the two fixings that secure the thermostat phial cover.
SERVICING - WARNING Disconnect from electricity and gas before servicing. Check appliance is safe when you have finished. 15. To Change Oven Door Outer Panel 17. To Change Oven Door Seal Open oven door. The seal is held in place by small hooks on the rear face. At the corner pull seal diagonally away from the door centre until that hook is released. Proceed to the next hook and release it in a similar way, and so on. Remove the two plastic blanking plugs from the door handles.
SERVICING - WARNING Disconnect from electricity and gas before servicing. Check appliance is safe when you have finished. the leads and connect to the replacement elements and re-assemble parts in reverse order. Check operation of grill. 20. To Remove Oven Inner Back. Open the oven door. Remove oven furniture. For the LH oven unscrew the 2 thermostat phial fixing screws. 25 To Remove the LH Oven Bottom and Top Elements Disconnect from the electricity supply.
Circuit Diagram A Grill energy regulator Colour Code B Left hand Multi function oven thermostat b C D Multi function oven function control Clock br Brown or Orange F Right hand oven thermostat r Red G Grill elements v Violet H I Multi function oven base element Multi function oven top element (outer pair) w y White Yellow J Multi function oven browning element (inner pair) K Multi function oven fan element M Multi function oven fan O Right hand fan oven element P Right hand oven f
Technical Data This cooker is category II2H3+ It is supplied set for group H natural gas. A conversion kit from NG to LP gas is included. INSTALLER: Please leave these instructions with the User. DATA BADGE LOCATION: Cooker back, serial number repeater badge below oven door opening.
Ratings Natural Gas Injector Hotplate Wok burner 3.65kW internal 80 external 129 Large Burner 3.0kW 134 Medium Burners 1.7kW 109 Small Burner 1.0kW 75 Gas burner inputs based on Gross Calorific Value Ovens Fan element Top element Browning Element Bottom element Grill L.P. Gas Injector 3.5kW (246g/h) internal 54 external 77 3.0kW (210g/h) 87 1.7kW (119g/h) 68 1.0kW (70g/h) 51 Left hand Multifunction Oven 2.5kW 1.2kW 1.15kW 1.0kW 2.3kW Right hand Fan Oven 2.5kW Maximum total electrical load at 230V 7.