Integrated Fridge-Freezer 50:50 User Guide & Installation & Service Instructions Please keeP For Future reFerence U110121 - 01A
contents 1. Before You Start 1 Safety 1 Refrigerant gas information 2 Caring for the Environment 2 2. About Your Fridge-Freezer 3 About the Fresh Food Compartment 4 About the Freezer Compartment 5 Fridge-Freezer Control Panel 6 Freezing Fresh Food 7 Warning Alarm 7 During First Use 7 3. Food Storage Tips 8 Tips on Storing Fresh Food 8 Tips on Freezing Food 9 4.
1. Before You start Thank you for buying a Rangemaster appliance. We hope that it provides a stylish yet practical solution to your cooling needs. We hope that this handbook supplies you with all the information you require. If there is anything you are not sure of please contact us (see Warranty section for Consumer Services details). • • WARNING: This appliance must be earthed. nn Please leave the appliance to stand for at least eight nn hours.
refrigerant gas information caring for the environment IMPORTANT: This appliance is provided with refrigerant gas, ISOBUTHANE (R600a). When moving the appliance take care to ensure that it is not excessively struck or shaken. Failure to do so could damage the appliance. Disposing of your packaging Your new refrigerator was protected by suitable packaging while on its way to you. All of the materials used are environmentally friendly for disposal and can be recycled.
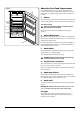
2. about Your Fridge-Freezer Fig.2-1 Egg rack Control panel Light Glass shelves Door shelves Bottle holder Glass shelf Crisper drawers Freezer drawers Ice tray The fridge-freezer is shown in Fig.2-1 and has the following features: • • • • • • • • • • • Foods that are likely to perish quickly should be placed towards the rear of the appliance – where it is coolest.
about the Fresh Food compartment Fig.2-2 It is recommended to leave storage space between the foods for good cold air circulation. The temperatures in the refrigerator are slightly warmer near the top and colder near the base. 5 ON ALARM 1. shelves The shelves may be placed in any of the guide slots within the interior of the appliance. They are protected from sliding out. 1 To remove a shelf When adjusting the height of a shelf, first remove nn any food placed on the shelf.
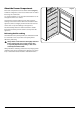
about the Freezer compartment Fig.2-3 The freezer compartment consists of four drawers (Fig.2-3). As with the refrigerator, certain areas of the freezer are better for storage of certain foods. Ice creams and water ices are best stored towards the rear of the appliance where it is coldest.
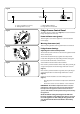
Fig.2-4 B ON D ALARM A C A – Power on indicator neon (green) B – Warning alarm neon (red) C – Warning alarm off button D – Fridge-freezer thermostat dial Fridge-Freezer control Panel Fig.2-5 The fridge-freezer control panel (Fig.2-4) is located inside the fridge compartment at the top. Power indicator neon (green) This will light as soon as the appliance is connected to the mains supply. Warning alarm neon (red) This neon will light if the warning alarm has been activated. Fig.
IMPORTANT: DO NOT run the appliance with the thermostat on higher settings in normal use otherwise the defrost drain hole will freeze. Fig.2-8 Freezing Fresh Food To freeze the maximum quantity of fresh food specified, turn the thermostat dial to its maximum position (Fig.2-8) a few hours before intending freezing. For smaller quantities of fresh food, turn the thermostat dial to its maximum position for an hour before intending freezing. Fig.
3. Food storage tips tips on storing Fresh Food • • • • • • • • • • • • Make sure that foods, which have been cooked and require chilling, are at room temperature before placing them into the appliance. Make sure that these foods are stored in suitable containers. Foods stored in the refrigerator should be cleaned and dried before storing.
tips on Freezing Food • • • • • • • • • • • • As with storing fresh foods, suitable packaging, correct temperature and food hygiene will enhance the quality of the food you are freezing. Avoid putting hot foods into the freezer. First let them cool until they reach room temperature. Make sure that all foods for freezing are of a high quality, and suitable for freezing.
4. Installation Fig.4-1 Positioning Your appliance 38 min IMPORTANT: We recommend that two people install this appliance. 596 choosing the right location The appliance should be installed in a location where the ambient temperature corresponds with the climate classification as stated on the rating plate. Your appliance may not function correctly if the ambient temperature falls outside of the following ranges.
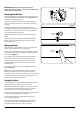
reversing the Doors Fig.4-2 The doors of your fridge-freezer can be set to open from the left or the right. If you want the door to hinge on the lefthand side and open from the right-hand side, then follow the proecedure below. This procedure MUST be completed before the nn furniture door is attached. When reversing a door, keep any parts that you remove from the appliance for later use. Take care when unscrewing any of the hinges: hold nn the door to stop it from falling and causing damage.
Fig.4-11 IMPORTANT: After you have completed reversing the door, check that the door opens and shuts correctly without fouling. 38 min 596 You should also check the appliance door seals. The seal should not be creased or crushed; otherwise there will be a gap between it and the inside of the door. The seal must bond properly all the way around the door.
Installing your fridge-freezer Fig.4-13 1. Fit the appliance towards the left-hand side of the housing unit, leaving a gap of approximately 5 mm. 2. This fridge-freezer has front adjustable feet, which can be used to level the appliance. Using a suitable spanner, adjust the feet. Turn the spanner clockwise to raise the feet and counterclockwise to lower the feet (Fig.4-13). The appliance should be flush with the underside of the housing unit. 3. Fix the appliance to the top shelf of the housing unit.
Fig.4-19 electrical supply connection Earth: to the terminal marked E, coloured Green/Yellow Your refrigerator is intended as a permanent nn installation. Connect the appliance to the electrical supply (220–240 V ~ 50 Hz) with the plug and lead, which are fitted. Neutral: to the terminal marked N, coloured Blue Connections to the mains supply should be in accordance with local regulations.
5. cleaning and Maintenance cleaning Fig.5-1 Disconnect the appliance from the power supply before cleaning. nn ON ALARM To maintain a high performance level, occasionally clean the condenser coils at the back of the appliance. Defrost the appliance regularly. A build up of thick ice decreases the efficiency of the appliance. You should defrost whenever the frost reaches 5 mm thickness. To keep internal odours to a minimum it is best to periodically clean the compartment.
You can also pour a small amount of water down the drain hole to clean the defrost drainage channel. Disconnect the appliance from the mains supply. Remove the drawers and leave the door to the freezer open. You can place a bowl of warm water inside the freezer section to speed up the defrost process. You should be careful to make sure that food packages do not touch the rear wall of the appliance, as this can interrupt the automatic defrosting process and deflect water into the base of your refrigerator.
replacing the light Bulb Fig.5-3 Disconnect the appliance from the power supply before replacing the light bulb. nn Bulb housing There is an interior light in the top of the refrigerator section. Remove the bulb housing cover, by gently pulling the clip away from its slot (Fig.5-3). Then slide the cover off, removing the lugs on the cover from the bulb housing. Change the present light bulb with a new one. The replacement bulb should not have a greater rating than 15 W.
6. troubleshooting IMPORTANT: If your fridge-freezer does not appear be operating properly, please refer to the checklist below before contacting Consumer Services. IMPORTANT: If your appliance appears not to be operating correctly, then you should disconnect it from your mains supply and then contact Consumer Services. My fridge-freezer does not appear to be working / there is no power to my appliance • Check that the plug is fully inserted into the power socket.
7. Warranty/after sales service If consultation or technical assistance is needed, please provide the local authorised service agent with the purchase invoice and the product code/serial number. The product number/serial number is located inside the refrigerator on the top left-hand side. The 2 years free maintenance for the operation of the appliance started from the date of purchase of this product. Any cosmetic damage to the appliance must be reported within 90 days of delivery.
8. technical Data • DocNo.608-0005 - Technical data - BIFF INSTALLER: Please leave these instructions with the user. DATA BADGE LOCATION: Front left-hand side of the freezer compartment. COUNTRY OF DESTINATION: GB/IE Dimensions All dimensions in mm.
21
• DocNo.000-0001 - Back cover Rangemaster Clarence Street, Royal Leamington Spa, Warwickshire, CV31 2AD, England. Tel: +44 (0) 1926 457400 Fax: +44 (0) 1926 450526 E-mail: consumers@rangemaster.co.uk ArtNo.000-0003 CE logo w w w.rangemaster.co.