
User's Manual


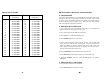


FREQUENCY CHART
Channel Channel
Frequency
Channel Channel
Frequency
1 26.965 MHz 21 27.215 MHz
2 26.975 MHz 22 27.225 MHz
3 26.985 MHz 23 27.255 MHz
4 27.005 MHz 24 27.235 MHz
5 27.015 MHz 25 27.245 MHz
6 27.025 MHz 26 27.265 MHz
7 27.035 MHz 27 27.275 MHz
8 27.055 MHz 28 27.285 MHz
9 27.065 MHz 29 27.295 MHz
10 27.075 MHz 30 27.305 MHz
11 27.085 MHz 31 27.315 MHz
12 27.105 MHz 32 27.325 MHz
13 27.115 MHz 33 27.335 MHz
14 27.125 MHz 34 27.345 MHz
15 27.135 MHz 35 27.355 MHz
16 27.155 MHz 36 27.365 MHz
17 27.165 MHz 37 27.375 MHz
18 27.175 MHz 38 27.385 MHz
19 27.185 MHz 39 27.395 MHz
20 27.205 MHz 40 27.405 MHz
PROCEDURE TO RECEIVE AND TRANSMIT
A. MICROPHONE
The receiver and transmitter are controlled by the push-to-talk switch on the
microphone. Press the switch and the transmitter is activated, release switch
to receive. When transmitting, hold the microphone two inches from the
mouth and speak clearly in a normal "voice". The transceiver come complete
with a low impedance dynamic microphone.
B. PROCEDURE TO RECEIVE
1. Be sure that power source, microphone and antenna are connected to the
proper connectors before going to the next step.
2. Turn unit on by turning the VOL knob clockwise .
3. Set the VOL for a comfortable listening level.
4. Set the MODE switch to the desire mode.
5. Listen to the background noise from the speaker. Turn the SQ knob
slowly clockwise until the noise just disappear. Level the control at this
setting. This SQ is now properly adjusted. The receiver will remain quiet
until a signal is actually received. Do not advance the control too far, or
some of weaker signal will not be heard.
6. Set the CHANNEL selector switch to the desired channel.
7. Set the RF GAIN control fully clockwise for maximum RF gain.
8. Adjust the CLARIFY control to clarify the SSB signals or to optimize
AM signals.
C. PROCEDURE TO TRANSMIT
1. Select the desired channel of transmission.
2. Set the MIC GAIN control fully clockwise.
- 10 -- 11 - - 12 -