
Install Guide


Pg. 4
SM-PROJ-XL Installation Manual
© 2013 Strong
®
5. Tools Required
• Ladderorscaffoldingtoallowaccesstothemountingarea
• Pencil(formakingtemporaryalignmentmarks)
• #2PhilipsScrewdriver
• Drill
• 3/16”Drill(ifmountinginwoodjoistceiling)
• 3/8”MasonryBit(ifmountinginconcreteceiling)
• Hammer(ifmountinginconcreteceiling)
• StudFinder(optional,suggestedforusewithwoodjoistceilings)
6. Installation Considerations
7. Installation
Review this section before beginning to ensure the best possible experience during and after installation of the
SM-PROJ-XLprojectormount.
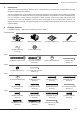
Step 1. Unpack the Projector Mount
A. The SM-PROJ-XL is packaged with most of the mount
pre-assembled. While unpacking the mount, refer to the
Package Contents section (Pg. 3) and inventory the parts in
thebox.Thepre-assembledpiecesarelistedtogetherfor
easy reference.
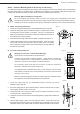
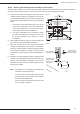
B. Unscrewtheceilingplate(A)fromtheprojectormount body
(B)andremovetheadjustmentknobcover(Figure1).
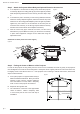
C. Removethefourscrews(E)usingthe3mmSecurityAllen
wrench (T2), and slide the mounting base (C) from the
mount body (B).
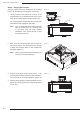
D. OpenandorganizethehardwarepackagesAand B, which
containpartsandtoolsrequiredforinstallationofthemount.
PackagesCandDcontainpartsandtoolsforattachingthe
mounttotheprojector.SettheseasideforuseinStep5of
Installation.
Figure 1
6.1. Mounting Height and Location
• Theidealparametersforprojectorheightanddistancefromthescreenvarydependingontheequipmentin
use and the operating environment. Plan the location that is best for performance according to the screen
andprojectorspecications.
• Makesurethatnothingwillobstructinstallationoftheprojectormountfastenersandwiringinthebuilding
structure,suchasconcealedplumbing, ductwork, electricalwiring orconduit.Ensurethatno exposed
items on the ceiling or walls will obstruct the line of sight or prevent any part of the system from being
mounted correctly.
6.2. Ceiling Mounting Options
• The SM-PROJ-XL projector mount and all Strong mounting accessories utilize 1.5” NPT threads for
attachment of mount parts, accessories, and extensions. These optional parts allow for mounting to a
varietyofceilingtypesandheights.SeetheSM-PROJ-XLMountingAccessoryGuide(includedinthebox)
for more information.
Remove Mount Base Screws (E)
(2 per side)
Unscrew Ceiling Plate (A)
Remove
Adjustment
Knob Cover