
Install Guide


Pg. 8
SM-PROJ-XL Installation Manual
© 2013 Strong
®
After the projector has been attached to the mounting
base, it can be attached to the projector mount body.
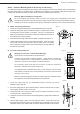
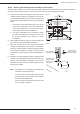
Step 6. Hanging the Projector
1. Lift the projector and position the front lip of the
mounting base (C) at the bottom-rear of the mount
body(B),andslideitintotheopening.(Figure10)
The mounting base should slide into the body with
ease with the rails engaged on both sides.
Note: Ifthemountingbasewillnotslidecompletely
onto the mount body, the mounting base
or the mount body has been installed
backwards, or the screws (E) are in place
and must be removed.
Figure 10
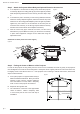
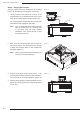
Figure 11
Figure 12
Projection Screen
(B)
(C)
Projection
Screen
(E)
(E)
2. Next, insert the screws (E) back into the holes on
the base as shown, and leave them loose enough
to allow the mounting base to slide forward and
backward.(Figure11)
Note: Lift the projector some when threading in the
screwstoavoidcross-threading.
3. Now let the projector hang from the mount. If the
projector leans forward or backward, slide the base in
themountbodytocorrecttheimbalance.(Figure12)
4. Afterthenaturalpositionforthebestbalanceisfound,
tightenall4screws(E)securelyusingthe3mmAllen
wrench (T2).
\
Projection Screen