
Install Guide


Pg. 9
SM-PROJ-XL Installation Manual
www.snapav.com Support: 866.838.5052
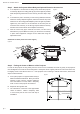
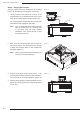
Now that the mount and projector are fully assembled and installed, make all connections and power on the
projector.Displayanimagefromasourceorapatterngeneratorsothatnaladjustmentscanbemade.SeeFigure
13 below for reference.
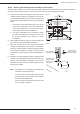
Step 7. Adjusting the Projector Image
Move each knob in the desired direction until the image is properly aligned.
Attachthecoverafternaladjustmentsarecomplete.TheSM-PROJ-XLmountisnowinstalled.
Note:Theneadjustmentknobsallowforadjustmentofupto+/-5degreesineachdirection.Iftheadjustments
do not allow enough movement to correct an alignment issue, the mount must be adjusted elsewhere.
Figure 13
Adjustment Knobs
A B C
Knob C
Clockwise
Knob A
Clockwise
Knob A
Counterclockwise
Knob C
Counterclockwise
Knob B
Clockwise
Knob B
Counterclockwise
Knob B
Clockwise
Knob B
Counterclockwise
Projection Screen
Projected Image
Movement