
User manual


CHAPTER 4: INSTALLATION 9
Power On
1. With your user consoles and devices attached, connect the supplied AC power cord to
ConsoleSwitch, and switch the power on. Note that terminals and devices may be attached or
disconnected at any time.
2. On the bottom-left of your user console, you will see a message directing you to type
H ↵ to access
the main help menu. (Note: if you attach a user console after
ConsoleSwitch has already been
powered on, you will not see this message). Type
H ↵ to access the main menu, entitled “Raritan
ConsoleSwitch Commands”.
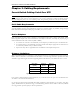
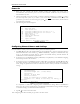
3. The following menu will be displayed:
Raritan Console Switch Commands (SCS232 v0A2)
H Main Help Menu
V View Stored Data
U# Configure Communications for User 1 or 2
D# Configure Communications for Device 1 - 32
N# Name Device 1 - 32
C Select Channel
D Display All Channels
S Scan Menu
F Update Firmware
Press CTRL+G to Enter/Exit HotKey Mode
Figure 6. Main Menu
Configuring Channel Names and Settings
For each channel to which you have attached a device, perform the following actions:
1. Type
N# ↵ (where # is the channel number of the attached device). Assign an appropriate name to
the device connected to that channel (e.g. “WWW1-NETRAT1”), and press ↵. Channel names may
be up to 12 characters in length; they are stored in non-volatile memory, and will therefore be
maintained even if ConsoleSwitch is powered off.
2. If the device is set to 9600 Baud, No Parity, 8 Data Bits, 1 Stop Bit; then you are finished configuring
the channel; proceed to the next device.
3. If the device is not set to 9600 Baud, No Parity, 8 Data Bits, 1 Stop Bit; then type
D# ↵ (where # is
the channel number of the attached device) to enter the communications setting menu. Using the
menu, change any parameter that needs to be altered in order to match your device’s communication
settings.
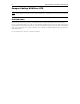
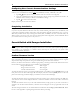
Communication Setup:
B Set Baud Rate
W Set Word Length (No. of Data Bits)
P Set Parity
S Set No. of Stop Bits
F Set Flow Control
R Reset all Settings to Default Values
Defaults: 9600 Baud, 8 Data Bits, No Parity, 1
Stop Bit.
H Exit to Main Menu
Figure 7. Communications Setup Menu
It is important to realize that configuring these communications settings affects ConsoleSwitch’s
device port only, not the external device. ConsoleSwitch communications settings should be changed
to match the settings of connected terminals and devices.
4. Type
H ↵ to return to the main menu.
After configuring each device channel port, proceed to the next section.