
DVD VCR Combo User Manual


II. Attach Local User Console and Set IP Address
In this step, you will connect the console used for accessing servers directly at the rack, and use this console to set
Dominion KX’s IP address.
1. Attach the included AC power cord to the Dominion KX unit, and plug into an AC power outlet.
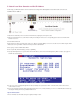
2. Attach a keyboard and mouse (either PS/2 or USB); and a multisync monitor to the corresponding ports in the back of Dominion KX
marked “Local User.”
3. Power ON Dominion KX.
4. After booting, you will see Dominion KX’s local access On Screen Display (OSD), used to choose between servers while using the KVM
switch at the rack. Log in with the default username/password of admin/raritan.
5. Press [F5] to enter the Administrative Menu.
6. Select option #3 (“Network Settings”), and press [ENTER].
7. Specify TCP/IP parameters for your Dominion KX unit: IP address; subnet mask; and default gateway. When complete, press [S]. The
unit will reboot automatically.
8. Connect one end of a straight-through Ethernet cable (included) to the port labeled “LAN1” on Dominion KX, and the other end to a
network switch or router.
9. From any networked workstation with Java Runtime Environment 1.4.x (or later) installed, you can access all administrative functions by
entering the following URL into any standard Web browser:
http://
IP-ADDRESS/admin
where
IP-ADDRESS is the IP address that you designated in Step 7 above.