
Setup guide


Dominion KX II Quick Setup Guide 1
QSG-DKX2-v2.6.0-0N-E 255-62-4022-00-RoHS
Dominion KX II
Quick Setup Guide
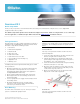
Thank you for your purchase of the Dominion
®
KX II, the industry's most full-featured, enterprise-class, secure, digital KVM
(Keyboard, Video, Mouse) switch.
This Quick Setup Guide explains how to install and configure the KX II. For details on using the KX II, access online help
from the application, or download help in PDF format from the Support page on Raritan's website.
Package Contents
Each KX II ships as a fully-configured stand-alone product in a
standard 1U (2U for DKX2-864) 19" rackmount chassis. Each
KX II device ships with the following contents:
1 - KX II device
1 - KX II Quick Setup Guide
1 - Rackmount kit
2 - AC power cords
2 - Cat5 network cable
1 - Cat5 network crossover cable
1 - Set of 4 rubber feet (for desktop use)
1 - Application note
1 - Warranty card
QS Rule
In Raritan products that require Rack Mounting, please follow
these precautions:
Operation temperature in a closed rack environment may
be greater than room temperature. Do not exceed the
rated maximum ambient temperature of the appliances.
See Specifications in online help.
Ensure sufficient airflow through the rack environment.
Mount equipment in the rack carefully to avoid uneven
mechanical loading.
Connect equipment to the supply circuit carefully to avoid
overloading circuits.
Ground all equipment properly, especially supply
connections, such as power strips (other than direct
connections), to the branch circuit.
QS Rule
Rack Mounting
The KX II can be mounted in 1U (1.75", 4.4 cm) of vertical
space in a standard 19" equipment rack.
Note: The Raritan device depicted in the rack mounting
diagrams is for example purposes only and may not depict
your device. The mounting instructions are specific to your
device.
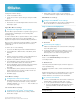
Forward Mount
The steps correspond to the numbers shown in the front
rackmount diagrams.
1. Secure the cable-support bar to the back end of the side
brackets using two of the included screws.
2. Slide the KX II between the side brackets, with its rear
panel facing the cable-support bar, until its front panel is
flush with the “ears” of the side brackets.
3. Secure the KX II to the side brackets using the remaining
included screws (three on each side).
4. Mount the entire assembly in your rack, and secure the
side brackets' ears to the rack's front rails with your own
screws, bolts, cage nuts, and so on.
5. When connecting cables to the rear panel of the KX II
drape them over the cable-support bar.
Rear Mount
The steps correspond to the numbers shown in the rear
rackmount diagrams.