
User guide


Chapter 6: Device Management
117
Modem server IP address - The address the user types to access
the KX II-101-V2 web interface once connected via modem.
Modem client IP address - The address assigned to the user
once connected via modem.
4. Click OK.
See Modem Access Cable Connections (on page 117) for details on
the cable connection for modem access and see Certified Modems (on
page 187) for details on certified modems that work with the KX II-101-
V2. For information on settings that will give you the best performance
when connecting to the KX II-101-V2 via modem, see Creating,
Modifying and Deleting Profiles in MPC in the KVM and Serial
Clients Guide.
Modem Access Cable Connections
Use the following cable connection configuration to connect the KX II-
101-V2 to a modem:
1. Connect an admin serial cable to the KX II-101-V2.
2. Connect a 9 pin male/male gender changer to the admin serial cable.
3. Connect a null modem cable to other side of the gender changer.
4. Connect the 9 pin male/male gender changer to other end of the null
modem cable.
5. Connect a DB9 to male DB25 modem cable between the null modem
cable and the modem.
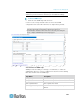
Configuring Date/Time Settings
Use the Date/Time Settings page to specify the date and time for the KX
II-101-V2. There are two ways to do this:
Manually set the date and time.
Synchronize the date and time with a Network Time Protocol (NTP)
server.
To set the date and time:
1. Choose Device Settings > Date/Time. The Date/Time Settings page
opens.
2. Choose your time zone from the Time Zone drop-down list.
3. To adjust for daylight savings time, check the "Adjust for daylight
savings time" checkbox.
4. Choose the method you would like to use to set the date and time: