INSTALLATION AND OPERATION INSTRUCTIONS FOR STRATUS 100-39 TRU STRATUS 125-39 TRU SAFETY INFORMATION WARNING If the information in these instructions are not followed exactly, a fire or explosion may result causing property damage, personal injury or loss of life. Do not store or use gasoline or other flammable vapors and liquids in the vicinity of this or any other appliance. INSTALLER: LEAVE THIS MANUAL WITH THE APPLIANCE. CONSUMER: RETAIN THIS MANUAL FOR FUTURE REFERENCE.
TABLE OF CONTENTS Please read and carefully follow all of the instruction found in this manual. Please pay special attention to the safety instructions provided in this manual. The instructions included here will assure that you have many years of dependable and enjoyable service from your Rayburn product. IMPORTANT INSTRUCTIONS....................................................................................................................................3 UNPACKING AND TESTING APPLIANCE ...............
IMPORTANT INSTRUCTIONS 1. Read all instructions before installing or using this heater. 2. Keep combustible materials, such as furniture, pillows, bedding, papers, clothes and curtains at least 3 feet from the front of the heater; keep them away from sides and rear as well. 3. Always switch off the heater at the mains supply when not in use. 4. Do not operate the fireplace if it has a damaged cord or plug, after it has malfunctioned, or if the unit has been dropped or damaged in anyway. 5.
Cautions ·Always install the heater in accordance with this guide. If in doubt obtain expert advice. ·Always make sure the electrical socket is accessible and located adjacent to, but not above the heater. Do’s ·Always disconnect the heater from the electrical supply before moving it, or carrying out cleaning, maintenance. ·Always make sure the heater is firmly secured to prevent it from being tipped over.
UNPACKING AND TESTING APPLIANCE Carefully remove the appliance from the box. Prior to installing the appliance, test to make sure the appliance operates properly by plugging the power supply cord into a conveniently located 230V electrical socket. Test all aspects of its operation (manual switches, remote and heater) to make sure all components operate correctly. As with most electronic devices, your new electric fireplace has been designed to operate at temperatures between 5℃ and 35℃.
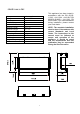
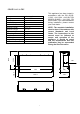
STRATUS 100-39 TRU Description Voltage Watts NO HEATER MOTOR HEATER Appliance Width Appliance Height Appliance Depth Gross Weight Plug Location Cord Length Rough Wall Opening Size KW This appliance has been tested in accordance with the EN 603351:2012 + A11:2014 + A13:2017,EN 60335-2-30:2009 + A11:2012, EN 62233:2008. If you need assistance during installation, please contact your local dealer. Built-in Appliance 230V AC 50Hz 1900W Max 25W 19W 109.7 cm 67.7 cm 36.3 cm 55kg Left side 180 cm 111.
STRATUS 125-39 TRU Built-in Appliance 230V AC 50Hz 1900W Max 25W 19W 135.2 cm 67.7 cm 36.3 cm 56kg Left side 180 cm 136.5 cm× 69 cm 1.9 NOTE: The complete installation must be done in accordance with current Standards and Local Codes. The instructions in this manual must be followed to ensure safe operation of the appliance. It should be noted that the requirements and this publication may be superseded during the life of the stove. 398.4 126.8 676.
SAFETY DRILL SCREW AREA There is a safety drill screw area as show below. Please make sure that the fix screws are in this area.
INSTALLATION The STRATUS TRU models are designed to be built-in and allow for the finishing material (drywall, stone, tile, etc) to be built right down to the glass edge. The rough wall opening size of the fireplace: NOTE: Due to the many different materials used on different walls, it is highly recommended that you consult your local builder before you install this appliance. W(") D(") STRATUS 100-39 TRU 111.2 37.5 STRATUS 125-39 TRU 136.5 37.5 2.
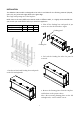
framing plate framing plate 5. Make an opening for the fireplace according to requested measurement. 7. After checking that the fireplace operates properly, cover the glass panels with protective plastic bag and install plywood or drywall. 6. Insert the fireplace into the wall opening. Drive the mounting screws into the frame plates on the unit and the wall studs.
fending bar and panel. 8. Decorate the plywood or drywall with glazed tile, wallpaper, etc. 3. After the fending panel is removed, screw back the bar. Installation for Front and Right Side Viewing 1. To install the fireplace where the left side is close to a wall, and you want to view the fire from front and right side, take off the fending panel on the right. 4. Remove the framing plates from the fireplace and fix them as the picture shows.
5. Make an opening for the fireplace according to requested measurement. 7. After checking that the fireplace operates properly, cover the glass panels with protective plastic bag and install plywood or drywall. 6. Insert the fireplace into the wall opening. Drive the mounting screws into the frame plates on the unit and the wall studs. To fix the bottom of the fireplace and the wall studs with the framing plates that you’ve removed from left and right side of the fireplace at STEP 4.
Installation for Front and Left Side Viewing 1. Install the fireplace where the right side is close to a wall, and you want to view the fire from front and left side, take off the fending panel on the left. 4. Remove the framing plates from the fireplace and fix them as the picture shows. Note: After removing framing plates on the left and right sides, screw back the screws. 2. Unscrew 7 screws on the right side that fix the fending bar and panel and then take off the fending bar and panel. 5.
7. After checking that the fireplace operates properly, cover the glass panels with protective plastic bag and install plywood or drywall. 6. Insert the fireplace into the wall opening. Drive the mounting screws into the frame plates on the unit and the wall studs. To fix the bottom of the fireplace and the wall studs with the framing plates that you’ve removed from left and right side of the fireplace at STEP 4. Plug in and check if the fireplace works. 8.
MEDIA OPTIONS The STRATUS TRU series are shipped with 11-PIECE-LOG, AMBER GLASS and VERMICULITE. 1 2 3 1. Vermiculite 2. Amber glass 3.
Media Operation 1. Unscrew 2 screws and take off two brackets which are fending the front glass panel. Screws and brackets 4. Installing the fire glass media. Pour the fire glass media into the tray as shown below. Feel free to use any combination of fire glass media that you find most appealing. 2. After the brackets are removed, the front glass panel will fall down automatically. 3. Take off the front glass panel and put it in safe place. 5.Put back the front glass and screw back the bracket.
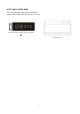
OPERATION The fireplace can be operated either by the switches located on the left bottom of the fireplace unit or by supplied remote control. Plug the fireplace into a13 Amp wall socket. MANUAL OPERATION 1、Press key . Press for the first time, heater work at 1900W, indicator Press for the second time, heater work at 950W,indicator lights red. lights blue. Press for the third time, the heating element turns off, indicator extinguishes.
REMOTE CONTROL OPERATION 1 2 3 、 Press the remote control’s key“ 1 ”, its screen turns on, the flame ignites and the flame icon appears on the LCD screen of the remote control. Week, time (24h system), and temperature setting are displayed normally. Press it again, the screen of the remote control will turn off; 、 Key“ 2 ”, flame and charcoal control switch. In case of ON, press once, the flame and the charcoal bed go out, the LCD screen does not display the LCD screen displays . .
7、Press the heating key“ .” Press for the first time ,the heating elements work at 1900W, the LCD screen displays , the indicator on the machine lights red. Press a second time , the heating elements work at 950W, the LCD screen displays , the indicator on the machine lights blue. Press a third time and the heating elements turn off, the LCD screen does not display the function icon, the indicator on the machine goes off.
for Tuesday. Press for the 7th time and it displays . Press for the 8th time and it exits and recovers to the current week day; 11、Press“ displays .” Press for the first time and the timing function turns on, the LCD screen , the machine’s indicator on the LCD screen lights green. Press again to turn off, icon goes off. After the timing function is turned on, it works according the parameter settings.
CARE AND MAINTENANCE 1. Switch off and unplug from the power supply before cleaning. 2. Using a soft, moist cloth, with or without a mild soap solution, carefully clean the exterior surface of the products. CAUTION: Allow the product to completely cool before handling or cleaning it. 3. Do not allow water or other liquids to run into the interior of the product, as this could create a fire and/or electrical hazard. 4.
REPLACEMENT PARTS NO 1 PART NUMBER STRATUS 100-39 TRU STRATUS 125-39 TRU 10701281 10701216 DESCRIPTION QTY FRONT GLASS 1 2 10201505 ADJUSTABLE SCREW 2 3 3123010 FRONT GLASS BRACKET 2 4 10702200 10702168 BOTTOM TRAY GLASS 1 5 10701284 10701219 BACK GLASS WITH BLACK PLASTIC 1 SIDE CLEAR GLASS 2 6 10701222 7 8 LED STRIP FOR TRAY AND FLAME 601136B 3151505 3123505 FLICKER ASSEMBLY 1 9 10101221C FLAME MOTOR 2 10 10104002 SWITCH 1 11 601035 MANUAL CONTROL 1 12 60
EXPLODED VIEW 23
Wiring Diagram 24
TROUBLE SHOOTING PROBLEM POSSIBLE CAUSE SOLUTION Dim or no flame Flame LED’s are burnt out Inspect the LED’s and replace them if necessary. Ember bed is not Ember LED’s are burnt out Inspect the ember bed LED’s and glowing or dimming replace them if necessary. Appliance turns off and Appliance has over heated and Turn off the main switch, allow will not turn on safety device has caused the appliance to cool for10 minutes, then thermal switch to disconnect turn it on.
SERVICE HISTORY This heater must be serviced annually depending on usage.
Warranty FREESTANDING ELECTRIC – 2 YEAR EXTENDED WARRANTY If you have purchased your stove from an authorised stockist within our Retailer Network, then automatically your product will carry a standard 1 year warranty. The 1 year warranty can be further extended to a total warranty period of 2 years by registering your Stove within 60 days of the purchase date or installation date whichever is shortest. Accordingly, the start date for the warranty period is the date of purchase.
The Extended Warranty does not cover: a) In normal usage the paint finish of your Stove may change colour slightly. As these circumstances are considered normal, they are not covered by the warranty. b) Enamelled components where these parts are subjected to abnormally high temperatures, chemical abrasion or thermal shocks, resulting in chipping, cracking, bubbling or discolouration and crazing of the enamelled finish.