
Operation Manual
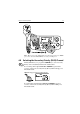
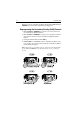
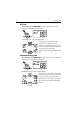
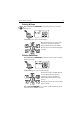
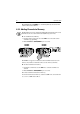

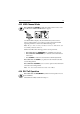

Table Of Contents
- Ray54E Marine VHF Radio
- About this Handbook
- Important Information
- Maritime Mobile Service Identity (MMSI)
- Automatic Transmitter Identification System (ATIS)
- SAFETY NOTICE
- Contents
- About this Handbook iii
- Important Information iv
- Chapter 1: Introduction 1
- Chapter 2: Installation 3
- Chapter 3: Getting Started 9
- Chapter 4: General Operations 17
- 4.1 Turning the Power ON and OFF 17
- 4.2 Setting the Volume 17
- 4.3 Setting the Squelch 17
- 4.4 Setting the Power Output 17
- 4.5 Setting the Channel 18
- 4.6 Selecting a Weather Channel (If Available) 19
- 4.7 Selecting the Priority Channel 20
- 4.8 Selecting the Secondary Priority (PLUS) Channel 21
- 4.9 Transmitting 23
- 4.10 Using the Scan Modes 23
- 4.11 Adding Channels to Memory 26
- 4.12 Using the Monitor Modes 27
- 4.13 USER Channel Mode 29
- 4.14 DSC Call Operation 29
- 4.15 Menu Mode Operation 30
- Chapter 5: Digital Selective Calling (DSC) 31
- Chapter 6: Menu Settings 57
- Chapter 7: Customer Service 85
- Appendix A: Specifications 87
- Appendix B: Channel List 89
- Appendix C: Glossary 101
- Index 103
- Chapter 1: Introduction
- Chapter 2: Installation
- Chapter 3: Getting Started
- 3.1 Keypad and Rotary Knobs
- 3.2 LCD Display
- 1. (HI/LO) TX Power
- 2. (TX) Transmitting
- 3. (RX) Receiving
- 4. (LOCAL) Local/Distant Mode
- 5. DSC Message
- 6. ATIS Active
- 7. NO GPS
- 8. Battery Low
- 9. (USER) Favourite Channel Mode
- 10. (SAVED) Memory Mode
- 11. (WX) Weather Channel
- 12. (ALERT) Weather Alert
- 13. (U I C) Channel Set
- 14. (A) Simplex Channel
- 15. (B) Receive-only Channel
- 16. Channel Number
- 17. Dot Matrix Display
- Chapter 4: General Operations
- 4.1 Turning the Power ON and OFF
- 4.2 Setting the Volume
- 4.3 Setting the Squelch
- 4.4 Setting the Power Output
- 4.5 Setting the Channel
- 4.6 Selecting a Weather Channel (If Available)
- 4.7 Selecting the Priority Channel
- 4.8 Selecting the Secondary Priority (PLUS) Channel
- 4.9 Transmitting
- 4.10 Using the Scan Modes
- 4.11 Adding Channels to Memory
- 4.12 Using the Monitor Modes
- 4.13 USER Channel Mode
- 4.14 DSC Call Operation
- 4.15 Menu Mode Operation
- Chapter 5: Digital Selective Calling (DSC)
- Chapter 6: Menu Settings
- Chapter 7: Customer Service
- Appendix A: Specifications
- Appendix B: Channel List
- Appendix C: Glossary
- Index

Chapter 4: General Operations 23
4.9 Transmitting
Press and hold the Push-to-Talk (PTT) key on the microphone to transmit on
the selected channel, then release to receive. The TX indicator appears during
transmission.
Note: International regulations and good communications practice dictate
that you not interfere with other communications. Before transmitting, listen
to make sure the channel is clear.
The radio is equipped with a timeout timer in the event of a stuck key. After
PTT has been held continuously for 5 minutes, transmission is discontinued
and the radio automatically returns to receive mode. An Error beep is emitted
10 seconds before the time out is triggered and TX flashes on the display until
PTT is released.
The TX time out timer is reset once the PTT key is released.
Note: If the current channel is receive-only, an alert tone sounds when PTT
is pressed, indicating such a transmission is not permitted.
4.10 Using the Scan Modes
The Ray54E is equipped with four types of scan options: All Scan, Saved
(Memory) Scan, Priority All Scan and Priority Saved Scan. If there are no
channels in memory, the default is All Scan.
This function automatically searches for broadcasting channels. If a
transmission is received, the scan stops on the receiving channel as long as it
is present. If the signal is lost for five seconds, the radio resumes scanning.
During the Scan Modes:
• Press the microphone Channel UP/DOWN keys or rotate the CH knob on
the main unit to change the scan direction. UP (CH key)/clockwise (CH
knob) increments the channel while DOWN (CH key) /counter clock-
wise (CH knob) decrements it.
• Press and release SCAN/SAVE to terminate the SCAN mode.
• Press and release CLEAR to terminate the SCAN mode.
• Press 16/PLUS to terminate the SCAN mode and tune to the Priority
Channel.
• DW/TRI and HILO/USER keys are disabled.
Note: Scan modes are disabled when the ATIS operation is active.