
Operation Manual
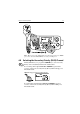
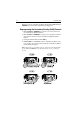
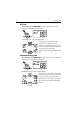
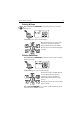
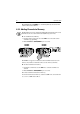

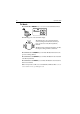

Table Of Contents
- Ray54E Marine VHF Radio
- About this Handbook
- Important Information
- Maritime Mobile Service Identity (MMSI)
- Automatic Transmitter Identification System (ATIS)
- SAFETY NOTICE
- Contents
- About this Handbook iii
- Important Information iv
- Chapter 1: Introduction 1
- Chapter 2: Installation 3
- Chapter 3: Getting Started 9
- Chapter 4: General Operations 17
- 4.1 Turning the Power ON and OFF 17
- 4.2 Setting the Volume 17
- 4.3 Setting the Squelch 17
- 4.4 Setting the Power Output 17
- 4.5 Setting the Channel 18
- 4.6 Selecting a Weather Channel (If Available) 19
- 4.7 Selecting the Priority Channel 20
- 4.8 Selecting the Secondary Priority (PLUS) Channel 21
- 4.9 Transmitting 23
- 4.10 Using the Scan Modes 23
- 4.11 Adding Channels to Memory 26
- 4.12 Using the Monitor Modes 27
- 4.13 USER Channel Mode 29
- 4.14 DSC Call Operation 29
- 4.15 Menu Mode Operation 30
- Chapter 5: Digital Selective Calling (DSC) 31
- Chapter 6: Menu Settings 57
- Chapter 7: Customer Service 85
- Appendix A: Specifications 87
- Appendix B: Channel List 89
- Appendix C: Glossary 101
- Index 103
- Chapter 1: Introduction
- Chapter 2: Installation
- Chapter 3: Getting Started
- 3.1 Keypad and Rotary Knobs
- 3.2 LCD Display
- 1. (HI/LO) TX Power
- 2. (TX) Transmitting
- 3. (RX) Receiving
- 4. (LOCAL) Local/Distant Mode
- 5. DSC Message
- 6. ATIS Active
- 7. NO GPS
- 8. Battery Low
- 9. (USER) Favourite Channel Mode
- 10. (SAVED) Memory Mode
- 11. (WX) Weather Channel
- 12. (ALERT) Weather Alert
- 13. (U I C) Channel Set
- 14. (A) Simplex Channel
- 15. (B) Receive-only Channel
- 16. Channel Number
- 17. Dot Matrix Display
- Chapter 4: General Operations
- 4.1 Turning the Power ON and OFF
- 4.2 Setting the Volume
- 4.3 Setting the Squelch
- 4.4 Setting the Power Output
- 4.5 Setting the Channel
- 4.6 Selecting a Weather Channel (If Available)
- 4.7 Selecting the Priority Channel
- 4.8 Selecting the Secondary Priority (PLUS) Channel
- 4.9 Transmitting
- 4.10 Using the Scan Modes
- 4.11 Adding Channels to Memory
- 4.12 Using the Monitor Modes
- 4.13 USER Channel Mode
- 4.14 DSC Call Operation
- 4.15 Menu Mode Operation
- Chapter 5: Digital Selective Calling (DSC)
- Chapter 6: Menu Settings
- Chapter 7: Customer Service
- Appendix A: Specifications
- Appendix B: Channel List
- Appendix C: Glossary
- Index

Chapter 4: General Operations 25
Priority All Scan
Press and hold the SCAN/SAVE key while All Scan is active to initiate
Priority Scan.
ALL PSCAN appears on the dot matrix display.
Priority Scan searches for activity on all
channels but alternates scanning the
Priority Channel 16 after each channel.
Priority Scan is demonstrated in the figure
to the left.
Priority Saved Scan
Press and hold the SCAN/SAVE key while Saved Scan is active to initiate
Priority Saved Scan.
SAVED PSCAN appears on the dot matrix display.
Priority Saved Scan is much like Priority
Scan except that the radio alternates
searching for activity on the Priority
Channel 16 and the channels stored in
memory.
Priority Saved Scan is demonstrated in the
figure to the left.
Press and hold SCAN/SAVE for 3 seconds to exit Priority/Priority Saved
Scan and return to All/Memory Scan.