
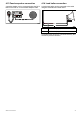
Operating Instructions and Installation Instructions

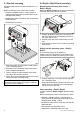

5.1Bracketmounting
Followthestepsbelowtomounttheproductonit’s
bracket.
Beforemountingtheunitensurethatyouhave:
•Selectedasuitablelocation,ensuringthereis
nothingbehindthemountingsurfacethatmaybe
damagedwhendrilling.
•Identiedthecableconnectionsandroutethatthe
cableswilltake.
•Attachedthefrontbezel.
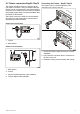
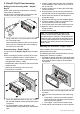
D13204-1
1.Markthelocationofthebracketmountingholes
onthemountingsurface.
2.Drillholesforthemountingxingsusingadrill
withasuitablesizeddrillbit.
3.Usethexingsprovidedtoattachthebracket
securelytothemountingsurface.
4.Attachtheunittothebracketandsecureinplace
usingthebracketmountingknobs.
Note:Drillbit,tapsizeandtighteningtorqueis
dependentonthethicknessandtypeofmaterial
theunitistobemountedon.
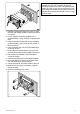
5.2Ray50/Ray52Panelmounting
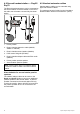
Removingthemountingholecovers—
Ray50/Ray52
BeforetheRay50/Ray52canbepanelmountedthe
mountingholecoversmustberemoved.
D13205-1
1.Usingaatbladescrewdriver,insertthetipof
thescrewdriverintheslotbetweenthebackof
thecoverandtheunit.
2.Carefullyleverthecoverforwardawayfromthe
unit.
3.Repeatsteps2and3fortheremainingmounting
holecovers.
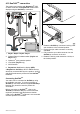
Drillingoutthemountingholes–Ray50/
Ray52
Themountingholesmustbedrilledout.
Guidesforthemountingholescanbefoundonthe
cornersoftheunit,underthemountingholecovers.
x 4
D13206-1
1.Usingadrillanda4mm(5/32)drillbit,drillout
the4mountingholes.
Holesshouldbedrilledfromthefrontoftheunit,
takingcarenottodamagetheunitbyapplying
toomuchforcetothedrill.
Panelmounting–Ray50/Ray52
TopanelmounttheRay50/Ray52,followthesteps
below.
Beforemountingtheproduct,ensurethatyouhave:
•Selectedasuitablelocation,ensuringthereis
nothingbehindthemountingsurfacethatmaybe
damagedwhendrilling/cutting.
•Identiedthecableconnectionsandroutethatthe
cableswilltake.
•Removedthemountingholecovers.
•Drilledoutthemountingholesontheunit.
38
Ray50/Ray52/Ray60/Ray70