
Operating Instructions and Installation Instructions
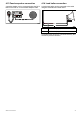


5.3Ray60/Ray70Panelmounting
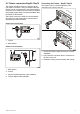
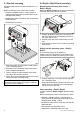
Drillingoutthemountingholes–Ray60/
Ray70
Beforepanelmountingtheproductthemounting
holesmustbedrilledout.
Guidesforthemountingholescanbefoundinthe
cornersoftheunit,underthefrontbezel.
x 4
D13209-1
1.Usingadrillanda4mm(5/32)drillbit,drillout
the4mountingholes.
Holesshouldbedrilledfromthefrontoftheunit,
takingcarenottodamagetheunitbyapplying
toomuchforcetothedrill.
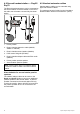
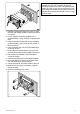
Panelmounting–Ray60/Ray70
TopanelmounttheRay60/Ray70followthesteps
below.
Beforemountingtheproduct,ensurethatyouhave:
•Selectedasuitablelocation,ensuringthereis
nothingbehindthemountingsurfacethatmaybe
damagedwhendrilling/cutting.
•Identiedthecableconnectionsandroutethatthe
cableswilltake.
•Drilledoutthemountingholesontheunit.
•Removedthefrontbezel.
D13210-1
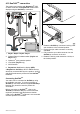
1.Checktheselectedlocationfortheunit.Aclear,
atareawithsuitableclearancebehindthepanel
isrequired.
2.Fixthesuppliedmountingtemplatetothe
selectedlocation,usingmaskingorself-adhesive
tape.
3.Usingasuitableholesaw(thesizeisindicated
onthetemplate),makeaholeineachcornerof
thecut-outarea.
4.Usingasuitablesaw,cutalongtheinsideedge
ofthecut-outline.
5.Ensurethattheunittsintotheremovedarea
andthenlearoundtheroughedgeuntilsmooth.
6.Drill4holesasindicatedonthetemplateto
acceptthexings.
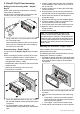
7.Removethebackingsfromthesuppliedgasket.
8.Placethegasketinpositiononthebackofthe
unitandpressrmlyontotheange.
9.Connectthepower,andothercablestotheunit.
10.Slidetheunitintoplaceandsecureusingthe
xingsprovided.
11.Attachthefrontbezel.
Note:Thesuppliedgasketprovidesaseal
betweentheunitandasuitablyatandstiff
mountingsurfaceorbinnacle.Thegasketshould
alwaysbeused.Itmayalsobenecessarytouse
amarine-gradesealantifthemountingsurfaceor
binnacleisnotentirelyatandstifforhasarough
surfacenish.
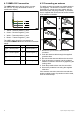
Attachingthefrontbezel–Ray60/Ray70
Afterinstallationthefrontbezelcanbeattached
followingthestepsbelow.
Thefollowingprocedureassumesthattheunithas
alreadybeenmountedinposition.
1.Orientatethebottom-rightsideofthebezelunder
thebottom-rightsideoftheunit,ensuringthatthe
clipsalongthebottomedgeofthebezellatch
intoposition.
D1321 1-1
2.Ensurethebezeliscorrectlyalignedwiththeunit,
asshown.
3.Applyrmbutevenpressuretothebezelalong
the:
i.Outeredges-workfromthesidesupwards
andthenalongthetopedge,toensurethatit
clipssecurelyintoposition.
ii.Inneredges-ensurethatthebezelsitsat.
4.Checkthatallcontrolbuttonsarefreetooperate.
40
Ray50/Ray52/Ray60/Ray70