ST6001 Smartpilot Controller Operating Guide Document number: 81215-1 Date: July 2003
ii ST6001+ Smartpilot Controller Operating Guide Autohelm, HSB (High Speed Bus), SailPilot, SeaTalk and SportPilot are registered trademarks of Raymarine Ltd. Raymarine, AST (Advanced Steering Technology), AutoAdapt, AutoLearn, AutoRelease, AutoSeastate, AutoTack, AutoTrim, FastTrim, GyroPlus, RayGyro, RayPilot and WindTrim are trademarks of Raymarine Ltd. Handbook contents © Raymarine Ltd. 2003.
Important Information iii Important Information About the documentation provided Welcome to Raymarine SmartPilot. The autopilot system that will steer your boat to a heading automatically, accurately, reliably and comfortably. SmartPilot documentation is arranged so that you can install, commission and quickly use your SmartPilot, keeping to hand only the information necessary.
iv ST6001+ Smartpilot Controller Operating Guide Your Raymarine SmartPilot will add a new dimension to your boating enjoyment. However, it is the skipper’s responsibility to ensure the safety of the boat at all times by following these basic rules: • • • • • • Ensure that someone is present at the helm AT ALL TIMES, to take manual control in an emergency. Make sure that all members of crew know how to disengage the autopilot.
Contents v Contents Important Information ....................................................................................... iii About the documentation provided .........................................................iii Warranty ..................................................................................................iii Safety notices ...........................................................................................iii EMC Conformance .............................................
vi ST6001+ Smartpilot Controller Operating Guide Operating hints for Wind Vane mode ............................................. 21 2.3 How do I display boat data? ............................................................ 21 Warning messages .......................................................................... 22 2.4 User Calibration Options ................................................................ 23 How do I access User Calibration settings? ....................................
Chapter 1: SmartPilot Operation 1 Chapter 1: SmartPilot Operation 1.1 Introduction 1 60- D54 The SmartPilot controller is a SeaTalk® compatible autopilot control unit. It is designed as the main controller for the SmartPilot system. The SmartPilot controller operates in the following modes: • • • • Standby: SmartPilot off.
2 ST6001+ Smartpilot Controller Operating Guide SmartPilot Functions The functions provided with your SmartPilot system depend on whether the SmartPilot computer contains an internal GyroPlus yaw sensor : S1G, S2G and S3G systems (with GyroPlus) Non-G systems (without GyroPlus) Internal GyroPlus yaw sensor provides enhanced course keeping using AST (Advanced Steering Technology) Full basic functionality: uses Raymarine steering algorithm without AST Steering to true and apparent wind in Wind Vane mod
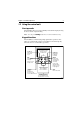
Chapter 1: SmartPilot Operation 3 1.2 Using the control unit Start-up mode The SmartPilot always powers up in Standby mode with the display showing the boat’s current compass heading. Note: You can press standby at any time to return to manual steering. Keypad functions The SmartPilot is controlled using simple push-button operations, all of which are confirmed with a short beep. In addition to the main single-key functions, there are several dual key operations.
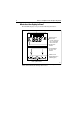
4 ST6001+ Smartpilot Controller Operating Guide What does the display tell me? The SmartPilot display screen provides the following information: Variable text region (up to 9 characters/digits) Heading indicators Distance units: • no units = kilometres • nm = nautical miles • SM = statute miles Autopilot mode indicators Port and Starboard direction-to-steer indicators Calibration mode indicator (displayed on calibration pages) Rudder position indicator D5457-2 The bar graph at the bottom of the screen
Chapter 1: SmartPilot Operation 5 1.3 Using the SmartPilot to steer your boat How do I automatically steer to a heading? 1. Steady the boat on the required heading. 2. Press auto The SmartPilot is now in AUTO mode and will steer to the chosen heading, shown on the display. This mode is often known as “point-and-shoot”. D3560-5 CAUTION: Automatic course control makes it easier to sail a boat, but it is NOT a substitute for good seamanship. ALWAYS maintain a permanent watch by the helm.
6 ST6001+ Smartpilot Controller Operating Guide How do I change course in Auto mode? In Auto mode, use the -1 and -10 (port) and +1 and +10 (starboard) keys to change the locked heading in steps of 1° or 10°. For example: press -10 three times for a 30° course change to port. Port Starboard or or D3320-3 Can I dodge an obstacle and then resume course? To avoid an obstacle when your boat is under autopilot control, you can dodge the obstacle and then resume your previous course.
Chapter 1: SmartPilot Operation 7 1.4 How do I adjust the performance of my SmartPilot? The principal method of adjusting the performance of SmartPilot systems is by changing the response level. This is the only user adjustment you should need to make to your SmartPilot on a regular basis. The response level controls the relationship between the SmartPilot’s course keeping accuracy and the amount of helm/drive activity. When you turn on your SmartPilot it will always be at the default level.
8 ST6001+ Smartpilot Controller Operating Guide Decrease response Increase response D5452-2 Note: The RESPONSE screen is set as a default data page (see SmartPilot Commissioning Guide) so you can also access it by pressing disp and then scrolling through the data pages. 2. Press -1 or +1 to change the response level. 3. Press disp or wait for 5 seconds to return to the previous display.
Chapter 1: SmartPilot Operation 9 Off Course warning = deviation to port = deviation to starboard D3315-4 The SmartPilot warns you when you have been off course from the locked heading for longer than 20 seconds. It shows whether the deviation is to port or starboard. Note: The default off course angle is set at 20º. You can adjust this angle in Dealer Calibration (see SmartPilot Commissioning Guide). 1. To cancel the off course warning, press standby to return to manual steering. 2.
10 ST6001+ Smartpilot Controller Operating Guide 1.5 Using the SmartPilot with sail boats Using the SmartPilot to automatically tack (AutoTack) The SmartPilot has a built in automatic tack facility (AutoTack) that turns the boat through 100° in the required direction. If you have set the vessel type to SAIL BOAT, you can adjust the default AutoTack angle in User Calibration (see page 23).
Chapter 1: SmartPilot Operation 11 With gybe inhibit off: • you can perform an AutoTack into or away from the wind. Note: Gybe inhibit is switched on as a default but can be disabled in User Calibration (see page 23). Gusty conditions In gusty conditions, the course may tend to wander slightly, particularly if the sails are badly balanced.
12 ST6001+ Smartpilot Controller Operating Guide . 1 second D3313-4 3. The display automatically returns to the previous mode if you do not press a key for 10 seconds: • if you press another mode key within 10 seconds you will select the mode assigned to that key (for example: auto selects Auto mode, standby selects Standby mode) Notes: (1) You can also adjust the lighting level from any other SeaTalk instrument or control unit.
Chapter 2: Advanced Operation 13 Chapter 2: Advanced Operation 2.1 How do I follow a route set on a Chartplotter? By using TRACK mode, the SmartPilot can maintain a route between waypoints created on a navigation system. It makes any course changes necessary to keep your boat on course, automatically compensating for tidal streams and leeway. Track mode is only available if you have connected the SmartPilot to a suitable navigation system providing SeaTalk or NMEA information.
14 ST6001+ Smartpilot Controller Operating Guide Automatic track acquisition Waypoint at 270˚ Waypoint at 270˚ Current heading From auto mode, press track to enter Track mode . . . . . . then press track again to turn boat to waypoint. D5414-3 Previous heading How do I leave Track mode? You can leave Track mode at any time by: • • pressing auto to return to Auto mode pressing standby to steer manually in Standby mode What is Cross track error? Cross track error (XTE) more than 0.
Chapter 2: Advanced Operation 15 from the navigation equipment, and displays the XTE in nautical miles (nm), statute miles (SM) or kilometres (km). If the cross track error is greater than 0.3 nm, the SmartPilot will sound the Large Cross Track Error warning and show whether you are to the port (Pt) or starboard (Stb) of the planned track. Tidal stream compensation Under most conditions, the SmartPilot will hold the selected track to within ±0.05 nm (300 ft) or better.
16 ST6001+ Smartpilot Controller Operating Guide What happens when I arrive at a waypoint? As the boat arrives at the target waypoint the chartplotter will select the next target waypoint and transmit this to the SmartPilot. It will then detect the new target waypoint name, sound a Waypoint Advance warning and display the Waypoint Advance (NEXT WPT) screen. This shows the new bearing to the next waypoint and the direction the boat will turn to acquire the new track.
Chapter 2: Advanced Operation 17 WARNING: Skipping a waypoint will take you straight to the next waypoint. Check your navigation before making the turn. What is the Waypoint Advance warning? The SmartPilot activates the Waypoint Advance warning (NEXT WPT?) in Track mode whenever the target waypoint name changes.
18 ST6001+ Smartpilot Controller Operating Guide Safety in Track mode CAUTION: Track mode provides accurate track keeping even in complex navigational situations. However, it is still the skipper’s responsibility to ensure the safety of their boat at all times through careful navigation and frequent position checks. Track mode assists precise navigation and removes the tasks of compensating for wind and tidal drift. However, you MUST still maintain an accurate log with regular plots. 2.
Chapter 2: Advanced Operation 19 wind trim settings will result in a pilot that is more responsive to wind changes. How do I select Wind Vane mode? You can select Wind Vane mode from either Standby or Auto mode: 1. Steady the boat onto the required wind angle. 2. Press standby and auto together to select Wind Vane mode and lock the current wind angle: • the display shows the locked heading (e.g. 128°) and the wind angle (e.g.
20 ST6001+ Smartpilot Controller Operating Guide Note: Because turning the boat affects the relationship between the true and apparent wind angles, you should only use this method to make minor adjustments to the wind angle. For major changes, return to Standby mode, steer onto the new heading, then reselect Wind Vane mode. How do I dodge an obstacle in Wind Vane mode? In Wind Vane mode you still have full control from the keypad.
Chapter 2: Advanced Operation 21 AutoTack - Port AutoTack - Starboard Wind Wind AutoTack angle AutoTack angle D5399-2 Note: If you have set the vessel type to SAIL BOAT, you can adjust the default AutoTack angle in User Calibration (see page 23). When you AutoTack in Wind Vane mode, the boat turns through the AutoTack angle. The SmartPilot will then trim the heading to mirror the locked wind angle from the previous tack.
22 ST6001+ Smartpilot Controller Operating Guide Notes: (1) If the SmartPilot system cannot obtain the required information, the data page will show dashes instead of a value. (2) The direction-to-steer arrows relate to the data page information.
Chapter 2: Advanced Operation 23 2.4 User Calibration Options The calibration information in this handbook relates to only those settings that can be adjusted during normal operation (USER CAL). For information on all available calibration settings, see SmartPilot Commissioning Guide. Note: Many of the settings are sailboat specific and will only be displayed if your vessel type is set to SAILBOAT How do I access User Calibration settings? You can only access the calibration mode from Standby mode: 1.
24 ST6001+ Smartpilot Controller Operating Guide Gybe inhibit (SAILBOAT only) With gybe inhibit on: • • you will be able to perform an AutoTack into the wind to prevent accidental gybes, the SmartPilot will prevent the boat from performing an AutoTack away from the wind With gybe inhibit off, you can perform an AutoTack into or away from the wind.
Chapter 2: Advanced Operation 25 Response level This sets the default SmartPilot response level setting. The response level controls the relationship between course keeping accuracy and the amount of helm/drive activity. You can make temporary changes to response during normal operation (see Operation Guide). S1G, S2G and S3G systems Screen Text Options RESPONSE Range = 1 to 9 levels 9 to 7 gives the tightest course keeping and greatest rudder activity (and power consumption).
26 ST6001+ Smartpilot Controller Operating Guide
Chapter 3: Fault Finding & Maintenance 27 Chapter 3: Fault Finding & Maintenance All Raymarine products are designed to provide many years of trouble-free operation. We also put them through comprehensive testing and quality assurance procedures before shipping. This chapter provides information about identifying problems, interpreting alarm messages, maintaining your SmartPilot and obtaining product support.
28 ST6001+ Smartpilot Controller Operating Guide SYMPTOM POSSIBLE CAUSE and SOLUTION The SmartPilot appears to be Northerly/Southerly heading correction (AutoAdapt) is unstable on Northerly headings not set up (see SmartPilot Commissioning Guide). [Does in the Northern hemisphere (or not apply to S1G, S2G and S3G systems.
Chapter 3: Fault Finding & Maintenance 29 ALARM MESSAGE POSSIBLE CAUSE and SOLUTION DRIVESTOP The autopilot is unable to turn the rudder (this occurs if the weather load on helm is too high, or if the rudder position sensor has passed beyond the preset rudder limits or rudder end-stops). Check drive and rudder position sensor. LOW BATT Supply voltage has dropped below acceptable limits.
30 ST6001+ Smartpilot Controller Operating Guide 3.2 General maintenance Routine checks CAUTION: The SmartPilot computer and controller do not contain any user serviceable parts. It should be serviced only by authorized Raymarine service technician. The SmartPilot computer does NOT contain user-serviceable parts. If you remove the main cover you will invalidate the warranty. The controller is also a sealed unit.
Chapter 3: Fault Finding & Maintenance • 31 In some installations, it may not be possible to prevent the equipment from being affected by external influences. In general this will not damage the equipment but it can lead to spurious resetting action, or momentarily may result in faulty operation. Product support Raymarine products are supported by a worldwide network of distributors and Authorized Service Representatives.
32 ST6001+ Smartpilot Controller Operating Guide Software information 4 seconds 1 second Control unit software version Time autopilot used in Auto 1 second Course computer software version 1 second D5493-2 Product details table For future reference, you may want to use this table to record serial and software information for your SmartPilot: Serial Number Software Version SmartPilot Controller SmartPilot Computer Hours Used hours
Specifications 33 Specifications ST6001 control unit Nominal supply voltage: 12 V DC via SeaTalk Operating voltage range: 10 V to 15 V DC Current consumption (in Standby mode) 60 mA (less than 200 mA with full lighting) Operating temperature: 0 °C to +70 °C (32 °F to 158 °F) Water protection: waterproof to CFR46 Overall dimensions: width height depth 110 mm (4.33 in) 115 mm (4.53 in) 41 mm (1.
34 ST6001+ Smartpilot Controller Operating Guide Glossary Term Meaning AST Advanced Steering Technology (AST) is Raymarine’s unique advanced steering algorithm. It uses inputs from a wide variety of sensors to tune the autopilot’s operation to provide superior control of the boat in any condition. AutoLearn Self-learning calibration feature available on S1G, S2G and S3G autopilot systems.
Glossary 35 Term Meaning response The autopilot response level controls the relationship between course keeping accuracy and the amount of helm/drive activity. rudder gain Rudder gain is a measure of how much helm the autopilot will apply to correct course errors. The higher the setting the more rudder will be applied. SeaTalk SeaTalk is Raymarine’s proprietary communication system. It links the products to provide a single, integrated system sharing power and data.
36 ST6001+ Smartpilot Controller Operating Guide
Index 37 Index A F Alarms 28 AUTO RELEASE 28 CURRENT LIMIT 28 DRIVE STOPPED 29 LARGE XTE 14 LOW BATT 29 LRN FAIL 29 MOB 22 MOT POW SWAPPED 29 NEXT WPT 17 NO DATA 29 NO PILOT 29 OFF COURSE 9 RG FAIL 29 SEATALK FAIL 1 or 2 29 SHALLOW 22 WINDSHIFT 20 Auto mode 5 AutoTack 9 Changing course 6 Dodging obstacles 6 Off course warning 9 AutoRelease Alarm 28 AutoTack 9, 23 in wind vane mode 20 Fault finding 27 Following a route 13 C P Controller Specifications 33 Course changes 6 Cross track error Explanation
38 Preventing gybes 9 SeaTalk SeaTalk fail 1 or 2 29 Service 31 Settings AutoTack 23 Gybe inhibit 24 Response level 25 User calibration 23 Wind type 24 Shallow alarm 22 SmartPilot Disengaging 5 Engaging 5 Functions 2, 33 Specifications 33 Standby Mode 5 T Technical support 31 Track mode 13 Cross track error 14 Next waypoint 17 Route completed 17 Safety 18 Tidal compensation 15 U User Calibration 23 W Waypoint Advance 16 Arrival 16 Skipping 16 Wind angle Adjusting 19 Wind type 24 Wind vane mode 18 Adjusti
Worldwide Warranty The Raymarine warranty terms and conditions as described below do not affect the customer's statutory rights. In order to ensure that the equipment continues to operate efficiently and reliably, we recommend that the Owner's handbook be carefully read and particular, attention is paid to advice on safe and correct operation and use of the product. We recommend that Raymarine equipment, be installed by an approved Raymarine installer.
Warranty limitations Raymarine warranty policy does not apply to equipment that has been subjected to accident, abuse or misuse, shipping damage, alterations, corrosion, incorrect and/or non-authorised service, or equipment on which the serial number has been altered, mutilated or removed. Raymarine assumes no responsibility for damage incurred during installation or as a result of improper installation.
Factory Service Centers United States of America UK, Europe, Middle East, Far East Raymarine Inc 22 Cotton Road, Unit D Nashua, NH 03063-4219, USA Raymarine Ltd Anchorage Park, Portsmouth PO3 5TD, England Telephone: +1 603 881 5200 Fax: +1 603 864 4756 www.raymarine.com Sales & Order Services Telephone: +1 800 539 5539 Ext. 2333 or +1 603 881 5200 Ext. 2333 Telephone: +44 (0)23 9269 3611 Fax: +44 (0)23 9269 4642 www.raymarine.