3-In-1 Omni-Directional Wireless Presenter User’s Manual Be sure to carefully read this User’s Manual first for the proper use of the Wireless Presenter and keep it for future reference. Model PS2400 Raytac Corporation, Tel: +886 2 8227 5596 Web:http://www.raytac.com Fax: +886 2 8227 7867 E-mail:service@raytac.
Information in this document is subject to change without notice. No part of this document may be reproduced or transmitted in any form or by any means, electronic or mechanical, for any purpose, without the express written prior permission of the seller. The seller provides this document without warranty, or condition of any kind. The seller may make improvements or change in the product described in this documentation at any time.
Table of Contents Chapter 1 Introduction What’s the benefits Equipment checklist System requirement 4 4 5 Chapter 2 Getting Started Inserting the battery Connecting the RF receiver 6 6 Chapter 3 Using the 3-in-1 Wireless Presenter Normal mode (Fig. 1) Function mode (Fig.
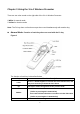
Chapter 1 Introduction Thank you for choosing Raytac’s 3-in-1 Omni-Directional Wireless Presenter —“Enjoy Your Wireless Life With Raytac” What’s the benefits Making your presentation easier and more successful With Raytac’s 3-in-1 Omni-Directional Wireless Presenter, you don’t need to stand beside your notebook computer or have an additional person to assist you, nor do you need to aim at the receiver of the remote control.
System Requirement The followings are the basic system requirements: Operating systems Windows® 98 SE, Me, 2000, XP Mac® OS 9.1 or later, Mac® OS X (10.1) or later One available USB port for connecting the USB receiver dongle.
Chapter 2 Getting Started Inserting the battery Open the battery cover and insert two AAA batteries. Notes on batteries: Be sure that the polarity of the batteries is set properly. Do not charge, heat, open, or short-circuit the batteries. Do not leave dead or exhausted battery in the presenter. If you do not intend to use this unit for a long period of time, it is advisable to remove the batteries.
If you have several RF devices within range and working at the same channel, the presenter is jammed evidently, you need to change RF ID for better communication quality. Please do as follows: 1. Press the ID link button on the receiver and the LED lights up steady. This means the receiver is ready for linking. 2. Press the Fn and Link keys on the Presenter simultaneously for more than three seconds. The LED on the receiver begins blinking to confirm a successful link.
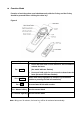
Chapter 3 Using the 3-in-1 Wireless Presenter There are two color words on the right side of the 3-in-1 Wireless Presenter: 1.White for normal mode 2.Yellow for function mode Note: The Fn key does not function except when used simultaneously with another key. Normal Mode: Function of each key when not used with the Fn key Figure 1 The function of each key is described below.
Function Mode Function of each key when used simultaneously with the Fn key, and the Fn key should be pressed before clicking the other key. Figure 2 Keys Function description Press and hold both Fn and On/Off for two seconds to Fn + On/Off activate the laser.
Chapter 4 Additional Information Specifications System Model name: PS2400 Frequency range: 2400~2483MHz Remote range: Approx. 50 feet (15 meters) indoors, 328 feet (100 meters) outdoors Operating voltage: Remote control: 2.4V~3.3V, Laser: 2.6V~3.3V Power: AAA batteries * 2 Very low power consumption: Normal operation <10mA Laser operation < 20mA Sleep < 10uA Output power: Under 1mW Physical Dimensions Size: Tx: 130(l) x 38.2(w) x 21.2(h) mm. Rx: 68.15(l) x 18(w) x 10.3(h) mm Weight: Approx.
Appendix A Regulatory Compliance FCC Statement on Class B Note: This equipment has been tested and found to comply with the limits for a CLASS B digital device, pursuant to Part 15 of the FCC Rules. These limits are designed to provide reasonable protection against harmful interference when the equipment is operated in a residential installation.