Stream and capture all your incredible gaming experiences like a pro with the Razer Ripsaw Game Capture Card. With high-definition 1080p video capture at up to 60 frames per second, over USB 3.0, your audience is assured the smoothest streaming performance ever. Razer Ripsaw also comes with a second mix-in channel for mic or music for a more layered audio production. Compatible with PC, Razer Forge TV, PS4, Xbox One, Wii U and more.
TABLE OF CONTENTS 1. PACKAGE CONTENTS / SYSTEM REQUIREMENTS ........................................ 3 2. REGISTRATION / TECHNICAL SUPPORT ....................................................... 4 3. TECHNICAL SPECIFICATIONS ....................................................................... 5 4. DEVICE LAYOUT .......................................................................................... 6 5. SETTING UP YOUR RAZER RIPSAW .............................................................. 7 6.
1. PACKAGE CONTENTS / SYSTEM REQUIREMENTS PACKAGE CONTENTS Razer Ripsaw Game Capture Card USB 3.0 cable HDMI cable Component AV cable Component AV Multi cable 3.5mm audio cable Important Product Information Guide SYSTEM REQUIREMENTS OS: o Windows® 10 / Windows® 8.1 / Windows® 7 CPU: o Desktop – Intel Core i5-4440 3.
2. REGISTRATION / TECHNICAL SUPPORT REGISTRATION Visit www.razerzone.com/razer-id to sign up for a Razer ID now to get a wide range of Razer benefits. For example, get real-time information on your product’s warranty status via Razer Synapse. To learn more about Razer Synapse and all its features, visit www.razerzone.com/synapse. If you already have a Razer ID, register your product by clicking on your email address within the Razer Synapse application and select Warranty Status from the dropdown list.
3. TECHNICAL SPECIFICATIONS TECHNICAL SPECIFICATIONS Interface: USB 3.0 only Video input: o Digital – HDMI o Analog – Component Audio input: o Digital – HDMI o Analog – RCA L/R Audio mix-in input: o 3.5mm mic-in o 3.
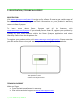
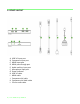
4. DEVICE LAYOUT A. B. C. D. E. F. G. H. I. J. K. L. USB 3.0 input port Component input port HDMI input port HDMI pass-through port Audio auxiliary input port Microphone input port Status indicator USB 3.0 cable HDMI cable Component AV cable Component AV Multi cable 3.
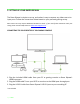
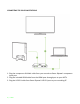
5. SETTING UP YOUR RAZER RIPSAW The Razer Ripsaw is simple to set up, and makes it easy to capture any video sent to its input ports. Follow the instructions below based on your personal gaming set up. Note: Some PCs may require additional hardware to work. If you need further assistance with your setup, please visit the FAQ section at www.razersupport.com. CONNECTING TO YOUR DESKTOP PC OR GAMING CONSOLE 1. Plug the included HDMI cable from your PC or gaming console to Razer Ripsaw’s HDMI input port. 2.
CONNECTING TO YOUR COMPONENT AV SYSTEM 1. Plug your console’s component AV cable to Razer Ripsaw’s component cable. 2. Plug the component cable to Razer Ripsaw’s component input port. 3. Plug the USB 3.0 cable from Razer Ripsaw’s USB 3.0 port to your recording PC.
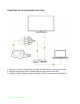
CONNECTING TO YOUR PLAYSTATION 3 1. Plug the component AV Multi cable from your console to Razer Ripsaw’s component input port. 2. Plug the included HDMI cable from the HDMI pass-through port to your HDTV. 3. Plug the USB 3.0 cable from Razer Ripsaw’s USB 3.0 port to your recording PC.
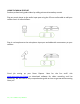
USING THE MIX-IN FEATURE Produce professional-grade videos by adding voice and secondary sounds. Plug any music player to the audio input port using the 3.5mm audio cable to add your custom music or sound effects. Plug in a microphone to the microphone input port and add audio commentary to your streams. Good job setting up your Razer Ripsaw. Now for the fun stuff: visit www.razerzone.com/ripsaw to download software for video recording and live streaming.
6. INSTALLING RAZER SYNAPSE FOR YOUR RAZER RIPSAW Step 1: Make sure your Razer Ripsaw is connected to your computer. Step 2: Install Razer Synapse when prompted* or download the installer from www.razerzone.com/synapse. Step 3: Register for a Razer ID or log in to Synapse with an existing account. *Applicable for Windows 8 or later.
7. CONFIGURING YOUR RAZER RIPSAW Disclaimer: The features listed here require you to log in to Razer Synapse. These features are also subject to change based on the current software version and your Operating System. The Razer Synapse configurator allows you to customize your device’s LED settings based on the selected recording software. Any changes made here is automatically saved to your PC and stored into the cloud servers.
8. SAFETY AND MAINTENANCE SAFETY GUIDELINES In order to achieve maximum safety while using your Razer Ripsaw, we suggest that you adopt the following guidelines: 1. Should you have trouble operating the device properly and troubleshooting does not work, unplug the device and contact the Razer hotline or go to www.razersupport.com. Do not attempt to service or fix the device yourself at any time. 2.
9. LEGALESE COPYRIGHT AND INTELLECTUAL PROPERTY INFORMATION ©2016 Razer Inc. Patent Pending. All Rights Reserved. Razer, the Razer Triple-Headed Snake logo, the Razer distressed word logo and other trademarks contained herein are trademarks or registered trademarks of Razer Inc. and/or its affiliated or associated companies, registered in the United States and/or other countries. Windows and the Windows logo are trademarks of the Microsoft group of companies. Razer Inc.
COSTS OF PROCUREMENT For the avoidance of doubt, in no event will Razer be liable for any costs of procurement unless it has been advised of the possibility of such damages, and in no case shall Razer be liable for any costs of procurement liability exceeding the retail purchase price of the Product. GENERAL These terms shall be governed by and construed under the laws of the jurisdiction in which the Product was purchased.