
Instructions / Assembly


BEFORE YOU BEGIN
Need Help? Visit our website for replacement parts, product support, a list of authorized service centers in the US and customer service contact information
at www.razor.com. Please have the product I.D. code (located on the white label of your product) available for better assistance. Additional Customer
Service contact information is listed at the back of this manual.
3
WARNING:
DO NOT USE NON-RAZOR
PRODUCTS WITH YOUR RAZOR
ELECTRIC SCOOTER. The scooter
has been built to certain Razor
design specifications. The original
equipment supplied at the time
of sale was selected on the basis of
its compatibility with the
frame, fork and all other parts.
Certain aftermarket products
may not be compatible and will
void the warranty.
Note: Electric scooter must be
moving at least 3 mph (5 km/h)
while pressing the throttle to
engage motor.
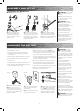
Product ID Locations:
(See locations to the left)
1. Handlebar Stem
2. Underneath Battery Tray
3. Charger
4. UPC Side of Box (Not Shown)
Box Contents:
• Charger
• Allen Wrench
• Owner’s Manual
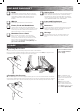
Remove contents from box. Remove the separators that protect the components from damage during shipping.
Inspect the contents of the box for scratches in the paint, dents or kinked cables that may have occurred during
shipping. Because the scooter was 95 percent assembled and packed at the factory, there should not be any
problems, even if the box has a few scars or dents.
MAKE SURE POWER SWITCH IS TURNED “OFF” BEFORE CONDUCTING ANY ASSEMBLY OR
MAINTENANCE PROCEDURES.
Estimated Assembly and Set-Up Time
Razor recommends assembly by an adult.
Allow up to 10 minutes for assembly, not including initial charge time.
Allow up to 12 hours for charge (see page 4 for charging information).
Required Tool
5 mm
Allen Wrench
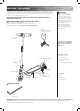
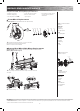
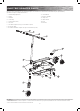
Throttle
1.
Limiter
Hub Motor
Kickstand
Battery
Control Module
Charger Port
ON/OFF Switch
2.
Charger
(Note: Charger design may
vary from one shown)
3.
Power Cutoff Fender Brake