Owner’s Manual Read and understand this entire manual before riding! DO NOT RETURN TO STORE! NOTE: E100/125/150 must be traveling 3mph before motor will engage. Kick start to 3mph then twist the throttle to start motor.
Contents Safety Warnings............................................................. 1 Before You Begin............................................................ 2 Assembly and Set-Up.................................................. 3-4 Repair and Maintenance............................................ 4-10 Troubleshooting Guide............................................. 11-12 E100, E150, E200 and E300 Scooter Parts............. 13-20 Safety Reminders...........................................
Before You Begin Remove contents from box. Remove the foam separators that protect the components from damage during shipping. Inspect the contents of the box for scratches in the paint, dents or kinked cables that may have occurred during shipping. Because the scooter was 95 percent assembled and packed at the factory, there should not be any problems, even if the box has a few scars or dents. Estimated Assembly and Set-Up Time Razor recommends assembly by an adult with experience in bicycle mechanics.
Assembly and Set-Up q Charging the Battery Your electric scooter may not have a fully charged battery. Therefore it is a good idea to charge the battery prior to use. • Initial charge time: 12 hours • Recharge time: up to 8 hours, Battery should be recharged a minimum of 8 hours after each use. When the vehicle is not in regular use, recharge the battery at least once a month until normal use is resumed.
Assembly and Set-Up q Adjusting the Handlebar Height (E100/E200/E300 only) WARNING: Failure to properly engage the quickrelease clamp may cause the T-tube to move up or down while riding, which may cause you to lose control and fall. With the quick-release properly adjusted and engaged, the handlebars will not move up or down. 1 Pull the quick-release lever outward.
Repair and Maintenance q Inflating the Tires Tires are inflated when shipped, but they invariably lose some pressure between the point of manufacturing and your purchase. WARNING: Failure to remove the valve adapter after inflating will cause the inner tube and/or adapter to be severed by the rear drive sprocket. E150 / E200 / E300 Rear Tire Note: If you lose the adapter, a valve stem extender can be purchased at almost any auto parts store. 1 Use the special valve extender/adapter supplied.
Repair and Maintenance q Adjusting the Chain Tools required: 10mm wrench, two (2) 8mm wrenches, and two (2) 17mm wrenches. Note: This system of adjusters is common to motorcycles and BMX bicycles. If you are not familiar with it or do not feel comfortable performing the adjustment, consult an authorized Razor service center or a qualified BMX bike or motorcycle mechanic. 1 Using two 17mm wrenches, loosen the rear axle bolts by turning the wrenches counter clockwise.
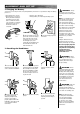
Repair and Maintenance q Chain and Rear Tire Replacement Tools required: Phillips screwdriver, 10mm wrench, two (2) 8mm wrenches, and two (2) 17mm wrenches. 1 With a Phillips screwdriver, 2 With a 10mm wrench, 3 With two 8mm wrenches, 4 With a 10mm wrench, loosen 5 With two 17mm wrenches, 6 Pull the wheel out. Note the 7 Install new chain or wheel by 8 To hook up the brake housing 9 Install the brake spring and loosen the two screws and remove the chain guard.
Repair and Maintenance 10 Install the axle adjusters and axle nuts. Tighten until they just barely hold the hardware in place. 11 Tighten both axle adjust- 12 Tighten the brake housing ers the same number of turns to fine-tune the tension on the chain and to approximately maintain the centering of the wheel. anchor securely. Test ride and check. Readjust as needed. 13 Replace the chain guard.
Repair and Maintenance q Front Tire Replacement Tools required: 10mm wrench, two (2) 17mm wrenches and a flathead screwdriver. 1 (E100 only, other models go to Step 2) Loosen the brake pad bolt and remove one brake pad. 2 Using two 17mm wrenches, 3 Remove wheel and replace loosen the front axle bolts by turning the wrenches counter clockwise. tire. To reinstall wheel, reverse these steps. Helpful hint: You may need to use a flathead screwdriver to center the axil and the bolts.
Repair and Maintenance q Battery Care and Disposal Do not store the battery in temperatures above 75° or below -10° F. CONTAINS SEALED LEAD BATTERY. BATTERY MUST BE RECYCLED. Disposal: Your Razor product uses sealed lead-acid batteries which must be recycled or disposed of in an environmentally sound manner. Do not dispose of a lead-acid battery in a fire. The battery may explode or leak. Do not dispose of a lead-acid battery in your regular household trash.
Troubleshooting Guide Problem Scooter does not run Possible Cause Solution Undercharged battery Charge the battery. A new battery should have been charged for at least 12 hours before using the scooter for the first time and up to 8 hours after each subsequent use. Check all connectors. Make sure the charger connector is tightly plugged into the charging port, and that the charger is plugged into the wall.
Troubleshooting Guide Problem Possible Cause Solution Sometimes the scooter doesn’t run, but other times it does Brakes are not adjusted properly Refer to adjusting the brakes instructions on page 4. Loose wires or connectors Check all wires around the motors and all connectors to make sure they are tight. Charger gets warm during use Motor or electrical switch damage Contact your local Razor authorized service center for diagnosis and repair.
E100 parts Keep your scooter running for years with genuine Razor parts. Visit our web site or e-mail us for more information on spare part availability. (Specifications subject to change without notice.) 01 Handlebar grip (right/left) 10 Front caliper brake 02 Single speed twist grip throttle 11 Battery tray 02-1 Sleeve 12 On/ Off switch 03 13 Charger port w/ wires 03-1 Black folding knob 14 Reset button w/ wire 03-2 6mm stem bolt 15 Control module 03-3 Washer 16 Battery (2- 12V/ 4.
E100 parts 14
E150 parts Keep your scooter running for years with genuine Razor parts. Visit our web site or e-mail us for more information on spare part availability. (Specifications subject to change without notice.
E150 parts 16
E200 parts Keep your scooter running for years with genuine Razor parts. Visit our web site or e-mail us for more information on spare part availability. (Specifications subject to change without notice.
E200 parts Only used on E200S 18
E300 parts Keep your scooter running for years with genuine Razor parts. Visit our web site or e-mail us for more information on spare part availability. (Specifications subject to change without notice.
E300 parts Only used on E300S 20
SB 1918 (CALIFORNIA) DECLARATION YOUR INSURANCE POLICIES MAY NOT PROVIDE COVERAGE FOR ACCIDENTS INVOLVING THE USE OF THIS SCOOTER/ELECTRIC VEHICLE. TO DETERMINE IF COVERAGE IS PROVIDED, YOU SHOULD CONTACT YOUR INSURANCE COMPANY OR AGENT.
Safety reminders PRE-RIDE CHECKLIST q Loose Parts q Tire Inflation q Brake q Safety Gear q Frame, Fork and Handlebars Check and secure all fasteners before every ride. Make sure steering stem clamp bolts are locked properly in place. There should not be any unusual rattles or sounds from loose parts or broken components. If you are not sure, ask an experienced mechanic to check. Check the brakes for proper function. When you squeeze the lever, the brake should provide positive braking action.