NOTE: The E100/E125/E150/E175 must be traveling up to 3 mph before motor will engage. Kick start up to 3 mph while applying the throttle to engage motor. OWNER’S MANUAL Read and understand this entire manual before riding! DO NOT RETURN TO STORE! NOTE: Manual illustrations are for demonstration purposes only. Illustrations may not reflect exact appearance of actual product. Specifications subject to change without notice. Please have your 19 digit product I.D.
CONTENTS Safety Warnings............................................................. 1 Before You Begin............................................................ 2 Assembly and Set-Up/Charging Battery......................... 3 Pre-Ride Checklist/Usage............................................... 4 Repair and Maintenance.............................................. 5-6 Troubleshooting Guide.................................................... 7 Electric Scooter Parts...................................
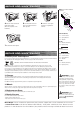
BEFORE YOU BEGIN Remove contents from box. Remove the foam separators that protect the components from damage during shipping. Inspect the contents of the box for scratches in the paint, dents or kinked cables that may have occurred during shipping. Because the scooter was 95 percent assembled and packed at the factory, there should not be any problems, even if the box has a few scars or dents. MAKE SURE POWER SWITCH IS TURNED “OFF” BEFORE CONDUCTING ANY ASSEMBLY OR MAINTENANCE PROCEDURES.
CHARGING BATTERY q Charging the Battery Charge the battery prior to use. • Initial charge time: 12 hours • Recharge time: up to 12 hours, even if the light turns green. Recommended maximum charging time is 24 hours. • Always charge the battery immediately after riding. • Fully charge battery before storing for extended periods of time. • Unplug charger from the wall outlet when not in use. • Failure to recharge battery periodically may result in a battery that will not accept a charge.
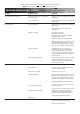
PRE-RIDE CHECKLIST q q Brake q Tires q Check the brakes for proper function. When you squeeze the lever, the brake should provide positive braking action. Make sure that brakes are not rubbing. Frame, Fork and Handlebars q q Check for cracks or broken connections. Although broken frames are rare, it is possible for an aggressive rider to run into a curb or wall and wreck, bend or break a frame. Get into the habit of inspecting your scooter on a regular basis.
REPAIR AND MAINTENANCE Turn power switch “OFF” before conducting any maintenance procedures. q Adjusting the Brakes Tools required: 10 mm open wrench 1 To adjust brake cable play, thread the brake lever adjuster in or out 1/4 to 1/2 turn until the desired brake adjustment is attained. Most adjustments are complete at this step. If brake still needs further adjustment, proceed to step 2.
REPAIR AND MAINTENANCE Note: Rear wheel hardware sequence 18-1 4 Remove wheel and install replacement wheel. (Note the sequence of the hardware) 5 Push the chain tensioner 6 With two 13 mm open down to install the chain on both sprockets. wrenches, re-tighten the locknuts. E100 Rear 18-7 18-2 18-3 18-4 18-8 18-4 18-3 18-2 18-7 18-1 (Brake) WLeft heeSide 18-1 13 l SmmeqLocknut uenc 18-7 Spring Washer e 18-2 Washer Frame 18-3 Washer (Plate Cut) 18-4 Spacer (Long) 7 Re-attach the chain guard.
*Unit(s) should be turned off and fully charged prior to doing any Troubleshooting NOTE: All troubleshooting steps should be performed by an adult only TROUBLESHOOTING GUIDE Problem Possible Cause Solution Does Not Work Out Of The Box Unit must be traveling up to 3 mph before motor will engage Kickstart to 3 mph while applying the throttle to engage motor Loose connection(s) Check for loose connections/wires underneath the deck plate Loose connection(s) Check for loose connections/wires underneath
E100/E125/E150/E175 PARTS Maintain your scooter with genuine Razor parts. Visit our website or e-mail us for more information on spare part availability. (Specifications subject to change without notice.) 01 Handlebar grip (right/left) 10 Front wheel complete (See pg. 5 for hardware sequence) 18 Rear wheel complete (See pg. 6 for hardware sequence) 11 Battery tray 19 Chain Tensioner 12 Control module 20 Chain 13 On/Off switch 21 Chain Guard 14 Charger port 22 Battery (2) 24V/4.
SB 1918 (CALIFORNIA) DECLARATION YOUR INSURANCE POLICIES MAY NOT PROVIDE COVERAGE FOR ACCIDENTS INVOLVING THE USE OF THIS SCOOTER/ELECTRIC RIDE-ON PRODUCT. TO DETERMINE IF COVERAGE IS PROVIDED, YOU SHOULD CONTACT YOUR INSURANCE COMPANY OR AGENT.
WARRANTY Razor Limited Warranty The manufacturer is not liable for incidental or consequential loss or damage due directly or indirectly to the use of this product. The manufacturer warranties this product to be free of manufacturing defects for a period of 90 days from date of purchase. This Limited Warranty does not cover normal wear and tear, tires, tubes or cables, or any damage, failure or loss caused by improper assembly, maintenance, storage or use of the Razor E100, E125, E150, E175.