TM OWNER’S MANUAL Read and understand this entire manual before riding! Item Numbers: Dirt Rocket MX350 15128050 Dirt Rocket MX500 15128190 Dirt Rocket MX650 15165070
contents Safety Warnings..................................................................................1 Before You Begin..................................................................................2 Assembly and Set-Up....................................................................... 3-5 Repair and Maintenance.................................................................. 5-9 Troubleshooting Guide................................................................. 11-12 MX350 Parts...........
Before You Begin Remove contents from box. Remove the foam separators that protect the components from damage during shipping. Inspect the contents of the box for scratches in the paint, dents or kinked cables that may have occurred during shipping. Because the Dirt Rocket was 95 percent assembled and packed at the factory, there should not be any problems, even if the box has a few scars or dents.
Assembly and Set-Up Charging the Battery Your electric motorbike may not have a fully charged battery; therefore it is a good idea to charge the battery prior to use. • Initial charge time: 12 hours • Run time: up to 40 minutes • Recharge time: up to 8 hours, • Average battery life: 250 charge/discharge cycles depending on the level of depletion Charger Port Charger Plug 2 Plug the charger plug into a wall outlet. 1 Plug the charger port into the port on the electric motorbike.
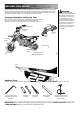
Assembly and Set-Up Installing the Front Wheel – MX500 / MX650 Fork Ball Bearing Nut Washer Axle Disc Brake Spacer Washer and slide disk brake into caliper. Small Spacer Washer Wheel 1 Position wheel in front fork 2 Make sure ball bearings are inserted in the wheel hub. Slide axle through fork, spacer washer and though wheel hub. When axle passes through the other side of the wheel hub, add the other spacer washer and slide though the fork. Secure with washer and nut.
Assembly and Set-Up Inflating the Tires Tires are inflated when shipped, but they invariably lose some pressure between the point of manufacturing and your purchase. Using a bicycle-style tire pump equipped for a Schrader-type valve, inflate the front tire to the PSI indicated on the sidewall of the tire. Note: The pressurized air supplies found at gasoline stations are designed to inflate high-volume automobile tires.
Repair and Maintenance q Chain and Rear Tire Replacement – MX350 Tools required: 10mm wrench, two (2) 8mm wrenches, and two (2) 17mm wrenches. 1 Loosen screws and remove chain guard. 2 With a 10mm wrench, loosen the brake cable anchor and disconnect the cable. 3 With two 8mm wrenches, loosen brake housing anchor and disconnect. Keep the spacer and washers together. 4 With two 17mm wrenches, loosen the axle. Push the chain tensioner down to loosen the chain and pull the wheel out.
Repair and Maintenance q Chain and Tire Replacement – MX500 / MX650 Tools required: Phillips screwdriver and two (2) 17mm wrenches. 1 Loosen screw and remove chain guard. 2 Loosen the rear axle by attaching wrenches to both axle nuts and loosening counterclockwise. 3 Push the chain tensioner down to slacken the chain and disengage the chain from the wheel sprocket and motor sprocket. Pull the wheel downward. Note: Your hands will get greasy doing this. 4 Pull the wheel out.
Repair and Maintenance q Replacing the Fuse – MX350 / MX500 / MX650 1 Remove the fairing/body cover. WARNING: To prevent shock or short circuit, please follow the instructions accordingly and do not skip or combine any steps. 3 Open the fuse cover to expose the fuse. 2 Locate the fuse cover attached to the batteries. Amperage number 4 Remove the fuse and replace with a new one of equal amperage. Note: Amperage is located on top of fuse and should be replaced with equal amperage.
Repair and Maintenance q Chain and Sprocket The chain will typically have a “loose spot” and “tight spot” corresponding with a particular sprocket rotational position. This is normal and common to all chain-driven vehicles due to run-out tolerances of the freewheel and sprocket. The chain should be adjusted to the ideal tension with chain in the tightest spot. Proper chain alignment must be maintained. The wheel must not be skewed.
SB 1918 (CALIFORNIA) DECLARATION YOUR INSURANCE POLICIES MAY NOT PROVIDE COVERAGE FOR ACCIDENTS INVOLVING THE USE OF THIS SCOOTER/ELECTRIC VEHICLE. TO DETERMINE IF COVERAGE IS PROVIDED, YOU SHOULD CONTACT YOUR INSURANCE COMPANY OR AGENT.
Troubleshooting Guide Problem Vehicle does not run Possible Cause Solution Undercharged battery Charge the battery. A new battery should have been charged for at least 12 hours before using the vehicle for the first time and up to 8 hours after each subsequent use. Check all connectors. Make sure the charger connector is tightly plugged into the charging port, and that the charger is plugged into the wall. Make sure power flow to the wall outlet is on.
Troubleshooting Guide Problem Sometimes the vehicle doesn’t run, but other times it does Possible Cause Solution Check all wires around the motors and all connectors to make sure Loose wires or connectors they are tight. Motor or electrical switch damage Contact your local Razor authorized service center for diagnosis and repair. Charger gets warm during use Normal response to charger use No action required. This is normal for some chargers and is no cause for concern.
MX350 Parts Keep your MX350 running for years with genuine Razor parts. Visit our web site or e-mail us for more information on spare part availability. (Specifications subject to change without notice.
MX350 Parts 14
MX500 / MX650 PARTS Keep your MX500/MX650 running for years with genuine Razor parts. Visit our web site or e-mail us for more information on spare part availability. (Specifications subject to change without notice.
MX500 / MX650 Parts 16
Safety reminders PRE-RIDE CHECKLIST q q q Loose Parts There should not be any unusual rattles or sounds from loose parts or broken components. If you are not sure, ask an experienced mechanic to check. Brake Check the brake for proper function. When you squeeze the lever, the brake should provide positive braking action. Frame, Fork and Handlebars Check for cracks or broken connections.